2 ansitel webinterface 3.0
All ansitel variants are configured as ansitel webinterface 3.0 (awi 3.0).
If the ansitel telephone solution receives its IP address from the DHCP-server provided by you, you should check the logs of the DHCP-server to see which IP address was provided for the ansitel telephone solution.
The webinterface is reachable by entering the IP address or the domain name in your web browser.
Example:
- http://192.168.100.1
- http://172.16.100.254
- http://demo.ansitel.de
2.1 Change the IP address of your ansitel telephone solution
After being delivered, the network settings expect to be given an address through the DHCP-server. Because of the fact that the telephone solution should always be reachable, it makes sense to give the telephone solution a static IP address.
When you connect to the ansitel web interface 3.0 with your web browser, you are able to change the IP address.
2.1.1 Login
Log on the server with the following login data:
Username: ansiteladmin Password: Admin2017
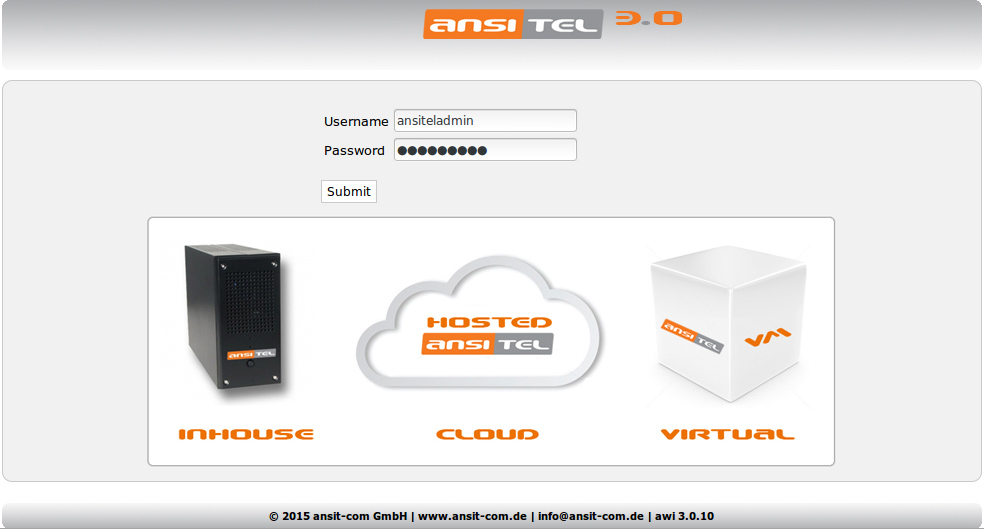
Figure: Logon the ansitel telephone solution
2.1.2 Change IP address
Therefore you have to do the following actions:
- Click on System in the head menu.
- Click on Settings in the left menu.
- Select the network tab.
- Click No at the DHCP setting.
- Change the IP address, Netmask, Gateway and DNS Server to the desired data.
- Afterwards click Submit.
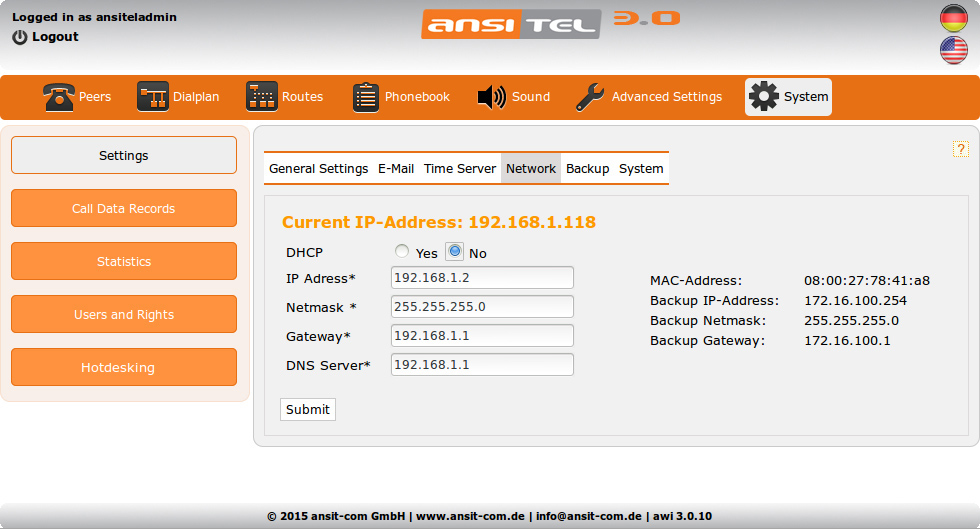
Figure: Change IP address
2.1.3 Save configuration and restart ansitel
Next the configuration has to be written.
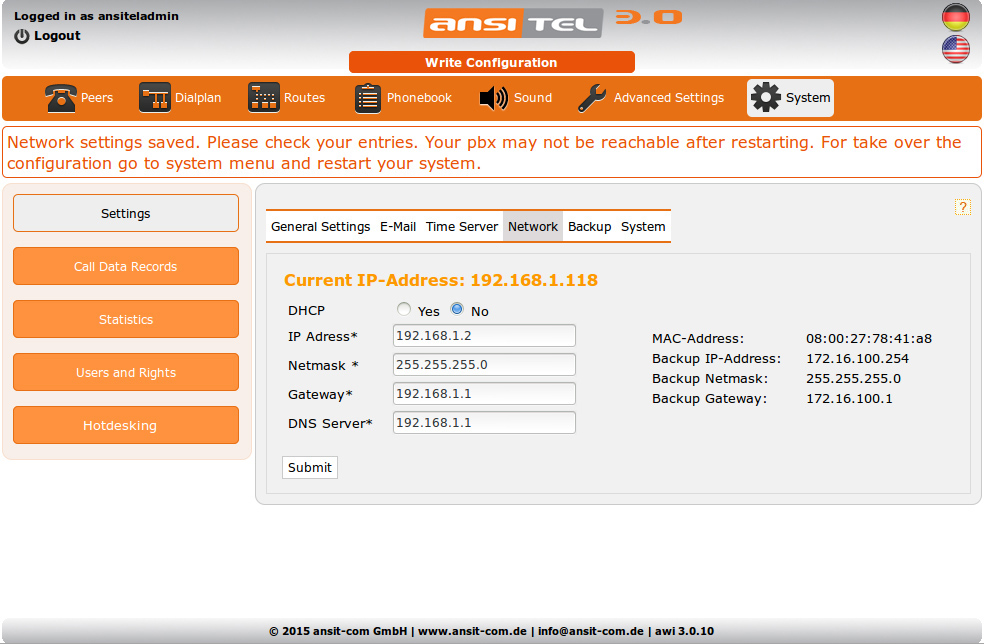
Figure: Save configuration
Thus, the ansitel telephone system accepts the new IP address, it must be restarted.
In order to achieve this, perform the following steps:
- Click on System in headmenu, in the submenu choose Settings and click on System there.
- Select "System reboot" in the selection field
- Enter the orange deposited code
- Press "Submit"
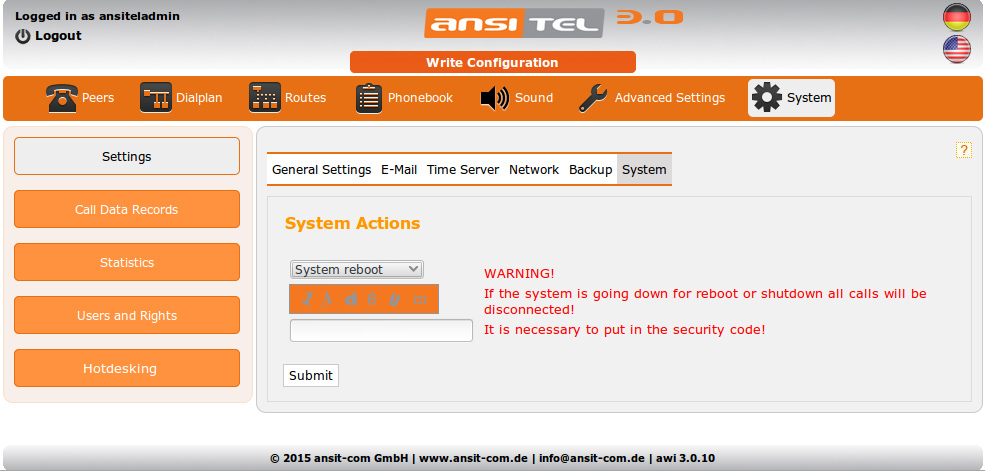
Figure: Restart ansitel
Afterwards the ansitel telephone solution will reboot. Within short notice it will be reachable under its new IP address.
2.2 Introduction to the ansitel webinterface 3.0
The ansitel webinterface is the central contral software of ansitel telephone system.
2.2.1 Basic concept for configuring the ansitel 3.0
The ansitel web interface 3.0 is the surface of the ansitel telephone solution, followed by the explanation of how to configure the ansitel 3.0:
Imagine a star. This star represents the ansitel telephone solution.

Figure: ansitel as a star
Each tip represents a possible connection to the telephone solution. The system is compatible with devices such as telephones, fax machines (SIP, IAX2-, ISDN or analog-based) and connections of SIP providers (e.g. ansitline) or conventional ISDN (e.g. telecommunications) are used.
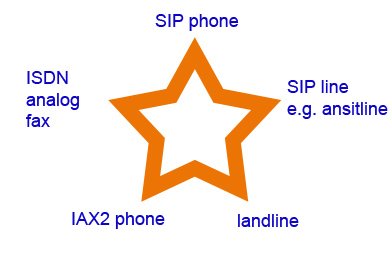
Figure: Connection types
Each tip (telephone / fax / line) and its technology (SIP, IAX2, ISDN) must first be defined in the ansitel web interface 3.0.
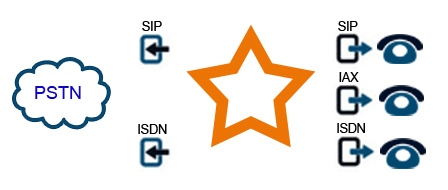
Figure: ansitel connection technologies
The combination of the phones will be made in the dial plan. In this dial plan defines the numbers of which the telephones can be internally called.
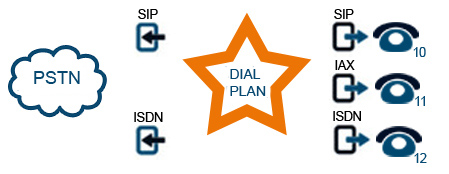
Figure: The dial plan
For performing external telephone calls, routes must be defined and added to the lines. To distinguish between the outgoing routes and the internal calls, a prefix can be selected. Explaining this with a sample number 0XXXXXXXX, the prefix would be 0 and the external number XXXXXXXXXX.
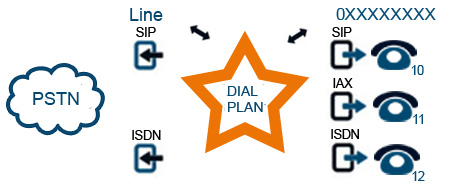
Figure: Outbound routes
Each phone line has a number (e.g. 03069206868) over which the connection can be reached from a land line. In order for the phone system to be able to receive external calls, routes get defined for every specific internal telephone. Every route represents a link between the external and internal number. In our example, the extension 10 is called when 03069206868 receives a call.
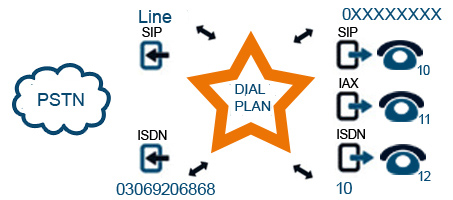
Figure: Incoming routes
2.3 Getting started with the awi 3.0
In the following section you will find how to control the ansitel telephone system via ansitel webinterface (awi).
2.3.1 Login
To access the awi 3.0, enter the following URL in your web browser: http://<IP address of ansitel telephone solution> and log on with the following credentials: “ansiteladmin” as username and “Admin2017” as password.
Figure: First login
2.3.2 General information for using the web interface
- The help symbol
 can be found on each page. To get detailed info about the corresponding module, just click the question mark and information will be shown.
 - All dialplan or peer number fields include preview of possible free numbers. Just enter a digit to get the preview and select a free number.
- To get tool tips, position the mouse on the fields without clicking. Help and explanations will appear:
 can be found on each page. To get detailed info about the corresponding module, just click the question mark and information will be shown.
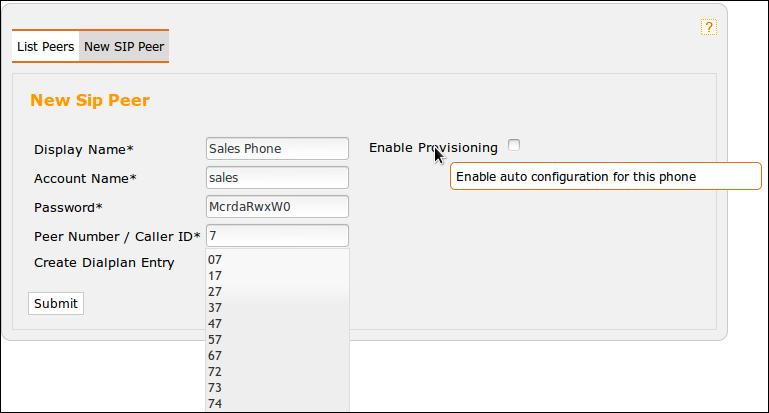
Figure: Help information through mouse positioning on fields.
- Live Search: All lists contain "Live Search" ability. Enter a character or word (case sensitive) to enable the filter. Use spaces between words/characters to get multiple filter results.
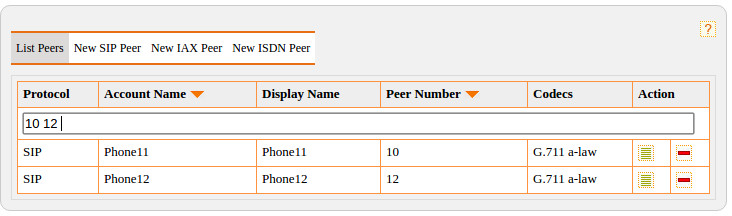
Figure: Live Search
2.3.3 Start wizard
The wizard can be started directly after login on ansitel webinterface. Just click on "start assistant".
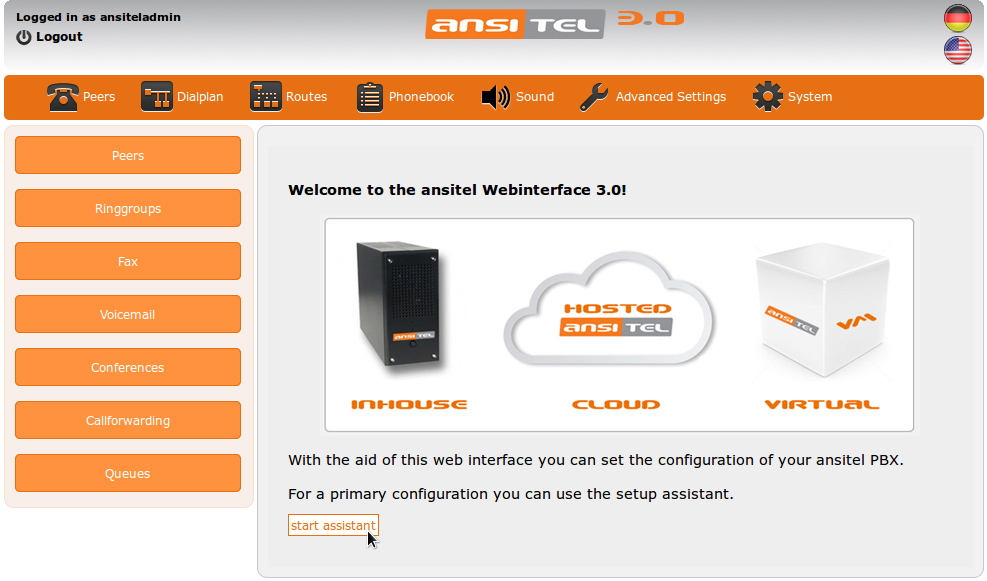
Figure: Start wizard directly
2.3.4 Wizard and first configuration
The wizard guides you through the most important steps to configure the telephone solution.
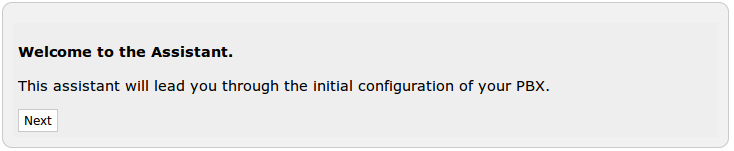
Figure: Wizard and first configuration
2.3.5 General settings
Specify the internal system language to set internal sound files and call tones.
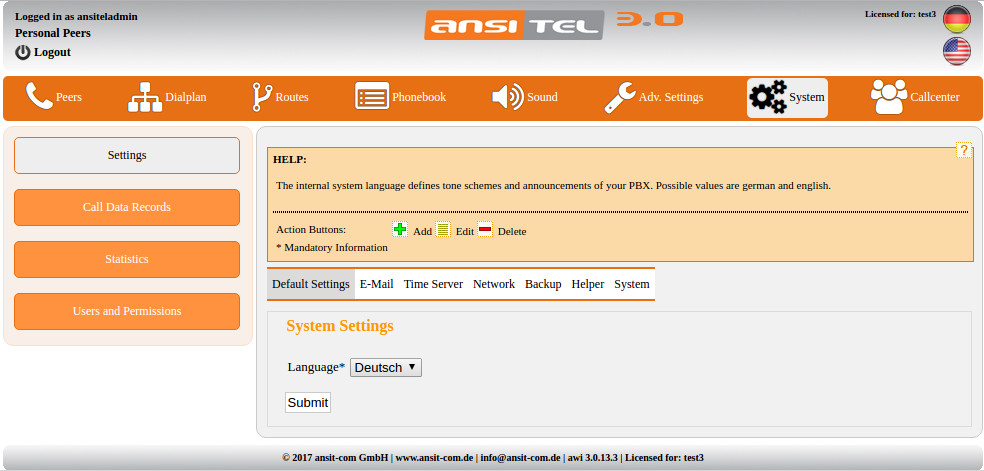
Figure: General settings
2.3.6 Email configuration
Specify the data of email accounts over which the telephone solution has to send emails. This is required for features as fax-to-email and voicemail recordings.
Select the desired connection type. Based on this the port will be suggested.
Verify the correct configuration by sending a test email.
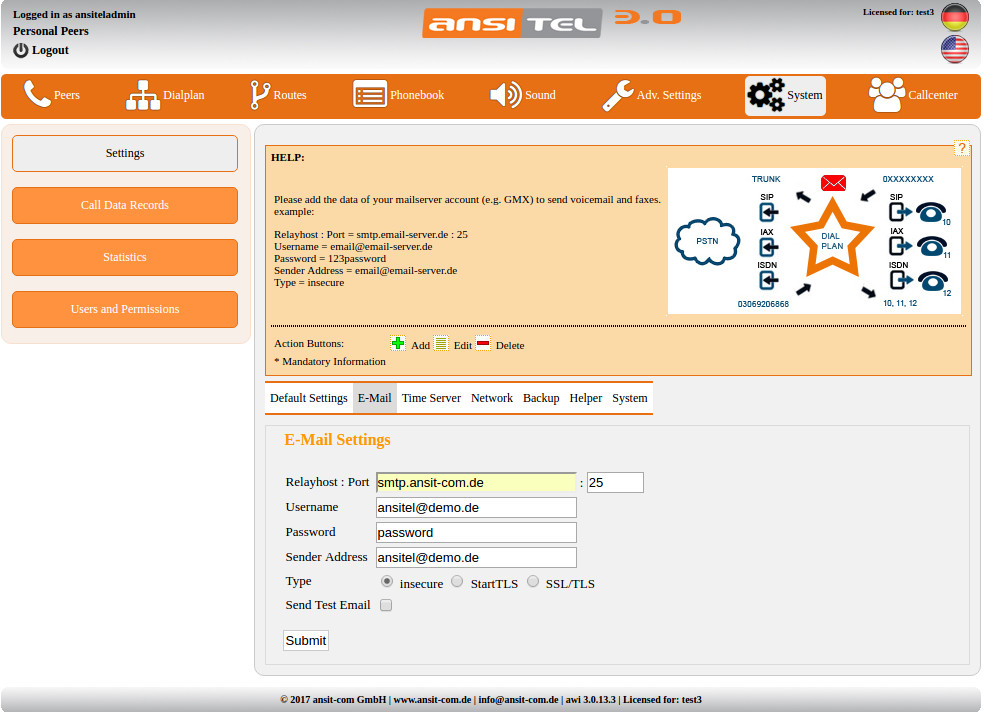
Figure: Email configuration
2.3.7 Add peers
Extensions are accounts for VoIP extensions like e.g. VoIP telephone, VoIP adapter or VoIP gateways. These extensions can be registered with the ansitel telephone system. There is a possibility to add SIP, IAX or ISDN extensions. In the following example, a SIP extension is added.
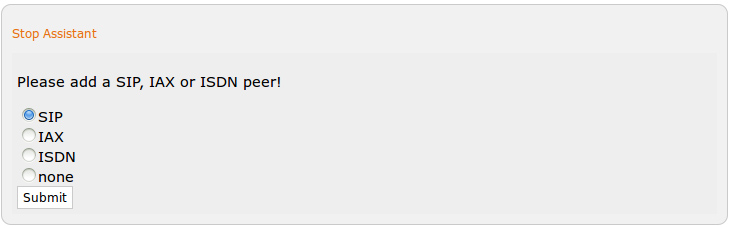
Figure: Add SIP peer
To create a SIP extension on the ansitel telephone solution, you must provide the following information:
Display Name: This name can contain spaces and will appear when a call to another phone is made.
Account Name: Under this name, a SIP-based phone is able to register to the telephone system.
Password: Secure password to authenticate the telephone on the system.
Peer Number / Caller ID: This number is assigned to the account and displayed as the sender number next to the “displayed name”. It will also be used for busy lamp fields.
The dial plan is the central organ of the ansitel telephone solution. Simply put, it manages the dial plan, who, when and how can be called.
With “Create Dialplan Entry” a dial plan number, identical to the extension number gets created. Thereby this peer is directly internally reachable over this number.
Provisioning of peer is also possible. Just select the phone model and its mac address. If the configuration is written (Write Configuration↓), the phone can be connected. It will receive its configuration automatically.
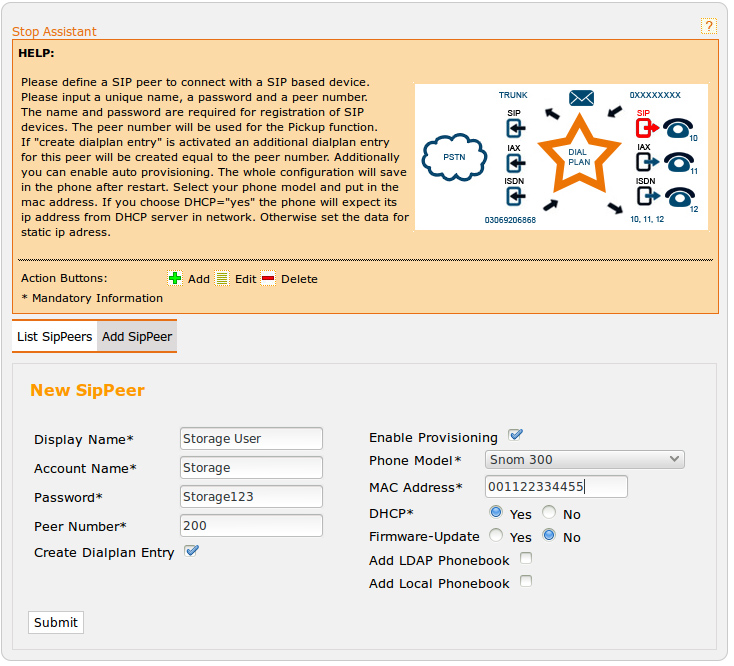
Figure: Creating a SIP peer
2.3.8 Configure the SIP trunk
SIP trunks realises access to the VoIP provider. Through these the ansitel telephone system registers the incoming and outgoing connections with the VoIP provider. In the following example, a SIP trunk gets selected.
Figure: Select SIP trunk
Chose your desired provider out of the following template. Fill in the fields with the information you recieved from your provider (this example: ansitline). Specify a unique provider name for that provider.
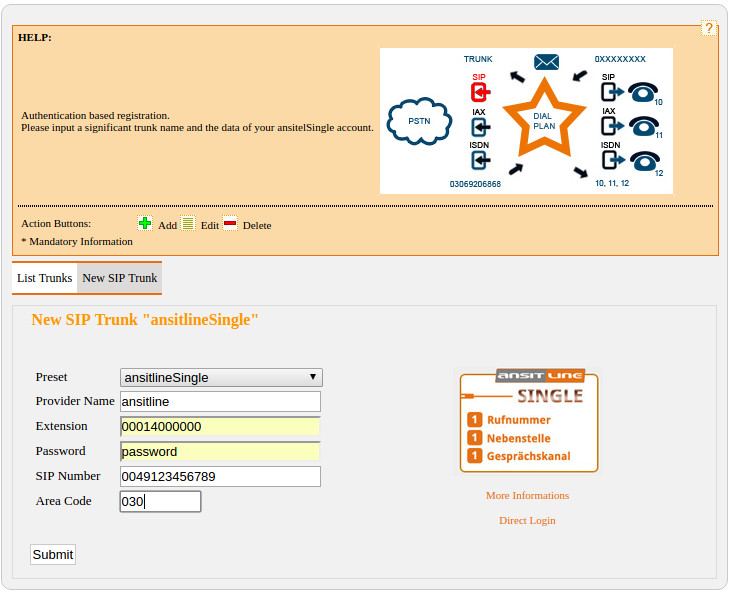
Figure: Create ansitline line
2.3.9 Incoming routes
In the incoming routes you enter the phone number(s) that you received from your VoIP provider and assign them to a dial plan phone number.
Specify the incoming phone number and connect them to the desired dial plan phone number. In this example, we connect the telephone number 0049123456789 with the dial plan phone number 123, of the account that was previously defined. Thereby the telephone solution reacts on this telephone number and makes extension 123 ring.
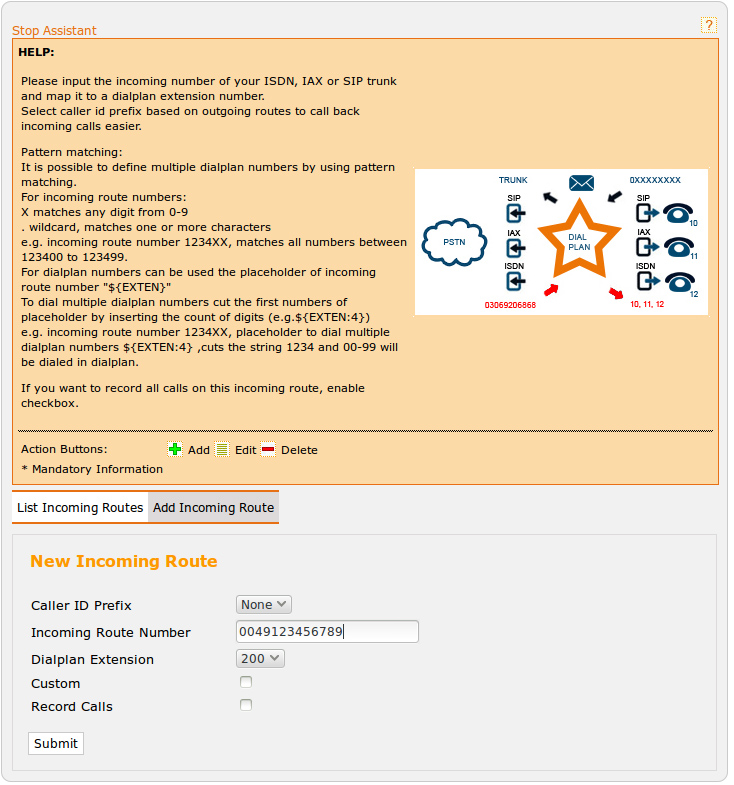
Figure: Incoming routes
2.3.10 Outgoing routes
Outgoing routes define possibilities for a connected telephone to call outside to landlines.
Enter a name for this outbound route and decide whether or not to select a prefix. Using the prefix multiple outgoing routes are distinguished.
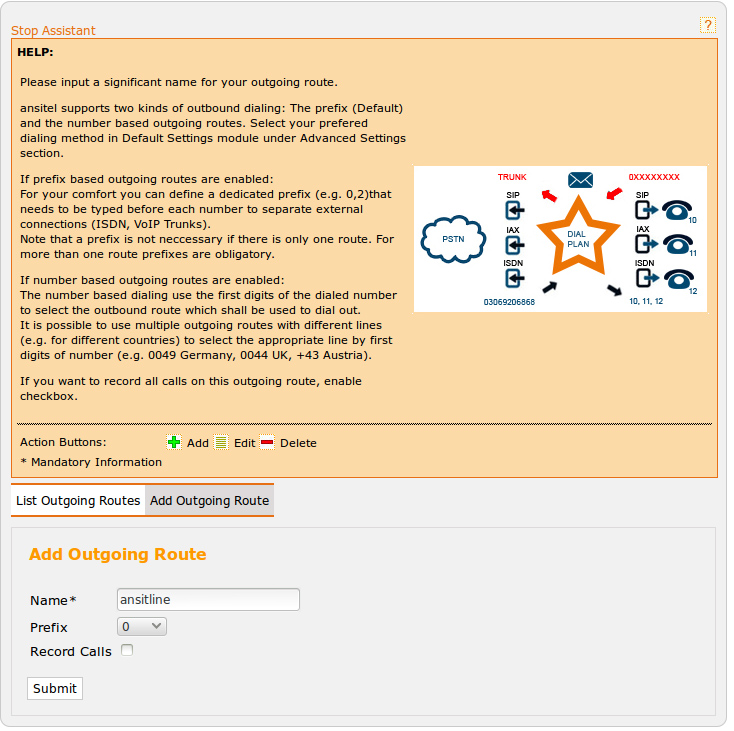
Figure: Outgoing routes
2.3.11 Add trunk to outgoing routes
A trunk has to be added to the outgoing route so that phones can use the VoIP-provider for outbound calls. Select one or multiple trunks that has to be added as outgoing line.
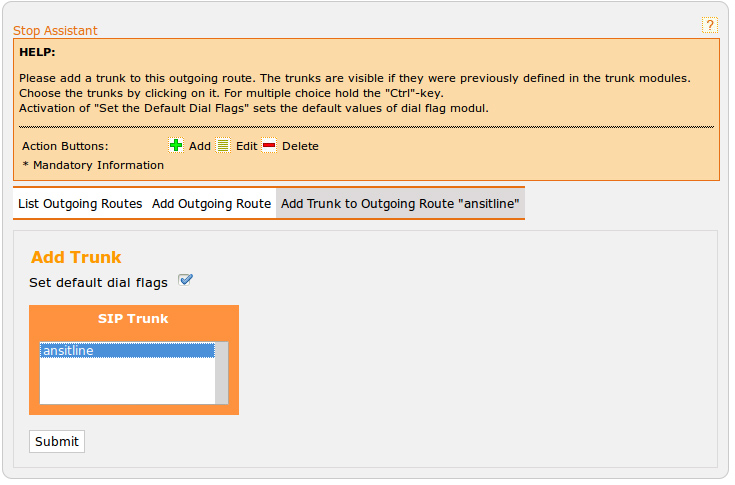
Figure: Add trunk to outgoing route
2.3.12 Write configuration
All settings will only be active after the configuration has been saved.
To do this, click the top red bar.

Figure: Write configuration
2.3.13 Connect a SIP phone

Figure: Example: snom 300
For incoming and outgoing calls a voip phone has to be connected with registration data of section Add peers↑. In this example a snom 300 VoIP telephone is used.
As soon as the snom 300 VoIP telephone is connected to the computer network and supplied with power, it gets auto-configured settings depending on the settings of the ansitel telephone system.
Another possibility is the manual configuration of the telephones. To do this, enter the ip address of the snom 300 VoIP telephone in your web browser.
Afterwards you click “Identity 1” and you enter all data found in section Add peers↑. Afterwards click save.
In the telephone display you should see the name of our SIP account "Storage User". If you see this the telephone is connected manually.
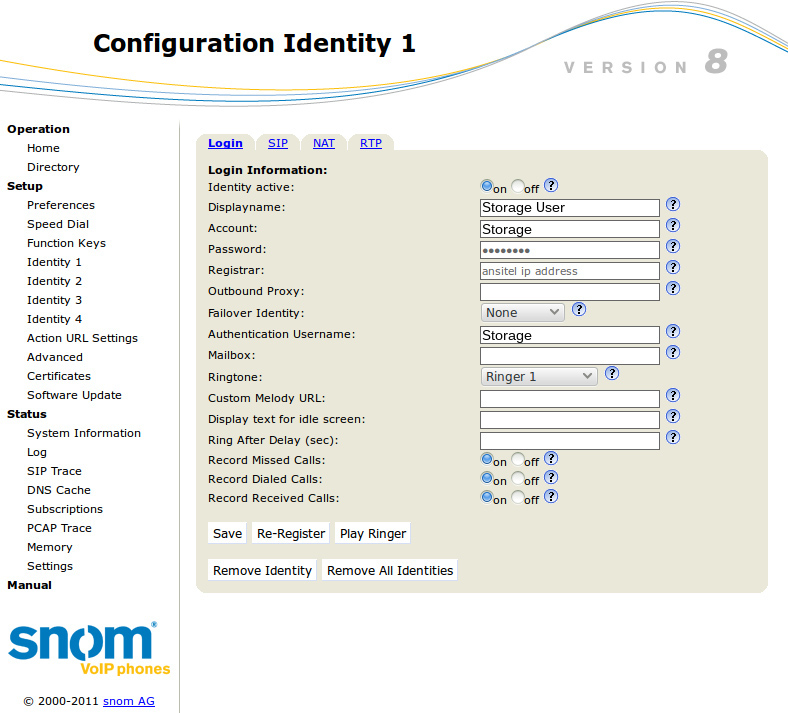
Figure: Manual configuration of snom 300 phone
2.3.14 Change ansiteladmin password
IMPORTANT: Please change your administrator password in the “Users and Permissions” module.
Figure: Change password of ansiteladmin
2.3.15 Finally
The initial setup of your telephone solution is now complete. All settings can now be changed in the menu.
Additional step-by-step manuals can be found in section Step-by-step tutorials.
2.4 Structure of the ansitel webinterface 3.0
In this section the structure and navigation of the ansitel web interface will be explained.
The ansitel web interface 3.0 is divided in four areas.
Figure: Structure of ansitel webinterface 3.0
2.4.1 The info area
The info area (1.) shows which user and which extension are logged in on the left side. To logoff from the ansitel web interface, push the button “Logout”  . On the right side you can find language flags for languages "German"
  und "English"
  . You can change the language by clicking on these flags.
2.4.2 Main menu
The main menu (2.) contains the parent groups in which the content of the modules is summarized.
- Peers - Possible modules that can serve as devices and that are directly accessible.
- Dial plan - The central dial plan for the control of the telephone solution and the module for the manipulation of the dial plan.
- Routes - Modules to configure the incoming calls from the landlines or the outgoing calls to the landlines.
- Phonebook - The central telephone books of the VoIP telephone solution.
- Sound - The modules for the uploading and playback of sound files.
- Advanced setting - Experteneinstellungen
- System - Modules and settings for controlling the operating system of the ansitel phone system.
- Callcenter - Modules to control callcenter applications
2.4.3 Submenu
The submenu (3.) on the left side lists the individual modules, which are grouped together in the main menu.
2.4.4 Module menu
The module menu (4.) contains the configuration possibilities of the modules. It appears after clicking on the submenu in the corresponding module.
2.4.5 Symbols
The ansitel web interface 3.0 has multiple symbols/buttons to manipulate the settings and views of the modules.
These are described below:
| Symbols | Description - ansitel webinterface I |
|---|---|
|
Logoff from ansitel webinterface |
|
Change language to english |
|
Change language to german |
 |
ansitel callcenter suite |
 |
Sugar CRM |
 |
Online help - available on each page |
 |
Add |
 |
Edit |
 |
Delete |
 |
Copy |
 |
Up |
 |
Down |
 |
Left |
 |
Right |
 |
Change order (drag and drop ) |
 |
Sort ascending |
 |
Sort descending |
Table: Symbols in ansitel webinterface I
| Symbols | Description - ansitel webinterface II |
|---|---|
 |
Additonal informationen / details |
 |
Select user |
 |
Call number |
 |
User permissions |
 |
Peer / Extension |
 |
Ring group |
 |
Voicemail |
 |
Voicemail check |
 |
Ring time |
 |
Announcement |
 |
Dialplan number |
 |
Fax |
 |
Conference |
 |
Time condition |
 |
Forwarding |
 |
Queue or queue parameters |
 |
Interactive voice response |
 |
Vip / Blacklist |
 |
Survey |
 |
Custom module |
 |
Manager assistant function |
 |
Callthrough |
 |
Busy on busy |
 |
Night switching |
 |
Callcompletion |
 |
One Number Concept / Personal peers |
Table: Symbols in ansitel webinterface II
2.5 ansitel modules
The ansitel web interface provides different modules. These modules are described in following section.
2.5.1 Peers
Peers are devices that can be connected to the ansitel VoIP telephone system. The ansitel 3.0 telephone system supports devices based on different technologies. Among them are SIP-, IAX2, ISDN- and analogue-based extensions.
In ansitel web interface extensions can simply be added in main menu “Peers”.
In the overview the protocoll, the account name, the display name, the peer number and also the codecs (Codecs↓) are shown.

Figure: Overview of peers
On this page you can create, edit and delete all peers.
2.5.1.1 SIP Peers
SIP peers are accounts of the telephone system at which SIP-based device (e.g. VoIP telephones, VoIP gateways and VoIP analogue adapters) can register.
SIP-based devices usually have their own web interface for configuration through the web browser. Create a new SIP peer and enter the data of the peer simply in the web interface of the SIP endpoint to register it to the telephone system.
New SIP Peer
The following parameters are important in creating a new SIP extension:
- Display Name: The name (spaces allowed) that is displayed for calls to other SIP phones (caller id name)
- Account Name: Name of the account in the system (spaces and special characters are not allowed)
- Password: System password (a secure password will be suggested)
- Peer Number / Caller ID: This number gets assigned to a peer. It is used in features as pick up calls (Pickup).
- Create Dialplan Entry: If this box is checked, a dialplan (Dialplan↓) number identical to peer number is created for this peer.
- Enable Provisioning: With this check box different phones can be configured automatically.
- Phone model: Select the desired phone model that should be automatically configured.
- MAC Address: The MAC address is the unique identifier of your phone within the network. The MAC address is generally shown on the back of the phone.
- DHCP: Since the peers receives the configuration directly from the PBX, you can specify in this parameter whether to get an IP address from the DHCP server or use a fixed IP address.
-
Firmware-Update: Automatic updates for Yealink, Snom and Grandstream phones. If this field is activated, possible firmware files for Yealink and Snom phones are shown. If no firmware file is found, please upload a file for your phone model in (Filemanager).
-
Add LDAP Phonebook: Bind the global LDAP phone book to your device. To do this select the desired LDAP directory. LDAP directories are managed in the main menu item phonebook in the LDAP phonebook module (Phonebook).
- Add Local Phonebook: Attach the local telephone book for you device. It gets saved directly in your device trough the auto-configuration, just choose the desired phonebook group. Local phone books can be managed in the menu item phonebook in the main module phonebook.
Figure: Add SIP peer
Edit SIP Peers
Since the creation of the new SIP peer ought to go as quickly as possible, only the most important parameters are asked in this screen to log on the device as quickly as possible.
When you edit the SIP peer, further parameters are adjustable. When the parameters get visible you simply press the “+”-button
The following additional parameters are available on this page:
- External Caller ID (Sender number): This caller id number will be sent by this peer on outgoing calls to pstn. There are several possibilities to set this number:
- Single Caller ID: Enter the caller id in format of the used trunk (e.g. for ansitline 00491234567).
- Multiple Caller IDs using different trunks without prefix:
On number based dial method↓ for outgoing routes multiple caller ids (in trunk format) will be separated by comma (e.g. 0049123456,+33123455). The caller id is set based on the international prefix (e.g. 0049,+33). - Multiple Caller IDs using different trunks with prefix: On prefix based dial method↓ for outgoing routes multiple caller ids (in trunk format) in combination with prefix will be separated by comma (Format: <PREFIX>:<CALLER ID>, e.g. 0:0049123456,1:+33123455). The caller id is set based on the used prefix.
If the caller id is set in this field it will be used with higher priority then the default caller id in module Trunks. Is this caller id field empty, the default caller id in module Trunks is set. Ist/Sind diese Absenderrufnummer(n) nicht gesetzt, wird automatisch die Rufnummer der
- Set CallerID Anonymous: If the peer has to supress the sender’s number, check this box.
- Fax: If the connected device is a VoIP analogue adapter with fax machine, enable this option.
- T.38 (Fax over IP): Supports the device (e.g. VoIP analogue adapter) the T.38 protocol, enable it. This feature must also be enabled in the device.
- Email address: Email and messages with the following parameters will be send. Prerequisite is the configuration of email system in module Settings↓.
- Enable fax receive: If an email address is defined and the parameter is activated, the extension will forward all incoming faxes to the specified email address. Prerequisite is the configuration of email system in module Settings↓ and the activation of sip fax detection im module Default Settings↓. A sip device has to be registered for this feature.
- Send busy email: If an email address is defined and the parameter is activated, the telephone system will send emails when a caller’s peer could not be reached because he was talking. The content of the email can be changed via the module Email Templates↓.
- Send missed call email: If an email address is defined and the parameter is activated, the telephone system will send emails when a caller’s peer could not be reached after some ringing time.
- Send email forwarding: If an email address is defined and this option is activated, the pbx will send emails in case of a call is forwarded by this peer. The contents of the email messages can be changed in Email Templates↓ module.
- Send email if no voicemail left: If an email address is defined and the parameter is activated, the telephone system sends emails when a caller’s peer could not be reached and left no voice mail. Prerequisite is the definition of an answering machine behind the extension in the dialplan.
- Permissions: With the permission it’s possible to allow the extensions to call to landlines (option: extension may call externally, internationally, cellular network or specific service numbers).
- Enable Encryption (TLS+SRTP): If the devices supports TLS/SRTP encryption, you can enable encryption. The feature must also be enabled in the device. Please use port 5061 for encryption.
- Record calls: All calls from and to this device will be recorded. The recordings can be found in Call Data Records↓ module.
- Answer Channel: Answer channel before ringing the peer.
- No internal forwarding: Disable forwarding if call comes from internal peers.
- Codecs: Codecs enable the coding for example the compression of the speech by various methods. Activate the required codecs (green) and drag them into the desired order. The ansitel telephone system tries to link the suitable code with the negotiation party when connecting. All the active codecs (green) are sequentially processed from top to bottom.
| Codec | Quality | Bandwidth | Supported by ansitel |
|---|---|---|---|
| G.711 a-law | ISDN quality (european coding procedure) | 64 kbit/s | direct |
| G.711 u-law | ISDN quality (american coding procedure) | 64 kbit/s | direct |
| GSM | mobile telephony quality | 20 kbit/s | direct |
| G.729 | nearly ISDN quality | 8 kbit/s | End-to-End (passthrough) |
| G.722 HD | better than ISDN quality | 64 kbit/s | direct |
| iLBC | comparable to G.729 | 15 kbit/s | direct |
| G.723.1 | less than GSM | 6.3 kbit/s | direct |
| G.726 | more than GSM, less than G.729 | 32 kbit/s | direct |
| H.261 | Video-Codec | 128 kbit/s - 768 kbit/s | End-to-End (passthrough) |
| H.263 | Video-Codec | 128 kbit/s - 2Mbit/s | End-to-End (passthrough) |
| H.263P | Video-Codec | 128 kbit/s - 2Mbit/s | End-to-End (passthrough) |
| H.264 | Video-Codec | based on resolution | End-to-End (passthrough) |
Table: Codecs
- Call Group: For call pickup (pickup). Enter a value in the range from 1 to 63.
- CallPickupGroup: Specifies which call groups can be picked up from this peer (pickup) (value: 1 – 63)
- Mailbox Number: Assign the voicemail↓ number for this peer. The message waiting indication lamp (MWI) on phone will blink when messages are available.
- Enable Callwaiting: Enable or disable callwaiting for this peer.
- Language: Internal system language for this peer. You will receive a system-specific menus (e.g. query answering machine) in the configured language. ( Choices: German, English)
- Port: SIP extension port (default: 5060 / TLS: 5061)
- Transport protocol: Protocoll for signalling calls. (possible values: UDP,TCP,TLS)
- Accountcode: Parameter for tracking in call data records.
- Type: Asterisk knowledge required (possible values: friend, user, peer)
- Host: Asterisk knowledge required (possible values: static or dynamic IP address)
- Call Limit: Maximum amount of calls at the same time for that extension. If this value is reached, any further calls are given the busy signal.
- Limit On Peers: Asterisk knowledge required (possible values: yes, no)
- Call Counter: Asterisk knowledge required (possible values: yes, no)
- DirectMedia: The parameter realizes the transmission of speech (RTP) end to end directly after signalling via ansitel pbx. (possible values: yes, no)
-
Dtmfmode: Transmission of touch tones (possible values: rfc2833, info, inband, auto). If key tones are not recognised e.g. in ivrs change this parameter to "inband".
-
Qualify: Telephone system periodically checks the registration of these extension/peers (possible values: yes, no). If the value is set to “yes” in the module statistics↓, registration time of this extension will be displayed.
Figure: Edit SIP peer I
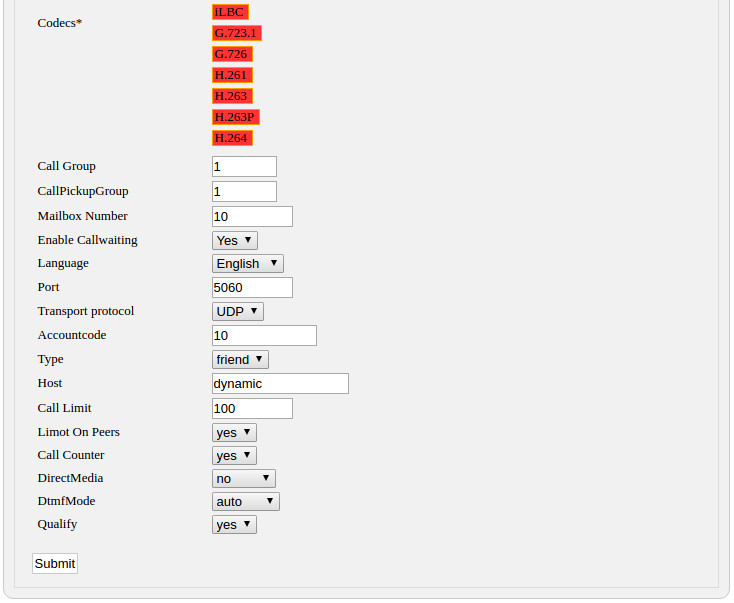
Figure: Edit SIP peer II
2.5.1.4 IAX Peers
IAX peers are accounts on the telephone system where IAX based devices (e.g. VoIP telephone, VoIP gateways) can regsiter with.
IAX-based devices usually have their own web interface for configuration via the web browser.
New IAX Peers
Folgende Parameter sind bei der Erstellung neuer IAX-Nebenstellen wichtig:
- Display Name: name (spaces allowed) that is displayed for calls to other IAX phones (sender’s name)
- Account Name: name of the account within the system. (spaces and special characters not allowed)
- Password: Passwort in system
- Peer Number / Caller ID: This number is uniquely assigned to a peer. It is used in fields such as picking up calls.
- Create Dialplan Entry: Is this field activated, the peer gets a dial plan number identical to the peer number. Like that, the peer is reachable under this number.
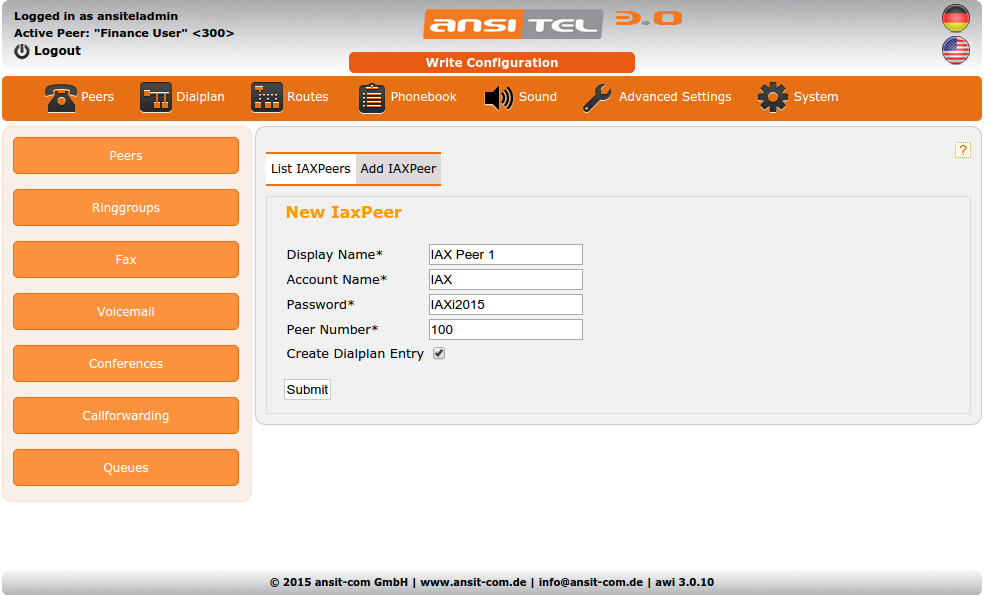
Figure: New IAX peer
Edit IAX peers
Because the setting up of a new IAX peers has to go as quickly as possible, only the most important parameters are required in this form to log in this device.
When you edit an IAX peer, further parameters are available. To show the additional parameters, just click the “+” button.
The following parameters are available on this page:
- External Caller ID (Sender number): This caller id number will be sent by this peer on outgoing calls to pstn. There are several possibilities to set this number:
- Single Caller ID: Enter the caller id in format of the used trunk (e.g. for ansitline 00491234567).
- Multiple Caller IDs using different trunks without prefix:
On number based dial method↓ for outgoing routes multiple caller ids (in trunk format) will be separated by comma (e.g. 0049123456,+33123455). The caller id is set based on the international prefix (e.g. 0049,+33). - Multiple Caller IDs using different trunks with prefix: On prefix based dial method↓ for outgoing routes multiple caller ids (in trunk format) in combination with prefix will be separated by comma (Format: <PREFIX>:<CALLER ID>, e.g. 0:0049123456,1:+33123455). The caller id is set based on the used prefix.
If the caller id is set in this field it will be used with higher priority then the default caller id in module Trunks. Is this caller id field empty, the default caller id in module Trunks is set. Ist/Sind diese Absenderrufnummer(n) nicht gesetzt, wird automatisch die Rufnummer der
- Set CallerID Anonymous: If the peer has to supress the sender’s number, check this box.
- Permissions: With the permission it’s possible to allow the extensions to call to landlines (option: extension may call externally, internationally, cellular network or specific service numbers).
- Codecs: Codecs enable the coding for example the compression of the speech by various methods. Activate the required codecs (green) and drag them into the desired order. The ansitel telephone system tries to link the suitable code with the negotiation party when connecting. All the active codecs (green) are sequentially processed from top to bottom.
| Codec | Quality | Bandwidth | Supported by ansitel |
|---|---|---|---|
| G.711 a-law | ISDN quality (european coding procedure) | 64 kbit/s | direct |
| G.711 u-law | ISDN quality (american coding procedure) | 64 kbit/s | direct |
| GSM | mobile telephony quality | 20 kbit/s | direct |
| G.729 | nearly ISDN quality | 8 kbit/s | End-to-End (passthrough) |
| G.722 HD | better than ISDN quality | 64 kbit/s | direct |
| iLBC | comparable to G.729 | 15 kbit/s | direct |
| G.723.1 | less than GSM | 6.3 kbit/s | direct |
| G.726 | more than GSM, less than G.729 | 32 kbit/s | direct |
| H.261 | Video-Codec | 128 kbit/s - 768 kbit/s | End-to-End (passthrough) |
| H.263 | Video-Codec | 128 kbit/s - 2Mbit/s | End-to-End (passthrough) |
| H.263P | Video-Codec | 128 kbit/s - 2Mbit/s | End-to-End (passthrough) |
| H.264 | Video-Codec | based on resolution | End-to-End (passthrough) |
Table: Codecs
- Call Group: For call pickup (pickup). Enter a value in the range from 1 to 63.
- CallPickupGroup: Specifies which call groups can be picked up from this peer (pickup) (value: 1 – 63)
- Language: Internal system language for this peer. You will receive a system-specific menus (e.g. query answering machine) in the configured language. ( Choices: German, English)
- Port: SIP extension port (default: 5060 / TLS: 5061)
- Type: Asterisk knowledge required (possible values: friend, user, peer)
- Host: Asterisk knowledge required (possible values: static or dynamic IP address)
- Qualify: Telephone system periodically checks the registration of these extension/peers (possible values: yes, no). If the value is set to “yes” in the module statistics↓, registration time of this extension will be displayed.
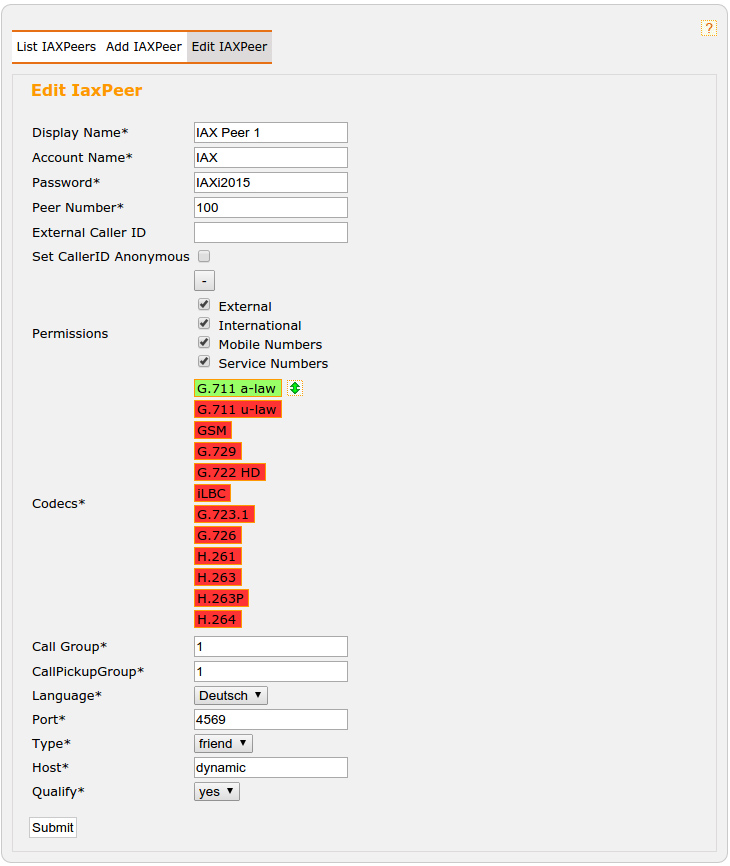
Figure: Edit IAX peer
2.5.1.7 ISDN / Analogue Peers
With ISDN / analogue peers, there are ports provided by the build in expansion cards of the ansitel telephone system. The number of ports depends on the shipping configuration. This is done by ansit-com after consultation with the customer. The necessary ISDN / analogue peers get entered in the ansitel web interface before. The configuration of the expansion are included by ansit-com at delivery.
New ISDN / Analogue Peers
Following parameters are important for the creation of a new ISDN / analogue peers.
- Display Name: The name (spaces allowed) that is displayed for calls to other phones (sender’s name).
- Account Name: Name of the account in the system (spaces and special characters are not allowed)
- Dial String: Dial string for this peer in the format "<technology>/<port>/<number>" (example: dahdi/1/400)
- Peer Number / Caller ID: This number is uniquely assigned to an peer. It is used in fields such as picking up calls.
- Create Dialplan Entry: Is this field activated, the peer gets a dial plan number identical to the peer number. Like that, the peer is reachable under this number.
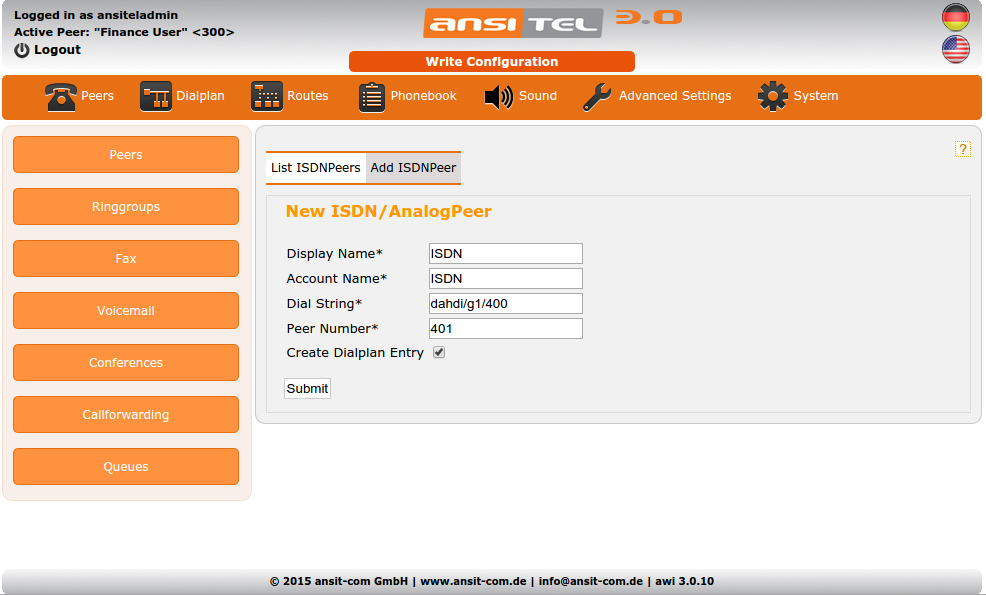
Figure: New ISDN Peer
Edit ISDN / Analogue Peers
Since the creation of a new ISDN / analogue peer has to go as quickly as possible only the most important parameters get asked in this form.
If you edit the ISDN / analogue peer, further parameters are adjustable.
The following additional parameters are available on this page:
- External Caller ID: This send number sends the peer number for calls over the lines of the landlines. If this send number is not set, an automatic call number from the ISDN / analogue trunk ([sub:Leitungen]) will be used. If this sender number is entered, it gets used primarily in relationship with the number in the ISDN / analogue line.
- Set CallerID Anonymous: If you want the peer to suppress the sender number, check this field.
- Permissions: With the permission it’s possible to allow the extensions to call to landlines (option: extension may call externally, internationally, cellular network or specific service numbers).
- Answer Channel: Answer channel before ringing the peer.
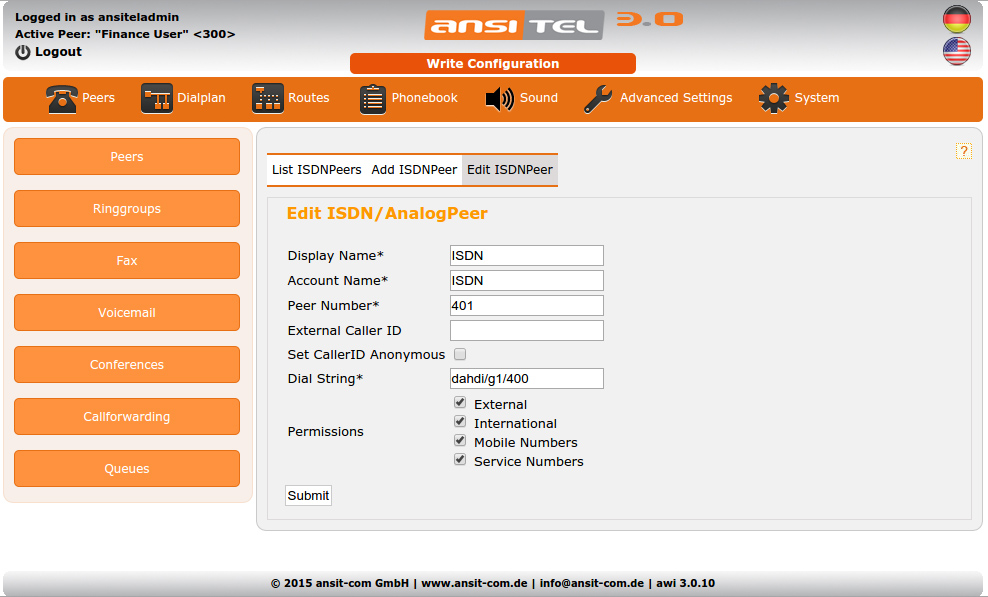
Figure: Edit ISDN / analogue peer
2.5.2 Ring groups
In this module peers, forwardings personal peers↓ (one number concept) can be summarized. In ring groups, phones will call simultaneously when there is an incoming call. Ring groups are useful, for example when an employee is not present, another employee of the ring group would still be able to take the call.
In addition, intercom groups can be defined. With intercom / paging, all phones in the group act like speakers at stations.
In ansitel web interface, the ring groups are configured in the menu peers. In this overview names of the ring groups and the associated peers (ring group objects) are displayed. If it is an intercom / paging call group, the hook in the intercom group column is enabled.
Ring groups can be easily created, changed or deleted.
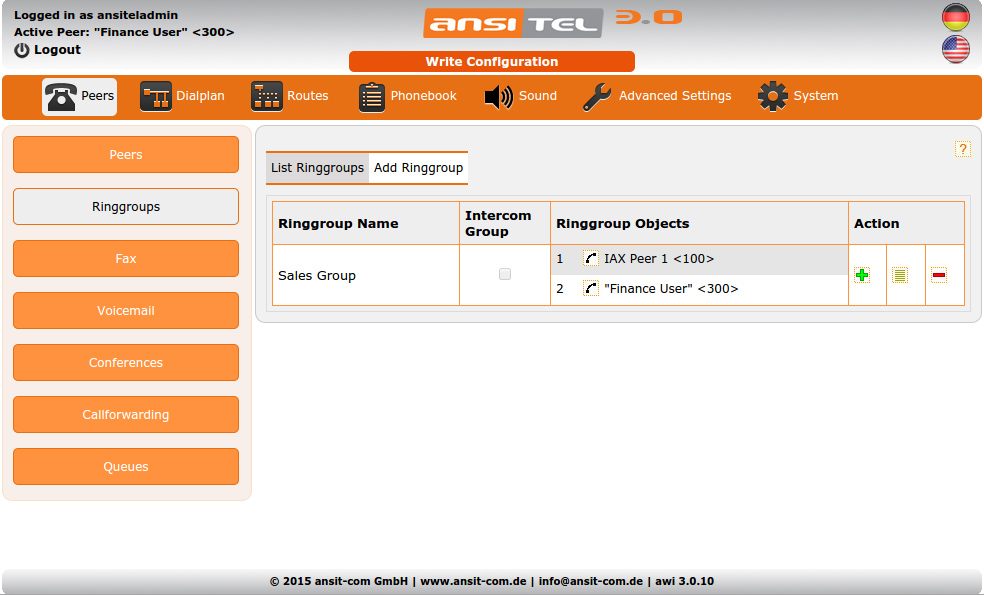
Figure: Ring groups
2.5.2.1 Create a new ring group
Click “New Ringgroup” to create a new ring group.
Enter the desired ring group name and choose whether or not it is an intercom group.
In this module, you have the possibility to create a corresponding dial plan number that is connected to the ring group. To do this, click “Create Dialplan Entry” and enter the dialplan number.
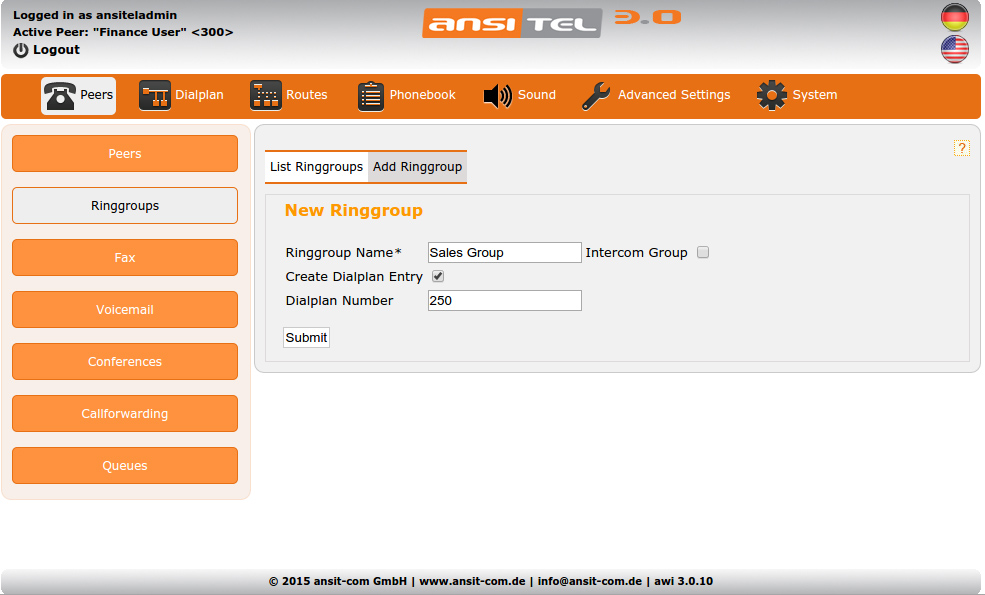
Figure: Create ring group
2.5.2.2 Add an object to the ring group
After the ring group was created, at least one extension or forwarding must be added.
For multiple selection, please use the “Ctrl” key.
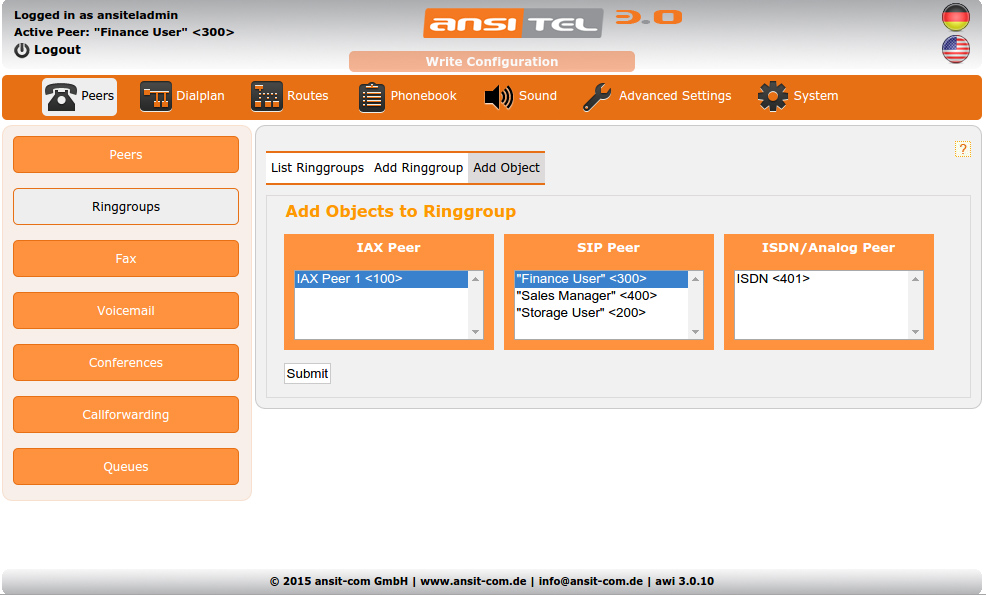
Figure: Add object to ring group
2.5.2.3 Edit ring groups
If the ring groups is edited, you have the following options
- Change the name of the ring group.
- Deleting ring group objects
- Adding ring group objects
- In case the ring group is an intercom group, you can change the intercom code.
The intercom code is a combination of numbers (possible special characters *, #) the extensions are called by the intercom (example "777*").
Attention: The intercom function must be activated in the devices. The change of the intercom code is only possible when the group has been defined as an intercom group.

Figure: Edit ring groups
2.5.3 Virtual fax
Virtual faxes receive conventional faxes and convert them into PDF documents and send them to an email address (fax to email functionality).
For each user workstation, programs as printer can be installed without extra cost. This printer are connected to the virtual fax server of ansitel. As a result the print to fax functionality is possible. A document (e.g. from excel or word) is printed, the destination number is entered and the system will automatically send this document to the specified number as a fax.
The ansitel 3.0 telephone system supports T.38, which can also be used with poor network connections.
Create and edit virtual fax
To create a new virtual fax, click “New Fax” and assign a Fax Name.
You have the ability to create a corresponding dialplan number associated with this fax immediately in this module. To do this, click “Create Dialplan Entry” and enter a dialplan number.
The faxes are received by the system and sent via email as an attachment. Please enter the email address of the recipient and select the desired format of the fax.
Attention: Prerequisites for fax-to-email function is the configuration of the email server.
If T.38 is offered by voice over ip provider, this feature can be enabled in the telephone system.
The transmission parameter includes information in the header of the transmitted fax (fax number, name of the sender) and the access for Hylafax compatible software (fax users, fax user password).
The Fax number should be entered in format of the used trunk. It will used as caller id.
Figure: Create virtual fax
Fax overview
In the overview, all fax machines, email address of recipients and the reception format are summarized.

Figure: Faxes
2.5.4 Voicemail
Answering machines (voicemails) accept calls and record them.
In this case, the caller can either hear a “busy” or a “unreachable” message (Dialplan↓).
Recorded messages can be sent to specified email addresses (as mp3 attachment).
Alternatively, a message can listen on the phone directly.
Creating and editing the voicemail
Click “New Voicemail” and assign a name to create a new voicemail.
For the voicemail check on the phone, you have to enter a voicemail number and password. The link to the voicemail check can be set in the dialplan↓ module. Different phones indicate existing voicemails via “MWI” LED. For this purpose, the voicemail number must be identical to the voicemail number in peers↑ module.
You have the ability to create a corresponding dialplan number linked to this voicemail immediately in this module. To do this, click the “Create dialplan Entry” button and enter the dialplan number.
Please enter the email address to which the voicemail messages have to be sent.
If the message shouldn’t be saved after sending it by email, select “Delete Messages”. In this case the messages are not accessable via voicemail check on phones.
If the messages are stored on the system, they must be deleted manually message by message over voicemail check module.
Additionally the system language of "busy" and "not reachable" announcements are adjustable. These announcements can be recorded via voicemail check menu.

Figure: Create voicemail
Figure: Voicemail chek in dialplan
Voicemail overview
The overview shows all voicemail boxes with voicemail number, voicemail name and email address.
Figure: Voicemail overview
2.5.5 Conferences
Many phones realizes the 3rd conference directly on the device. Conferences with more than 3 participants can be done over the ansitel pbx. The safe access to the conference occurs after the input of a predefined PIN. Conferences without PIN/password are also possible. The desired menu language within the conference is selectable for every conference.
Add and edit conferences
To create a new conference, click at “New Conference”, set a name, a conference number and a password / PIN if desired.
If password is defined, it will be asked by login of this conference to prevent unwanted access.
Select the desired language for the menu guidance of the conference or disable the menu.
In this module, you have the possibility to immediately tie a suitable dialplan number with the conference. Therefore click “Create Dialplan Entry” and enter the desired Dialplan Number.
Figure: New conference
Conference overview
In this overview, all conferences are shown with conference number and name.
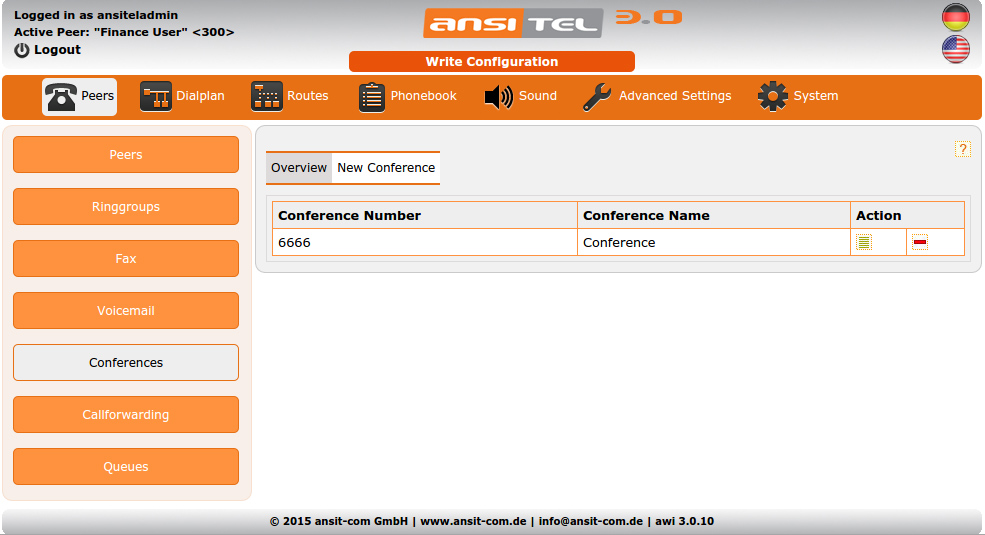
Figure: Conferences
2.5.6 Callforwarding
Forwarding is part of the basic functionality of a telephone system. If a co-worker should be accessible outside it is possible to forward the call.
Therefore, forwarding offers the advantage that the caller does not know that he gets redirected to another device.
Setup and edit callforwarding
To set up a callforwarding, click on “New Callforwarding”. Please enter a name and destination phone number.
The type is usually used “Callforwarding over pbx”. The call occupies an incoming and an outgoing channel. By ISDN and some connections (depends on sip provider) the option “Call Deflection” can be chosen. By that, the forwarding takes over the telephone provider and not the pbx. In this scenario no channels are used.
If the outgoing route (outgoing route↓) used a prefix, it must be selected here.
In this module you have the possibility to immediately tie a suitable dialplan number together with the callforwarding. For this click on “Create Dialplan Entry” and enter the desired Dialplan Number.
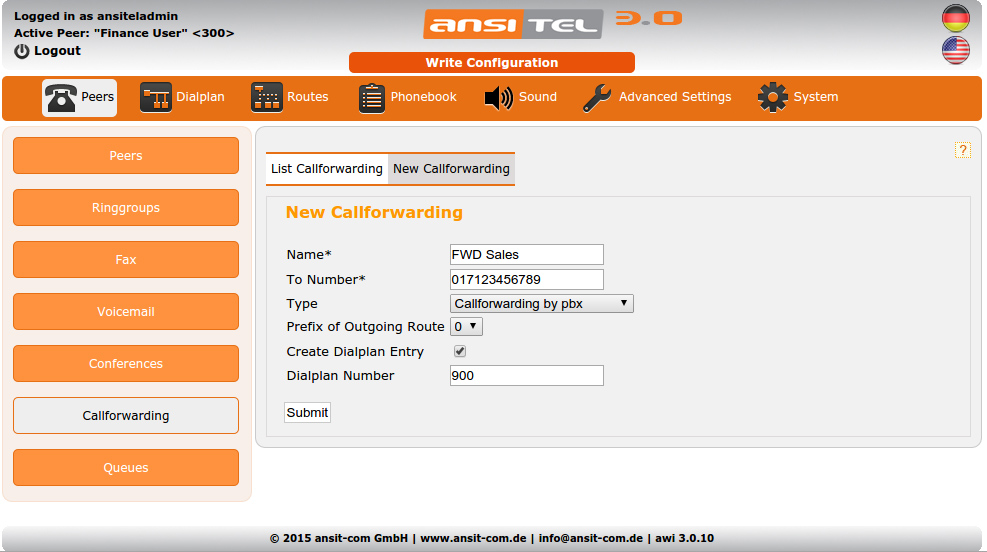
Figure: New callforwarding
Callforwarding overview
In the overview, forwarding name, destination phone number, type and prefix are shown.
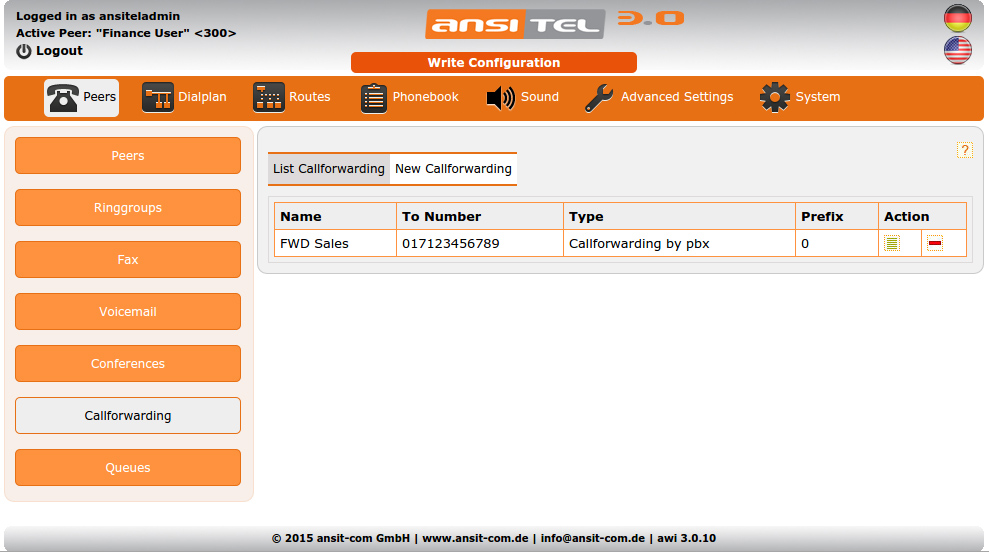
Figure: Callforwardings
2.5.7 Callthrough
Callthrough realize calls from pstn through the ansitel pbx to pstn. In this case calls use the trunk and the callerid of the ansitel pbx and not the id of the caller (e.g. mobile phone).
There are two kinds of callthrough:
- 1. Callthrough: The caller gets a prompt to enter pin und destination number. It is not necessary to add valid callback numbers in this mode.
- 2. Callback: The call will be hungup by system and recognise the callerid. If the callerid is a valid callback number, the telephone system will callback and provide a prompt for entering destination number.
Create callthrough
To create a callthrough click on "New Callthrough" and enter a valid name.
In this module you have the possibility to immediately tie a suitable dialplan number together with the callforwarding. For this click on “Create Dialplan Entry” and enter the desired dialplan number.
For "Callthrough" enter a pin to secure your pbx. It is necessary for incoming calls.
Select the desired type Callthrough or Callback.
The language of the menu for callthrough is available in german and english.
Enter the desired callerid (owned by trunk) should be shown the call receiver.
If multiple outgoing routes are defined in ansitel pbx, it is necessary to select a prefix.
Attention: The callerid should belong to the trunk containing in outgoing route with select prefix.
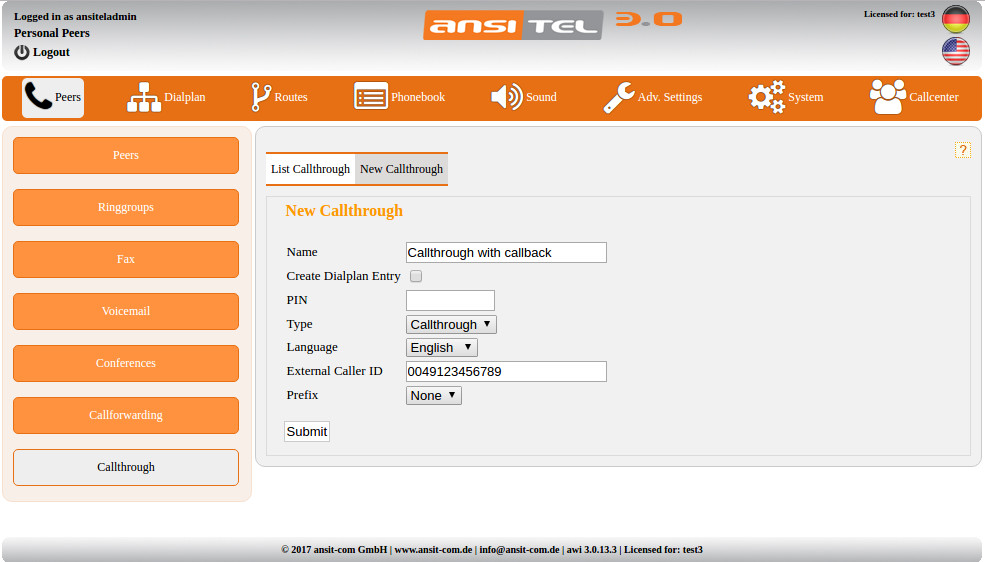
Figure: Create callthrough
Overview of callthroughs
In this overview the available callthroughs are shown with name, pin, type and valid callback numbers.
If type "Callback" is defined you can add valid callback numbers using button.
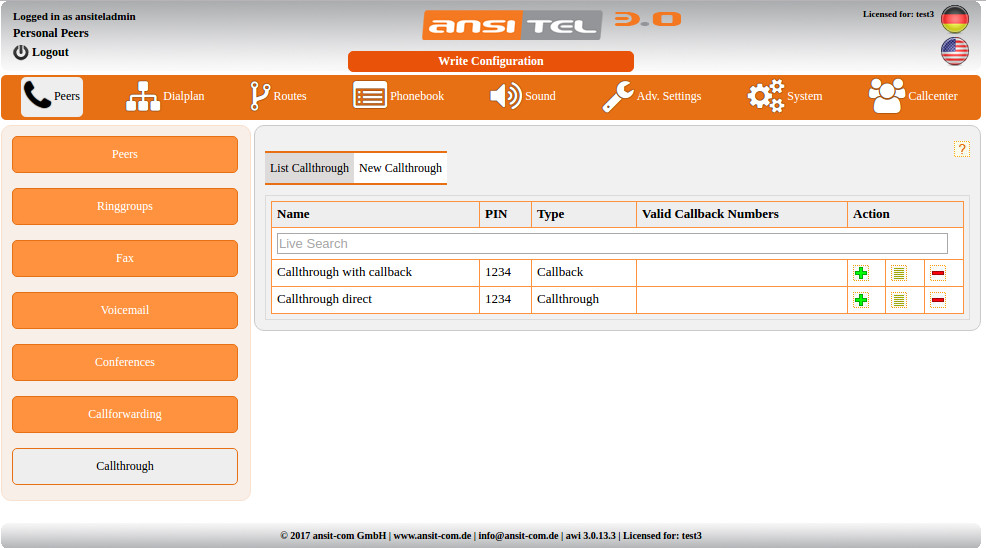
Figure: Overview of callthroughs
Valid callback numbers
Enter your valid callback numbers here. Based on these numbers the ansitel pbx identifies the caller and triggers a callback. This function is only possible for type "callback".
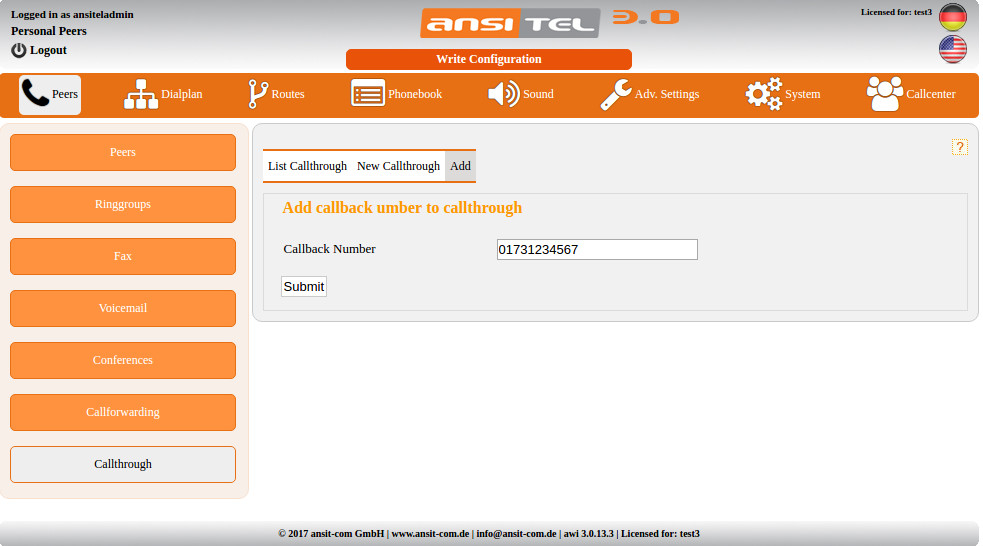
Figure: Valid callback numbers
Edit callthrough
All parameters of a callthrough can be edited in this page.
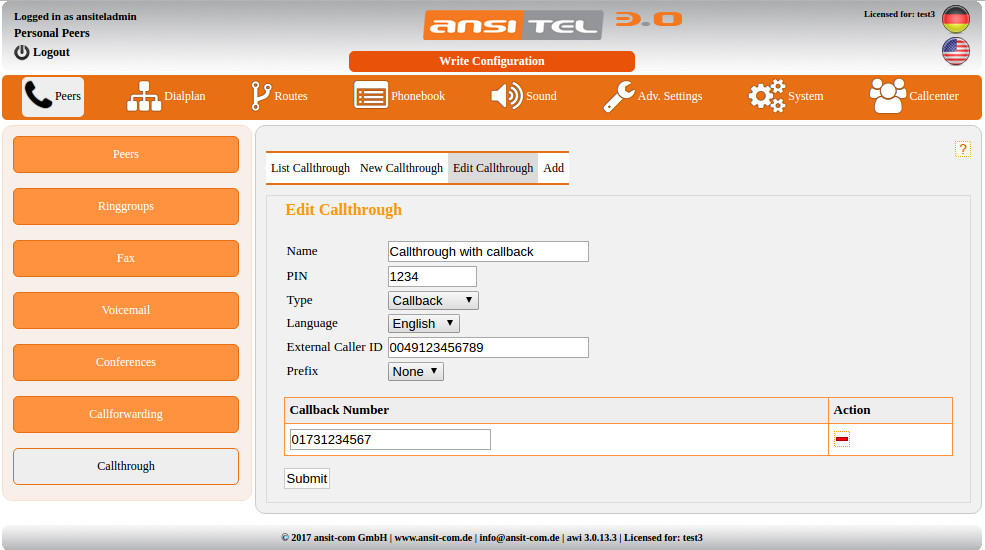
Figure: Edit callthrough
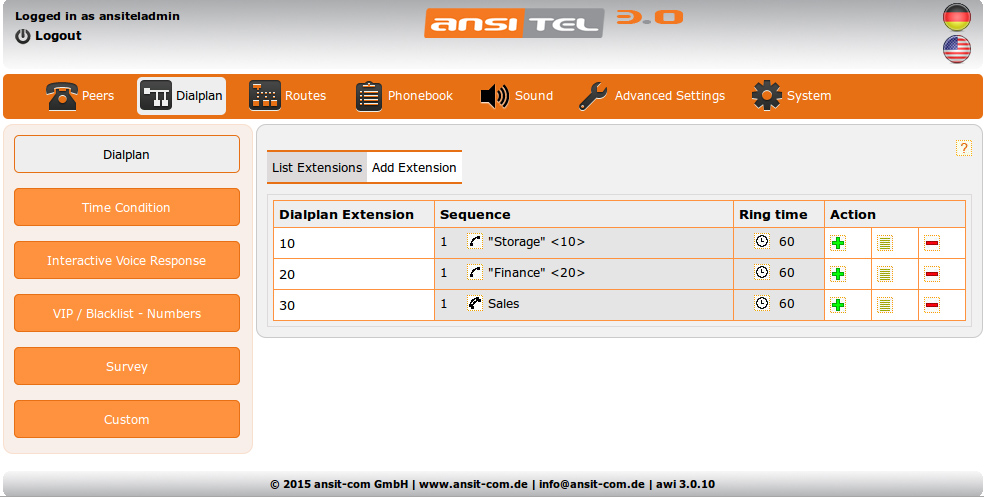
2.5.8 Dialplan
In the dialplan, all modules for the desired function are put together. This is the heart of the ansitel 3.0 telephone system.
In easy words, the dialplan defines what how and when it gets handled.
Dialplan overview
The dialplan overview exists of 4 parts.
- Dialplan Number: The dial plan number is the internal number for a sequence of objects. This can be called from each connected peer.
- Sequence: The sequence describes what should happen with calls to dial plan numbers. It can contain one or more objects/awi modules and is handled sequentially (top to bottom).
- Ring time: The ring time describes how long an object or awi module is called (in seconds), before the next object is handled. If there is only one object in the sequence or the last object is reached then the call will be hungup. If an object (e.g. a peer) is busy then the sequence will automatically jump to the next object.
- Action: Each dialplan number can add new objects that get created especially for them. Through editing of the dialplan numbers, it has the possibility to change the sequence of the objects. When deleting the dialplan number, all modules stay saved.
With the example of the dialplan number 200 the device with account number “Storage User” will be called for 60 seconds. Because there is no other object with this number, after 60 seconds there will be a busy tone or the device will be hung up.
Some modules contain jumps to other dialplan numbers. In the dialplan jump destination are shown with "»" symbols.
Example: The time condition "Mon-Fri 8.00-16.00 h" has a jump destination to dialplan number 100.
Objects in dialplan can be edited by click on it directly.
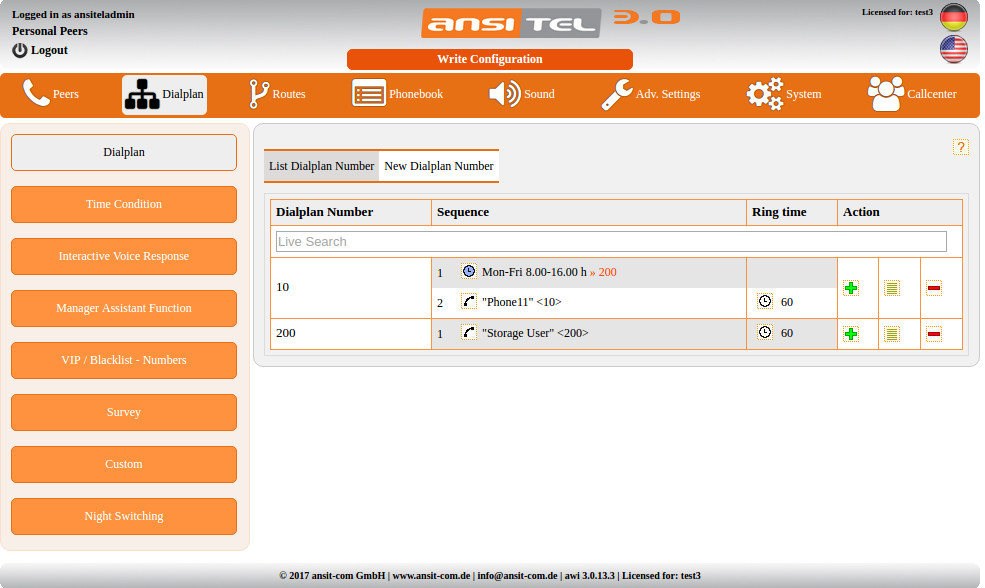
Figure: Dialplan
Add a dialplan number
To add a new dialplan number press “Add Dialplan Number”.
Please enter the desired dialplan number. After enter the first digit the ansitel webinterface suggest free dialplan numbers.
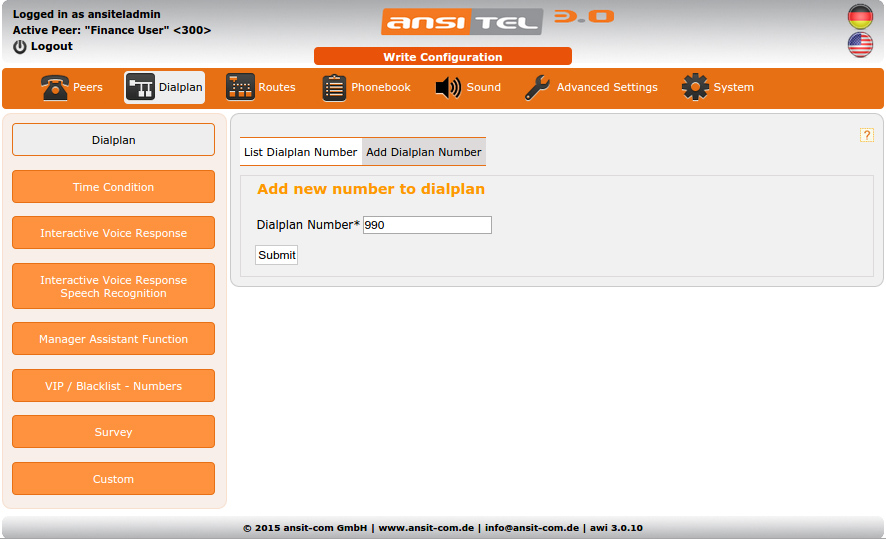
Figure: Add a dialplan number
In the overview you can see a new dialplan entry with empty sequence. A call to this number will only return a busy signal or hangup.
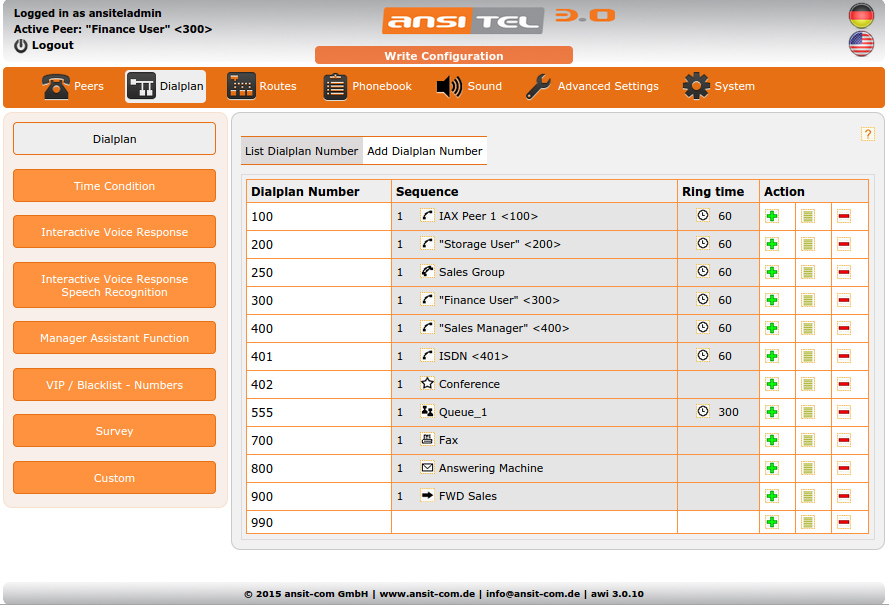
Figure: Dialplan with new dialplan number
Now one or more objects should be added to the dialplan number.
Add objects to the dialplan number
To add an object to the dialplan number, press the green plus symbol under action of the corresponding dialplan number.
Now you can choose from previously created objects / awi modules, that you want to add to the sequence. Multiple choice is possible by pressing "ctrl". The order of the objects / modules corresponds with the awi 3.0 menu structure.
Information about the option "Set default dial flags" can be found in section dial flags↓.
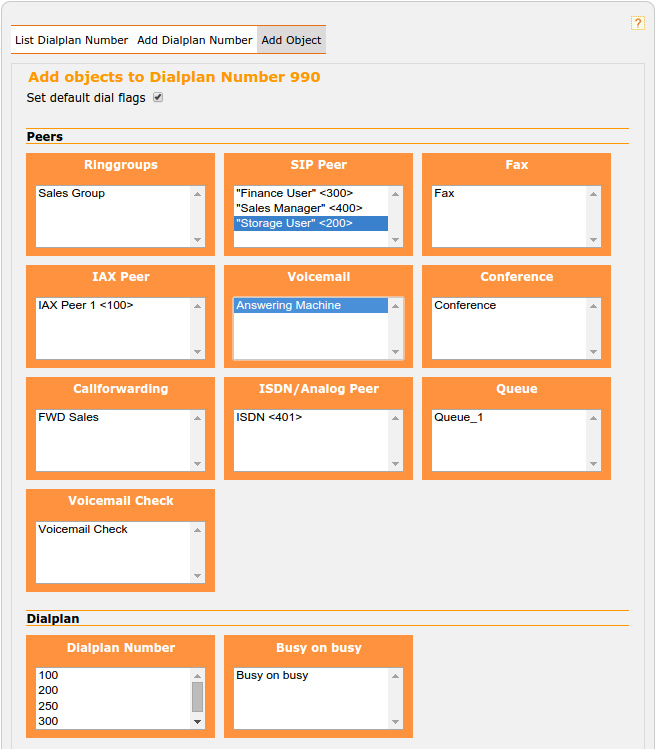
Figure: Add object to dialplan number
The voicemail check is a function of the module "voicemail". Here you can add a dial plan number, the voicemail check is then reachable over this number.
Edit the dialplan numbers
Is it possible that the chosen objects / awi modules were not added to the sequence in the correct order. In this example first the voicemail "Answering Machine" will be called with the dial plan number 990 and then the peer "Storage User". Because this sequence does not make sense the order should be changed.
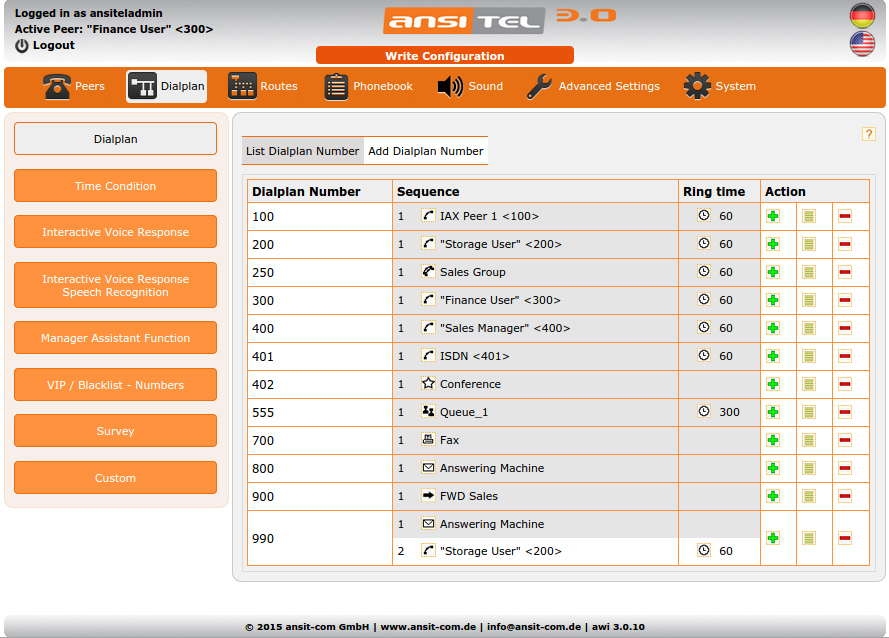
Figure: Edit the dialplan numbers
Through editing the dialplan number this change is possible.
On this page you have the following possibilities:
- change the dialplan number
- change the order of the objects
- add or delete objects / awi modules
- change the ring time of the objects / awi modules
- change the dialplan options (dial flags) for one object / awi module
Further information about the dialplan options can be found in section dial flags↓.
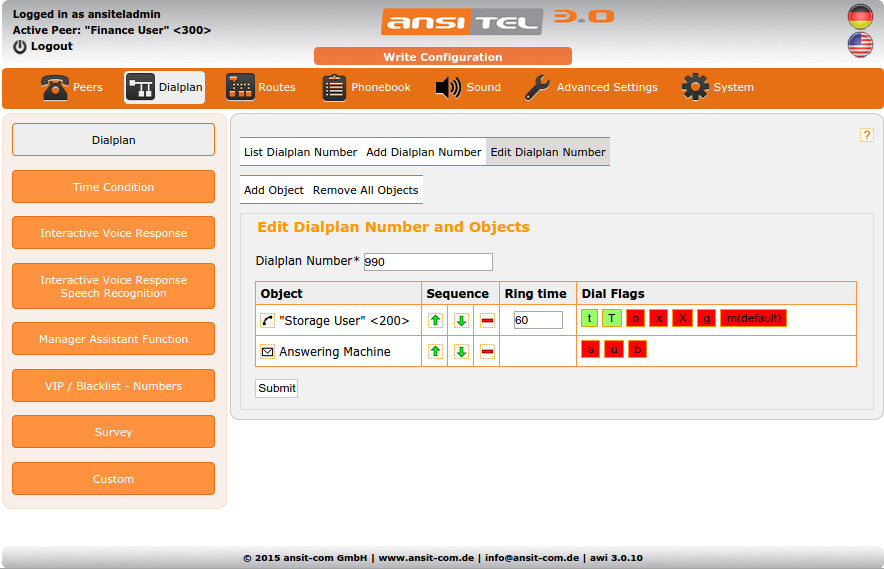
Figure: Edit dialplan number
After changing the order of the above mentioned example the logical expiration fits together. By calling the dial plan number "990", peer "Storage User" gets called for 60 seconds. When the call does not get answered, it will get redirected to the voicemail "Answering Machine".
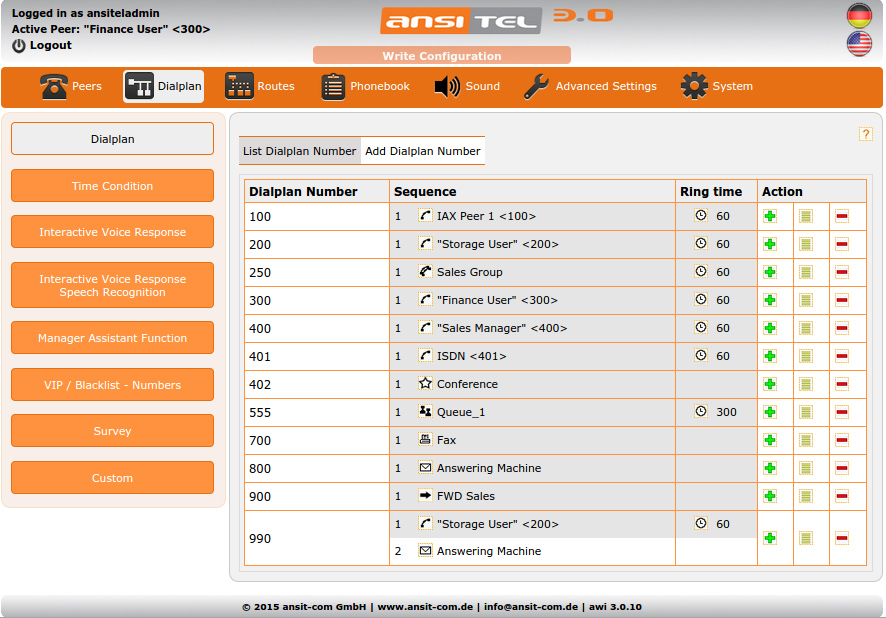
Figure: Overview after changing sequence order
2.5.9 Time condition
Over time conditions, time based actions can be implemented in the dialplan. Through time conditions, a certain forward can be done after reaching a certain time. E.g. an automatically activation of the voicemail is one of the possibilities.
Time condition can be found in many professional companies, for example to inform customers about certain events (e.g. out of office time, breaks, holidays) or to redirect them to another telephone number.
In the ansitel web interface, time conditions can be found in the menu dialplan. There you can set days, months, weekdays, hours and minutes.
Create and edit time conditions
To create a new time condition, simply click on "New timecondition". Enter a unique name and select the dial plan number that should be used if the rule set in the time condition is matched.
If you hover over the numbers in the field "Go to Dialplan Number" you will see the sequence of the dialplan number (this function only works with firefox). This should make it easier for you to choose the correct dialplan number.
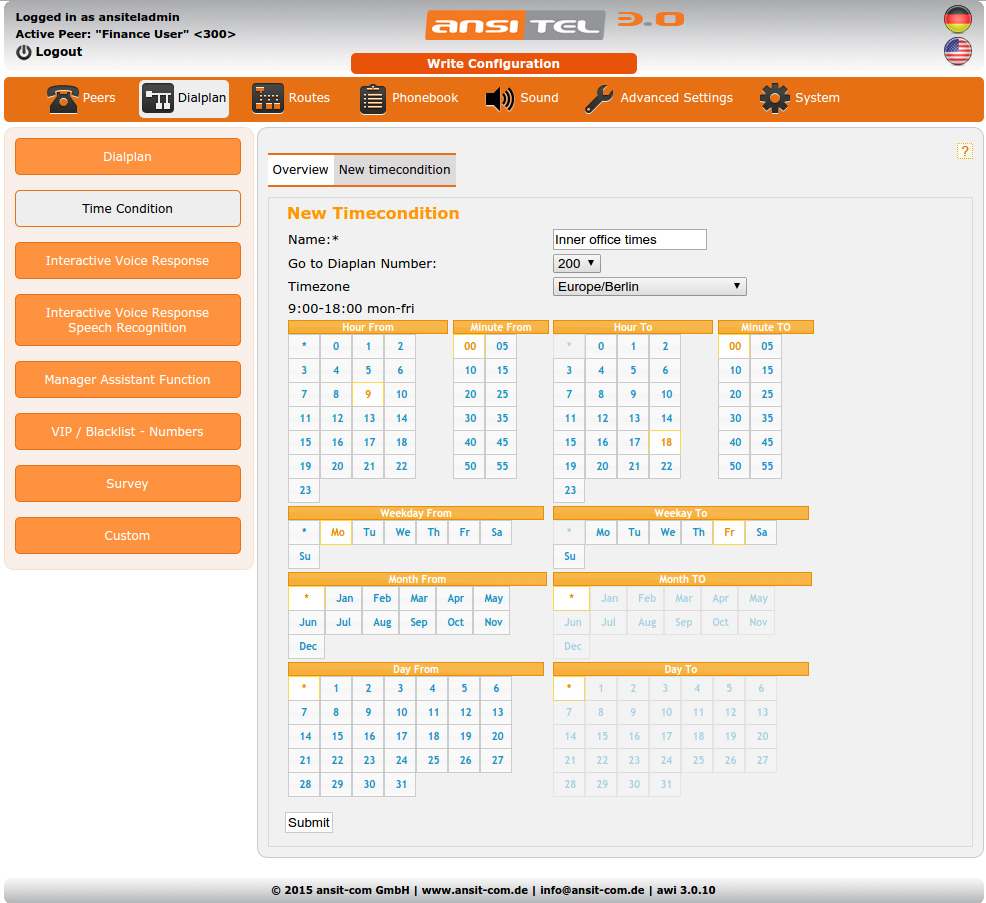
Figure: Create timeconditions
Overview of time conditions
In the overview, all time conditions are shown.
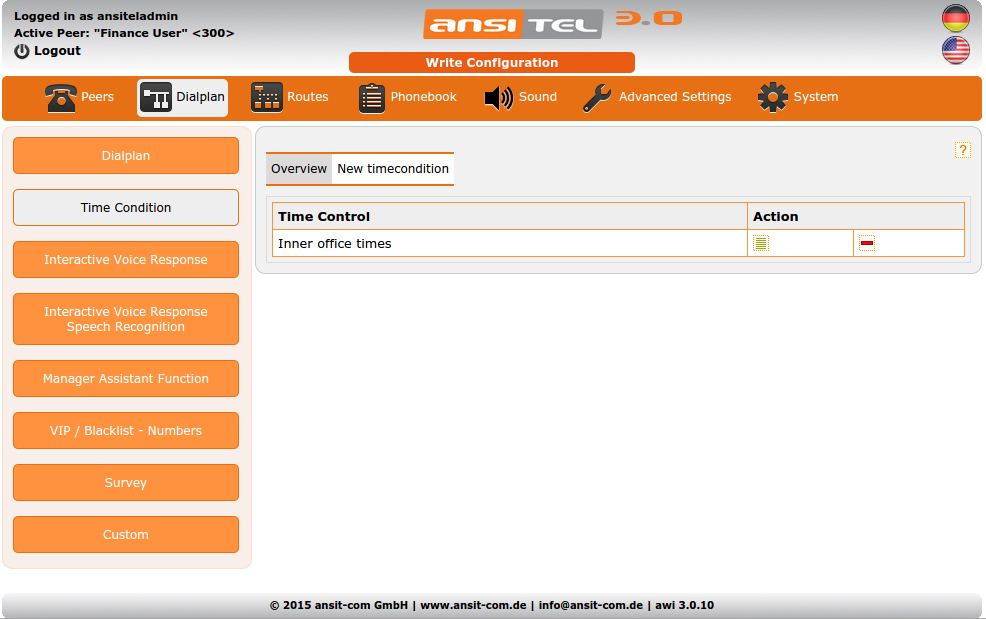
Figure: Time conditions
These time conditions can be added as an object in the dialplan number (dialplan↑). Usually time conditions will be set in the beginning of the sequence of the dialplan. If the system time does not correspond with the time condition it will be skipped. Therefore it is possible to set more than one time condition within the dial plan.
2.5.10 Interactive voice response
Interactive voice response (IVR) give the caller the possibility to choose and therefore to forward the call to different dialplan numbers (e.g. peers). The caller will hear an announcement that will explain him the different options of the IVR (as announcement↓). By pressing the corresponding button (e.g. 1) the call will be forwarded to the selected dialplan number (e.g. ring group or extension or queue).
IVRs are useful especially for companies that have to deal with medium or high amounts of customers and that want to preselect the actual target of the call (e.g. 1 for accounting, 2 for sales, 3 for customer services).
Input errors will be caught. Afterwards the announcement of the possible options will be repeated.
In our ansitel web interface (awi 3.0) interactive voice responses can be configured over the dial plan menu. The sound file for the IVR can be uploaded via the internal file manager (filemanager↓).
Create interactive voice response
To create an IVR click on "New IVR" and enter a name.
In this module you have the possibility to set a dialplan number linked to this IVR. To do this, click “Create Dialplan Entry” and enter the desired dialplan number.
Select an announcement that describes the options of the interactive voice response. The announcement has to be set in the announcement module (announcement↓).
In case there is no input you have the possibility to repeat the announcement or to redirect to a dialplan number.
Select the language of the IVR menu system announcements. Possible values are "German" and "English".
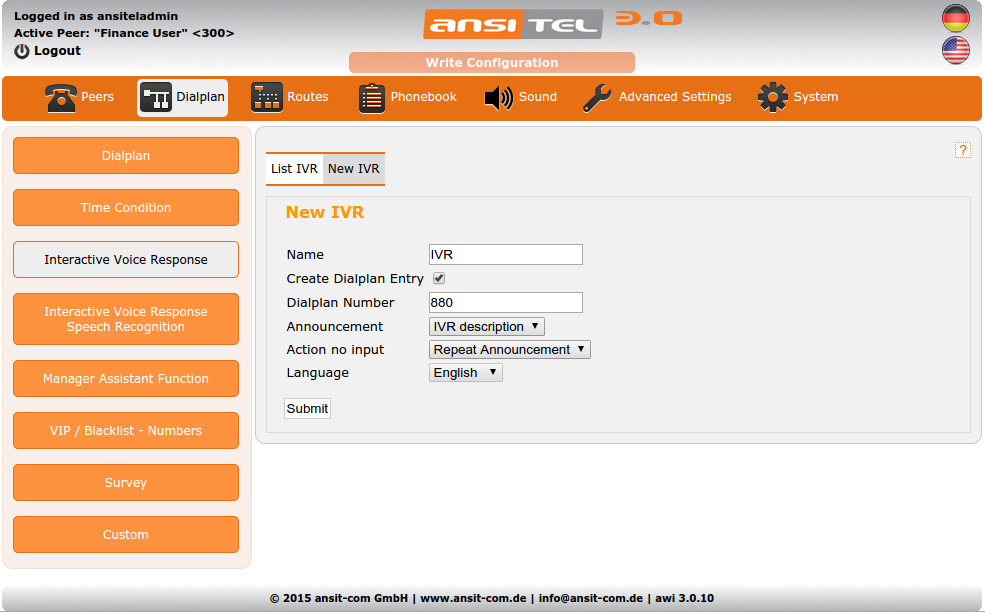
Figure: Interactive voice response
Overview of interactive voice responses
The overview show the names of existing IVR and the assigned options with dial plan numbers. In this example, the IVR does not have a valid option (IVR Number). Inputs from callers in the interactive voice response that are not defined get quoted as “invalid”. Afterwards the announcement of the IVR is played again.
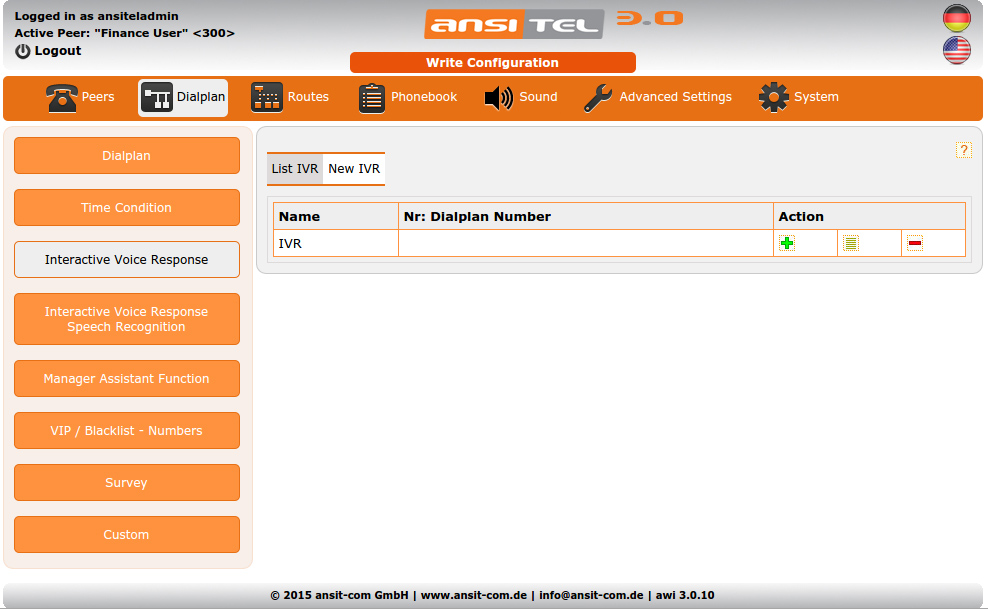
Figure: Overview of interactive voice responses
Add IVR numbers
IVR numbers are numbers the caller can dial in the IVR. The special characters "*" and "#" are also possible.
Add IVR numbers by clicking the green plus button.
You have the possibility to choose IVR numbers and assigned dial plan numbers.
If you hover over the numbers in the field "dialplan number” you will see the sequence of the dial plan number (this function only works with Firefox). This should make it easier for you to choose the correct dialplan number.
If an automatic recording on the incoming route is active (incoming route↓), it can be deactivated by clicking “Disable Call Recording”.
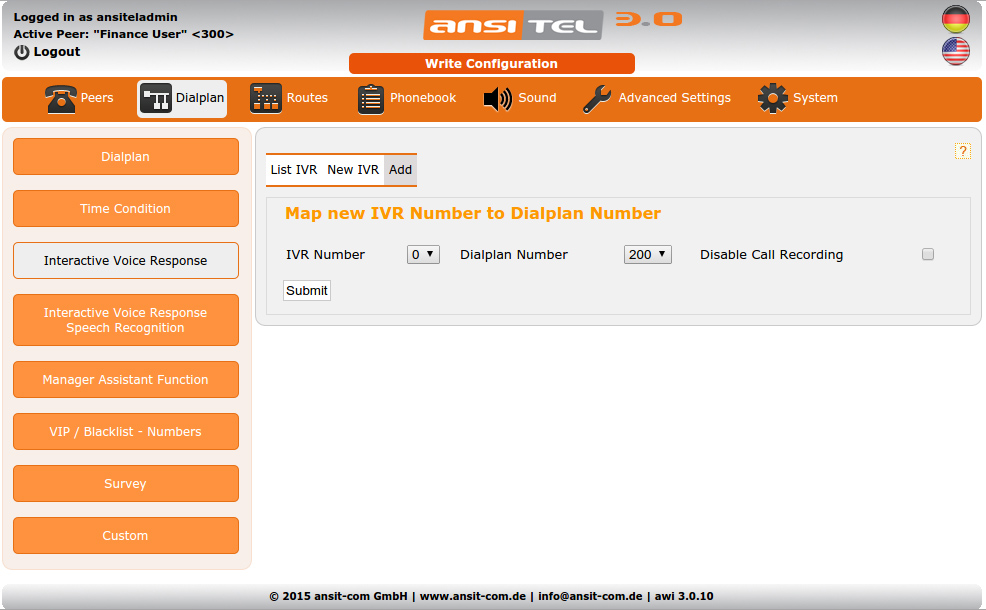
Figure: IVR numbers
Overview IVR numbers
In the interactive voice response, IVR numbers and assigned dialplan numbers were added.
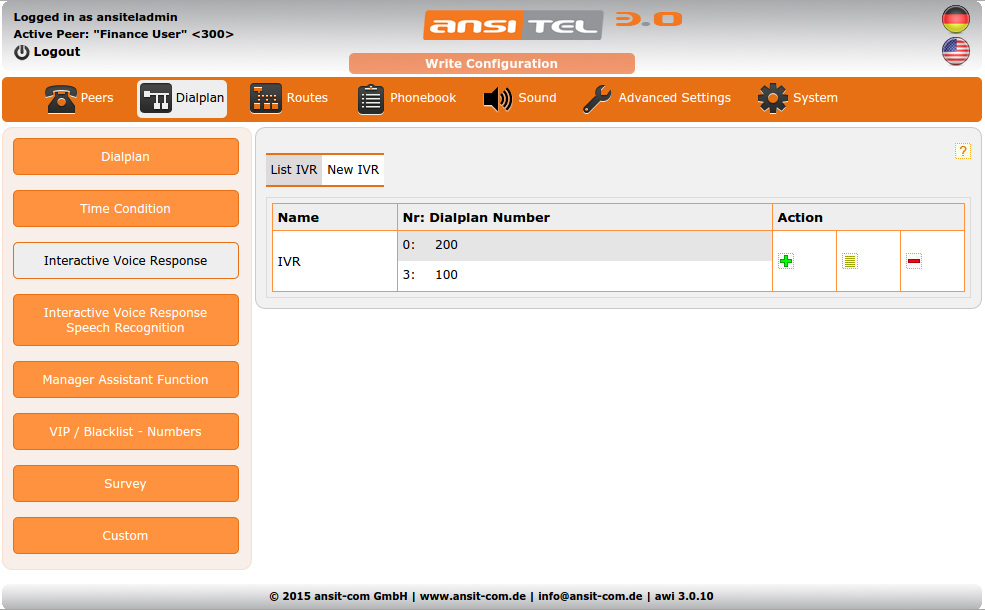
Figure: Overview IVR with IVR numbers
Edit IVR
On this page, you can edit the names of the IVR and select another announcement that describes the IVR options.
The “Action no input” can be changed to other dialplan numbers or repetition of the announcement.
Select the IVR number, the corresponding dialplan number or the call recording option.
Select the desired system language.
IVR Numbers can be deleted here.
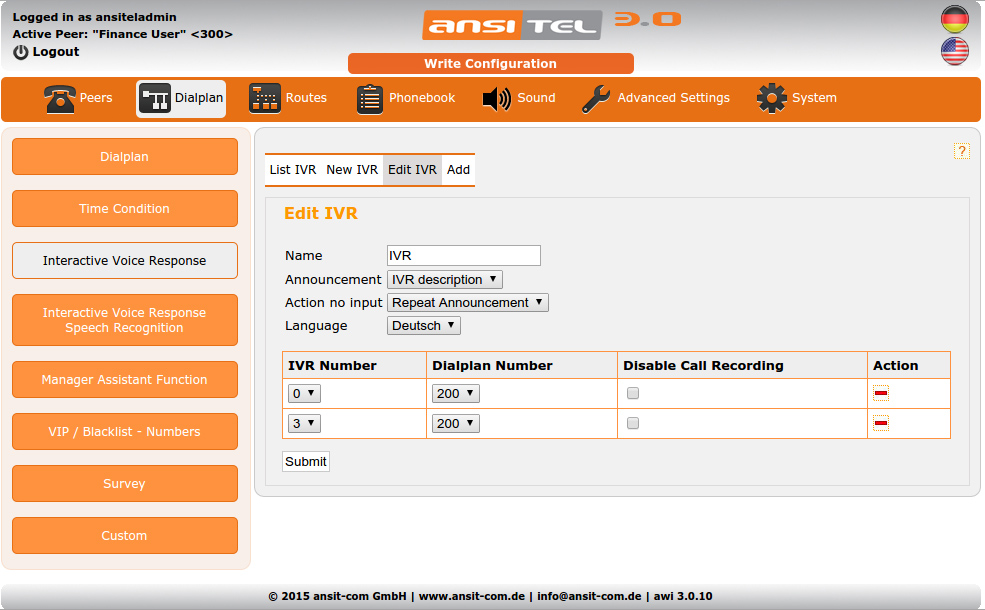
Figure: Edit IVR
2.5.11 Interactive Voice Response with Speech Recognition (Optional)
Interactive voice response (IVR) give the caller the possibility to choose and therefore to divide the call to different dialplan numbers (e.g. peers). The caller will hear an announcement that will explain him the options of the IVR (announcement↓). By saying relevant words (e.g. Berlin), the call will be forwarded to the selected dialplan number (e.g. ring group or peer or waiting queue).
A wrong word recognition gets caught. This is followed by the repetition of the options of the sound file.
In ansitel web interface (awi 3.0) we can configure interactive voice response with speech recognition. The sound files of the IVR can simply be uploaded by the internal file manager (filemanager).
Create interactive voice response with speech recognition
To set up an interactive voice response with speech recognition, click on “New IVR” and assign a name.
In this module, you have the possibility to immediately tie a suitable dial plan number with the IVR. Therefore click “Create Dialplan Entry” and enter the desired dialplan number.
Select an announcement that describes the options of the interactive voice response. The message has to be set in the announcement module (announcement↓).
In case no voice input is requested, you have the possibility to repeat the announcement or to redirect to a certain dialplan number.
Select the language of the IVR menu system announcements. Possible values are "German" and "English".

Figure: Create interactive voice response with speech recognition
Overview of interactive voice response with speech recognition
The table shows the name of the existing IVR and the assignment “word recognition to dialplan number”. In this example, the IVR has no valid words. Voice input from callers in interactive voice response that are not defined are acknowledged by an announcement “invalid input”. Thereafter, the announcement of the IVR will be played again.
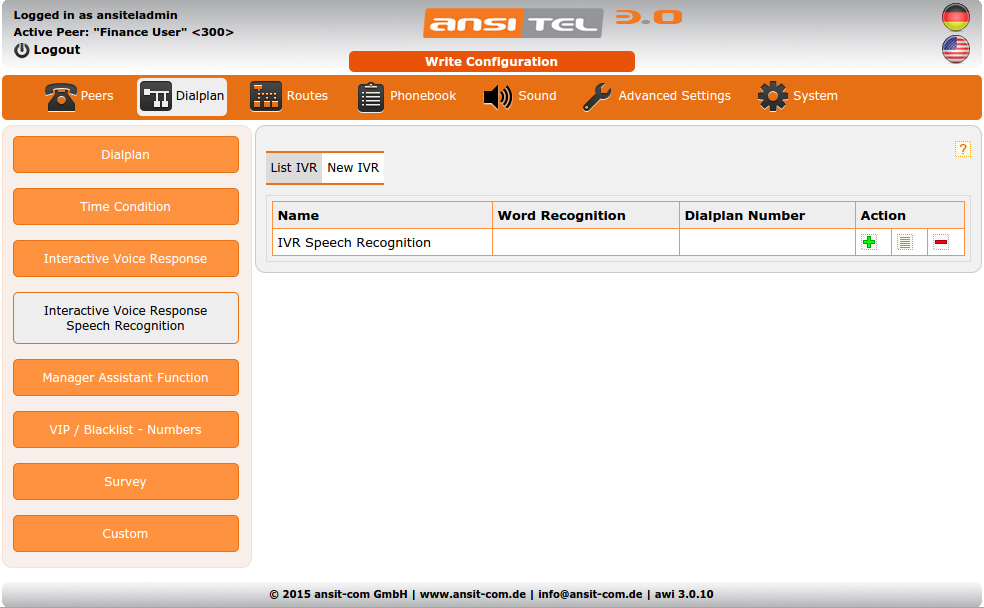
Figure: Overview of Interactive Voice Response with Speech Recognition
Adding words for the word recognition
Words are recognized by voice input of the caller.
Add words to IVR by clicking the green plus button.
You now have the opportunity to fill in words and the associated dialplan numbers.
If you hover over the numbers in the field "Dialplan Number” you will see the sequence of the dial plan number (this function only works with Firefox). This should make it easier for you to choose the correct dialplan number.
If an automatic recording on the incoming route is active (incoming route↓), it can be deactivated by clicking “Disable Call Recording”.
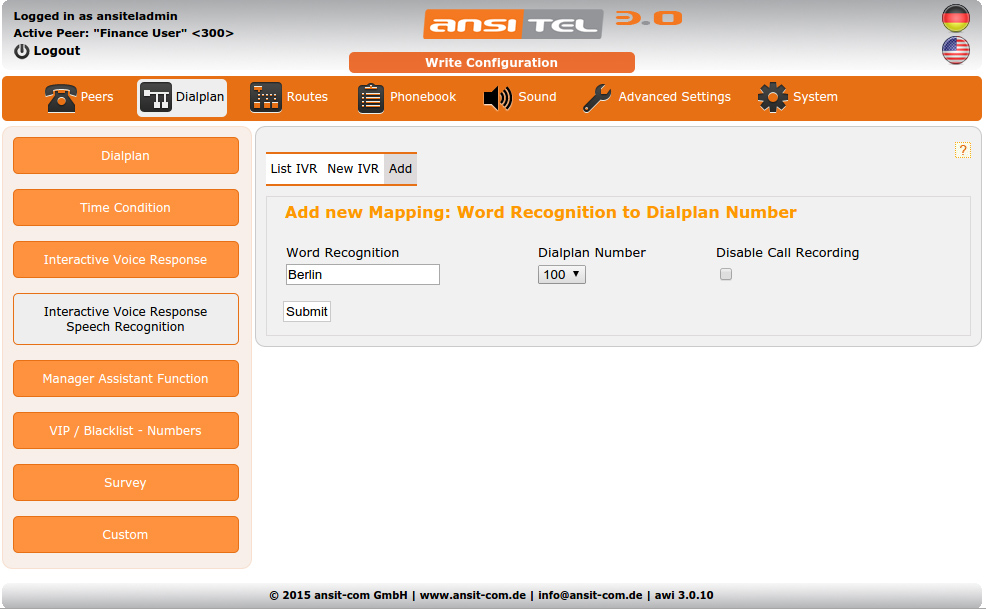
Figure: Adding words for the word recognition
Overview of IVR with speech recognition
The interactive voice response has added a word and its corresponding dial plan number.
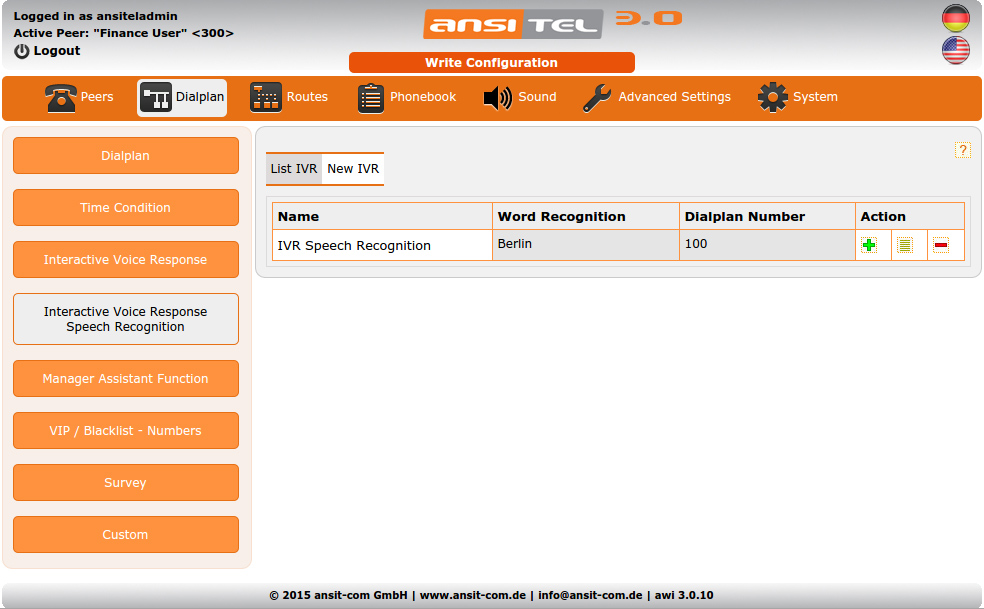
Figure: Overview of IVR with speech recognition
Edit IVR with speech recognition
On this page you can change the name of the IVR and select another announcement that describes the IVR options.
The “Action no input” can be changed to other dialplan numbers or repetition of the announcement.
You can change the words, the associated dialplan number or the call recording option.
Choose your desired language for system announcements.
Single recognition words can be deleted here.
Change the system internal announcemnts to german or english.
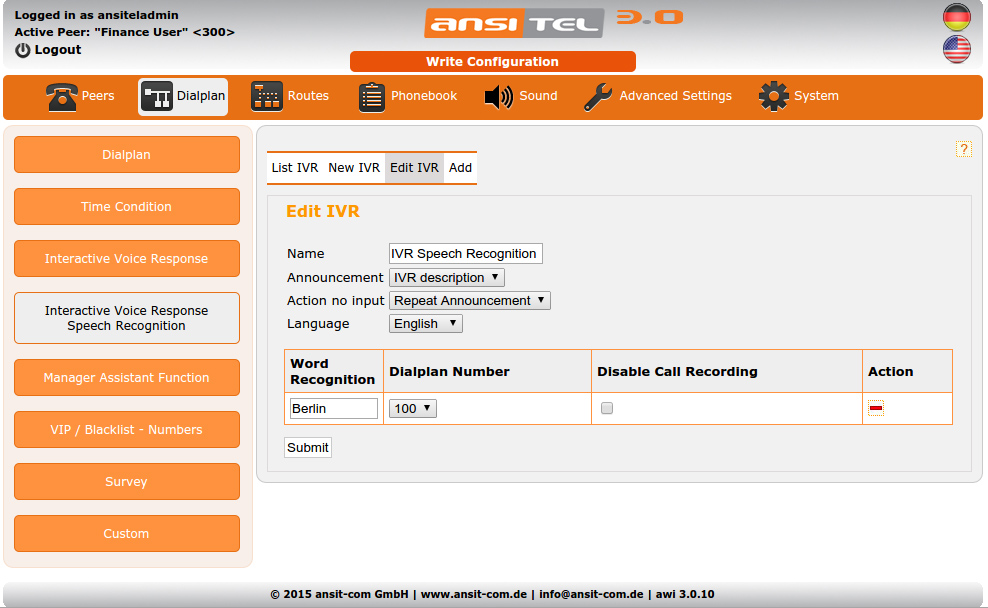
Figure: Edit IVR
2.5.12 Manager Assistant Function
With this module you can create manager assistant functions. With this, manager peers can be put on do not disturb. In this mode, only the assistant peer can call or forward to the manager peer. All other callers are forwarded to the assistant peer or another dialplan numbers. Add this module to a dialplan number in the dial plan and then set this dialplan number as BLF (Busy Lamp Field) in your SIP phone to active / deactivate the function.
Create manager assistant function
To create the manager assistant function you choose “New Manager Assistant Function”
Please enter a unique name for the manager assistant function.
You can create a dialplan number directly. To do this, click on “Create Dialplan Entry”.
Select a manager peer that can be switched to “do not disturb”. If “do not disturb” is active, all callers except the secretary peer get forwarded to the dialplan number (usually to the secretary peer).
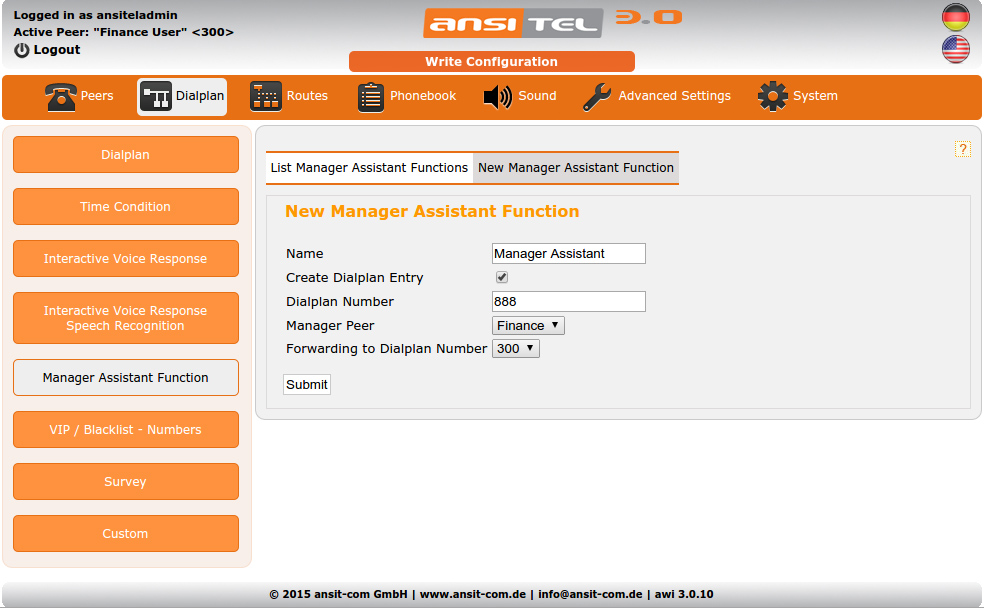
Figure: Create manager assistant function
Adding a assistant peer
By clicking on the green plus button in the overview, a assistant peer can be added.
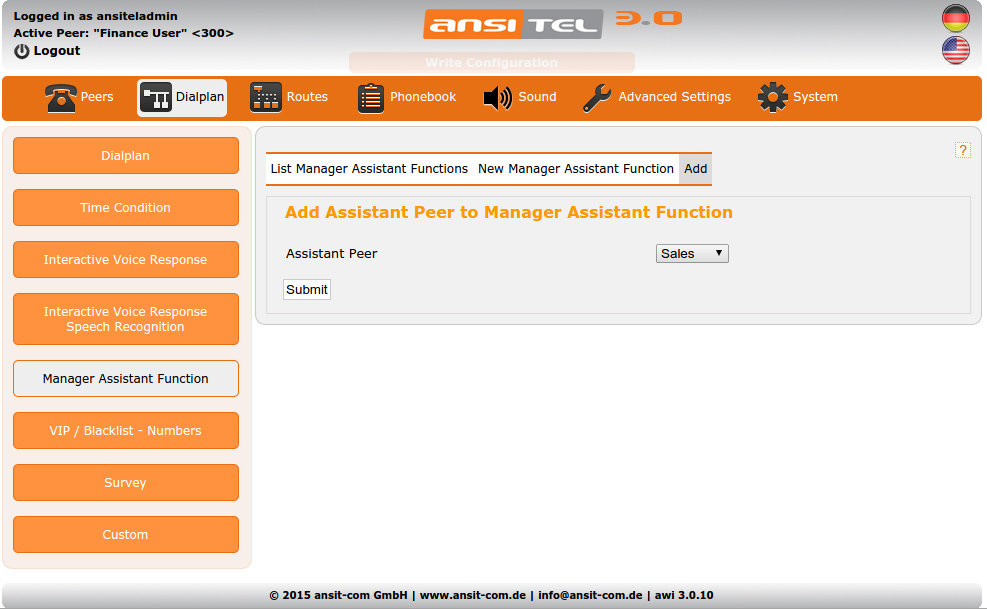
Figure: Add assistant peer
Overview manager assistant function
The overview shows the manager assistant function with manager peer, forwarding when “do not disturb” and assistant extension.
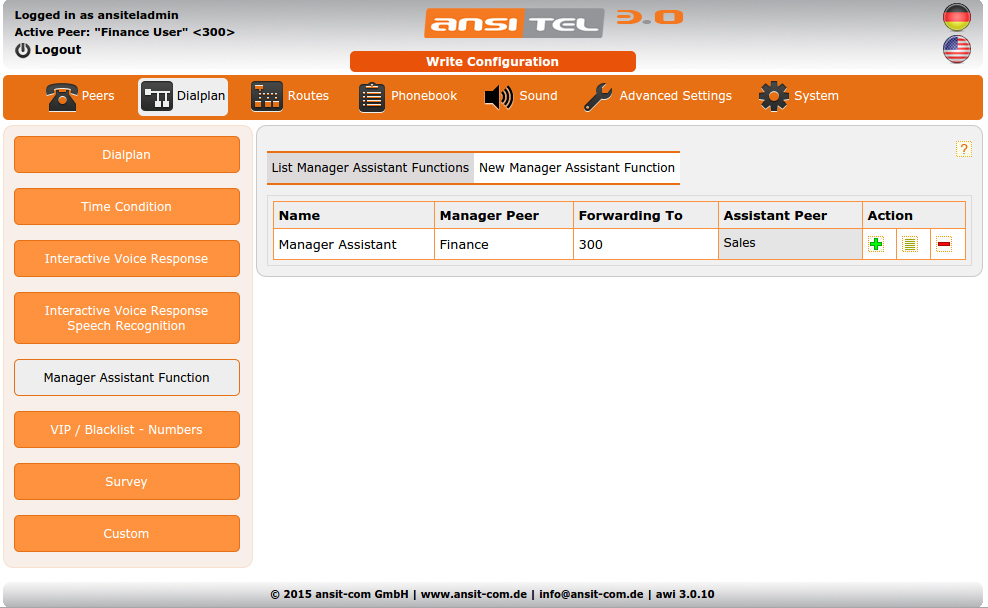
Figure: Overview manager assistant function
Edit the manager assistant function
You have the ability to change the name, the manager peer, the assistant peer and possibly the forwarding. Individual Assistant peer can be deleted on this page.

Figure: Edit the manager assistant function
2.5.13 VIP / Blacklist
With these lists, callers can be treated separately according to their sender phone number (Caller ID) in the dial plan. VIP and blacklisting are particularly suitable for companies that manage high telephone traffic every day and often have long waiting time for callers or busy lines.
The telephone numbers included in the VIP list get a preferred treatment. The telephone system will forward these numbers directly to the dial plan number.
Blacklists contain numbers that are to be immediately rejected by the telephone system. So this makes it possible to block unwanted call directly and automatically.
VIP/Blacklists are used within sequences in the dialplan (dialplan↑). So for example like this a caller in the VIP list can be redirected directly to an extension. All other callers have to wait in queue first.
Create VIP / Blacklist
Create a new list by clicking “New VIP / Blacklist”
Assign a name to this list and select the type. The choices are:
- VIP: All numbers in this list are treated and recognized by their callerid number. Afterwards, these calls are routed to a separate dialplan number (jump to dialplan number).
- Blacklist: All numbers in this list are “not wanted” and treated and recognized by their callerid number. Afterwards, these calls are rejected by the telephone system. The caller gets a busy signal and will be disconnected.
In this module you have the possibility to create a dialplan number associated with this VIP / Blacklist. Do this by clicking on “Create Dialplan Entry” and enter the dialplan number.
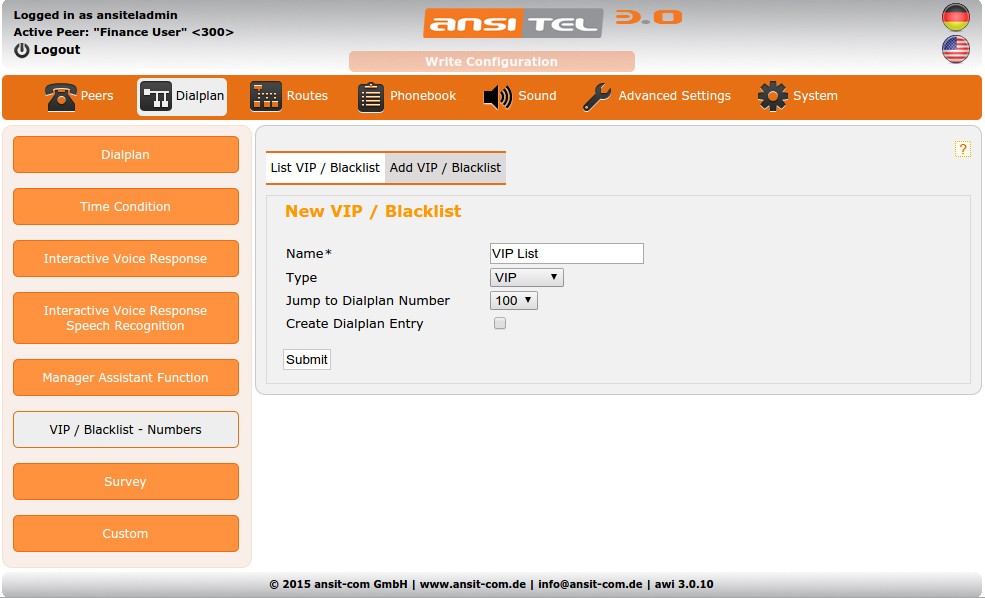
Figure: Add VIP / Blacklist
Add telephone numbers
To add phone number of caller to the list, click on the green plus button.
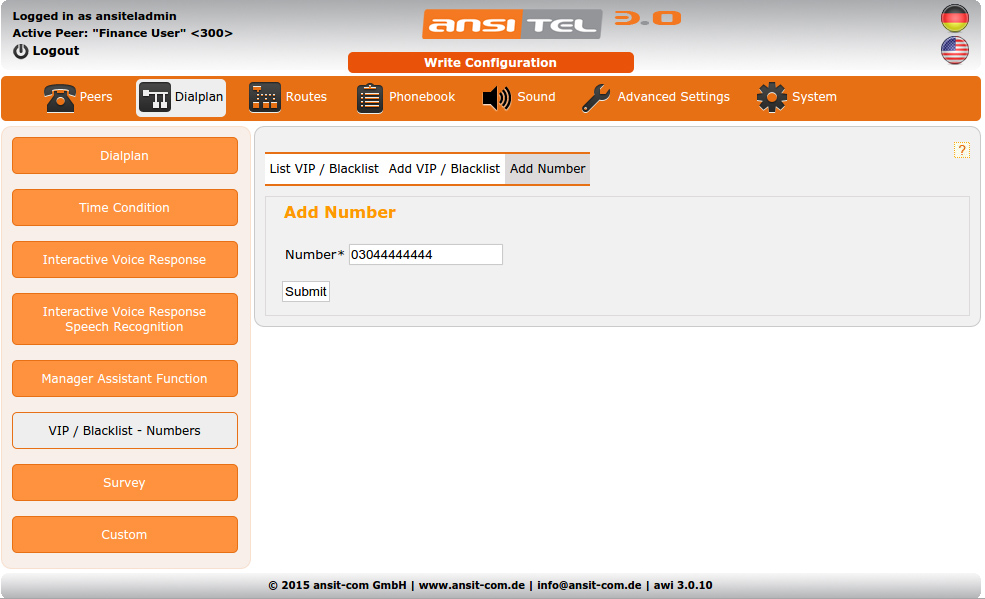
Figure: Add number of callers
Overview VIP / Blacklist
The overview shows all the lists by name, type and phone number of caller id.
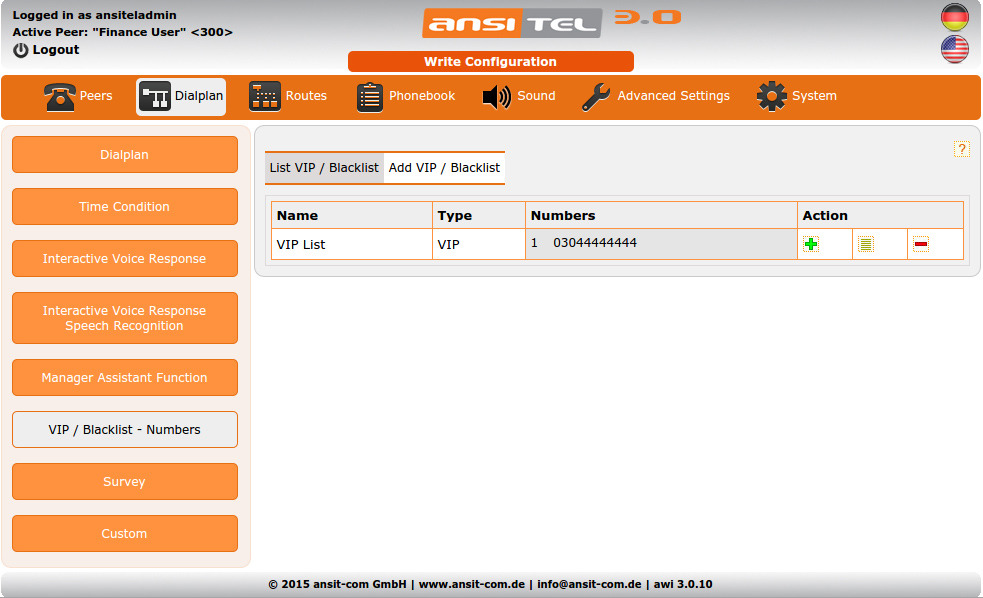
Figure: Overview VIP / Blacklist
Edit VIP / Blacklist
You have the possibility to change the name, type and if necessary the target dialplan number (depending on the type). Callerid numbers can be deleted on this page.
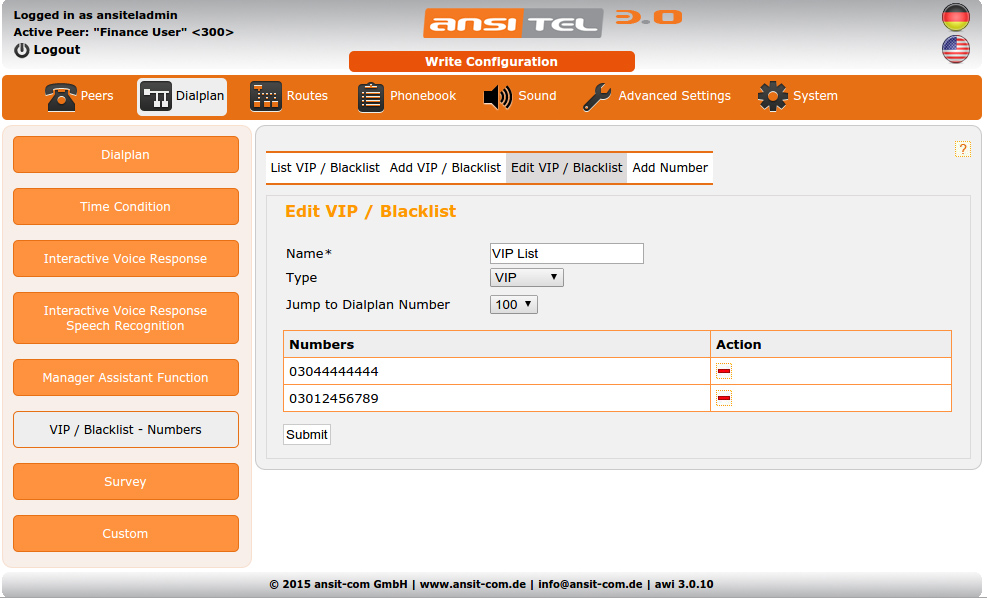
Figure: Edit VIP / Blacklist
2.5.14 Survey
Surveys can be used for reviews of the conversation partner or as substitute for evaluation sheets. Such surveys are usually presented to the caller at the end of a call. Companies using such survey modules can thus directly measure the quality of certain services to improve their quality accordingly.
In this case, the caller hears a freely selectable sound file that describes the possibilities of evaluation (e.g. school grades 1-6). The caller can leave the connection by pressing the corresponding number rating.
All data is stored in the database and can be exported via the survey module or via csv file to excel. Therefore further analyses is possible.
Create a new survey
To create a new survey, click “New Survey”. Enter a name for this survey.
In this module you have the possibility to create a corresponding dial plan number. To do this, click “Create dialplan Entry” and enter a dialplan number.
Select an announcement that describes the survey. The announcement must first be set over the announcement module (announcement↓).
If the call should be handled after the survey, activate “Handle After Survey” and select the desired dial plan number. This makes it possible to connect to several polls in a row.
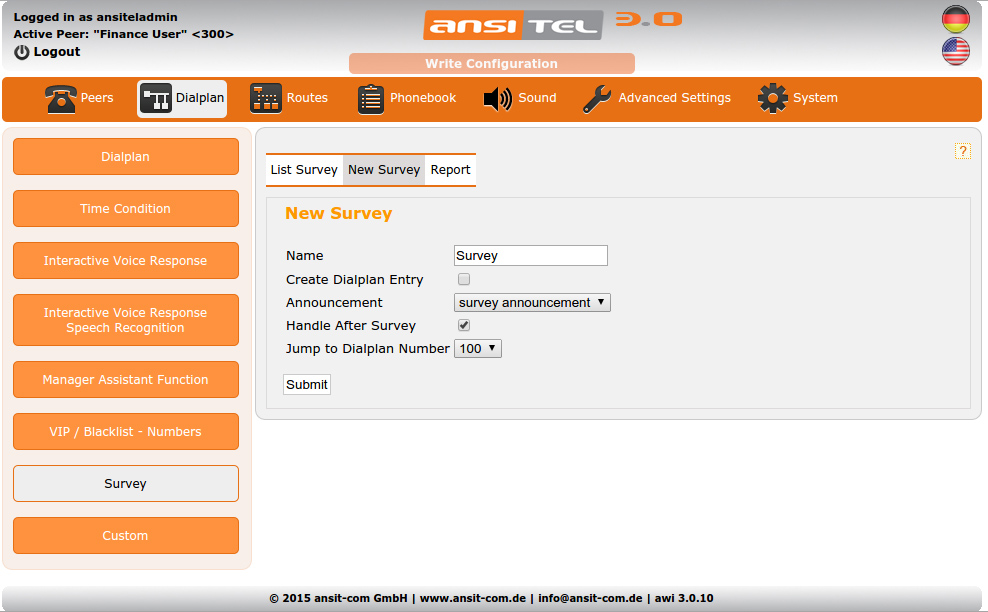
Figure: New survey
Adding survey / grading numbers
Through adding of surveys / grading numbers it is possible to limit the possible selections. If the caller selects a number that is not defined, it gets a message “input invalid” and the survey announcement is played again.
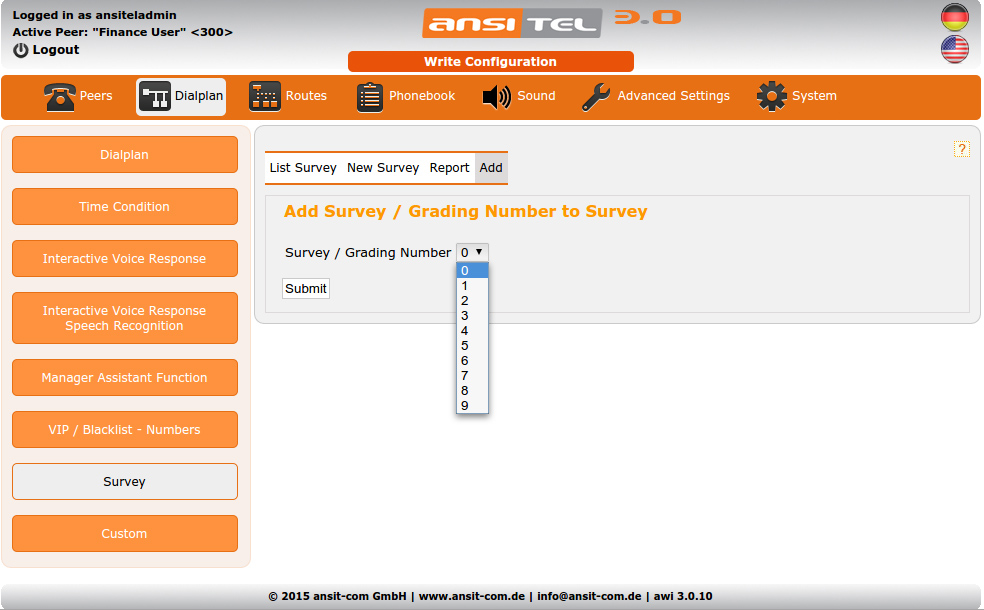
Figure: Adding survey / grading numbers
Overview of survey / grading numbers
The overview of the survey name and survey grading numbers are shown.
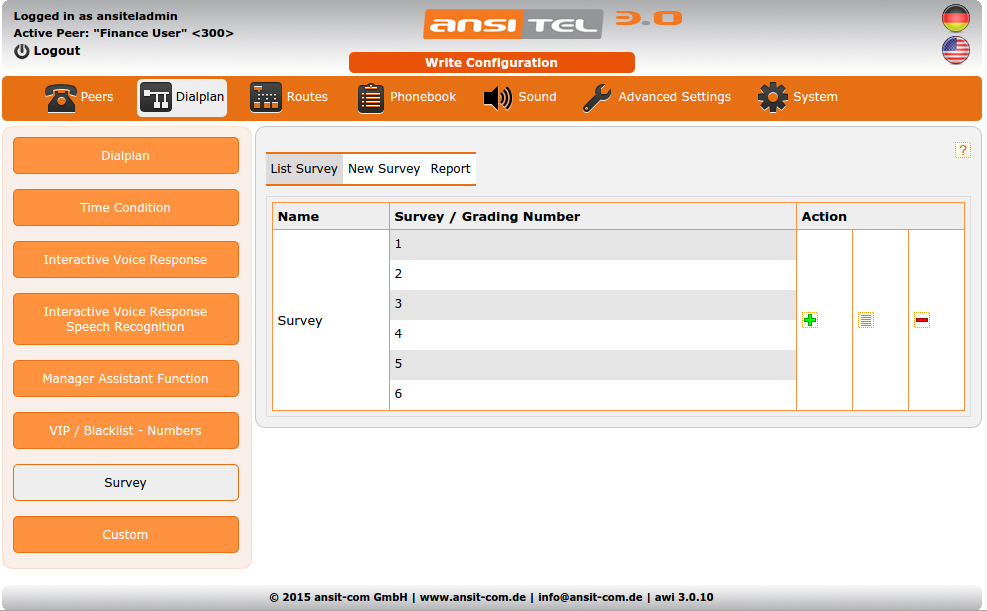
Figure: Overview of survey / grading numbers
Edit survey
On this page you can edit all of the above made changes and delete individual survey / grading numbers.
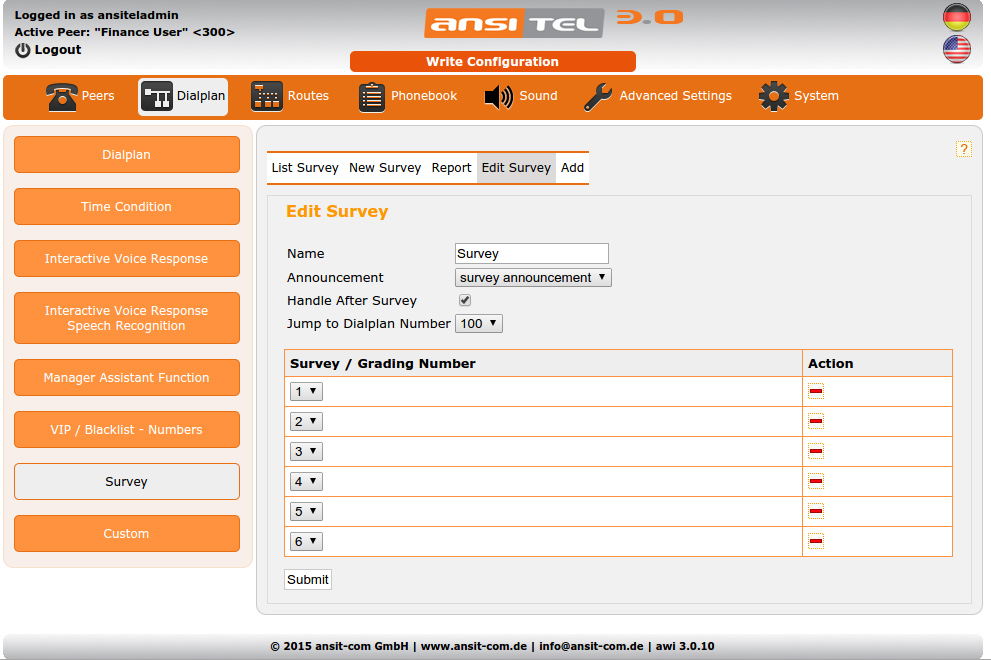
Figure: Edit survey
Reports
The reports show the caller (Caller ID), the time, the survey name and the survey grading number.
If the survey module (dialplan↑) in a dial plan sequence is positioned directly behind a queue (queues↑), the agent is shown in destination column. Like that e.g. an agent based evaluation is possible.
This data can be downloaded via csv file and further processed in e.g. Microsoft Excel.
With “Delete” all entries will be deleted.
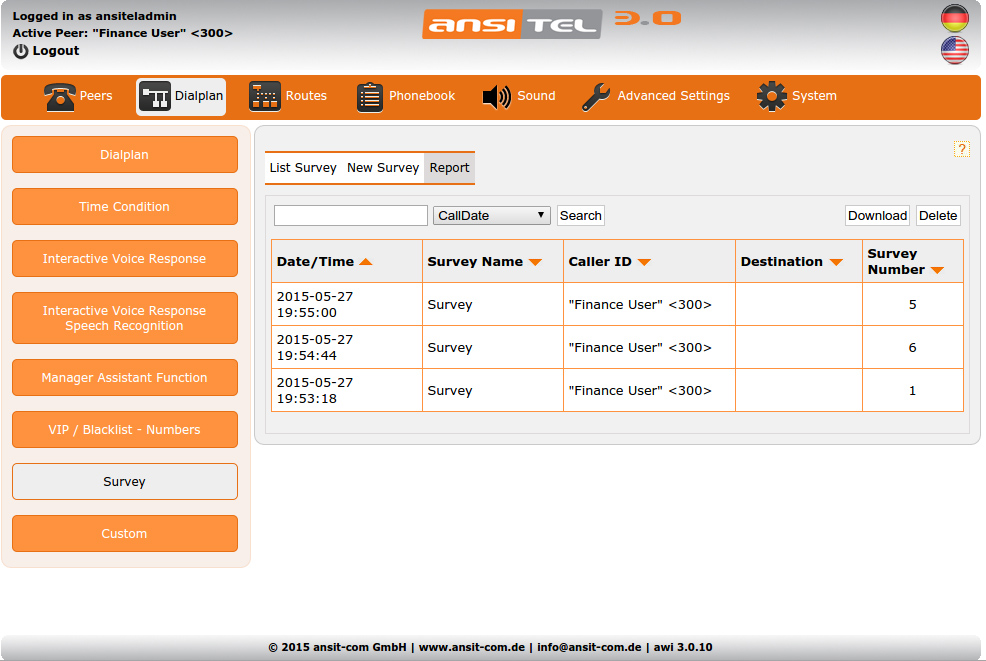
Figure: Reports
2.5.15 Custom module
With custom module, specific functionalities can be implemented with the ansitel telephone system, which are not included in the existing modules. Asterisk skills are required for the creation of custom modules. The functionality in this module is built with Asterisk syntax.
Creating a custom module
A new custom module can be made with “New Custom Dialplan Module”. Enter a name for this module.
In this module you have the possibility to immediately create a corresponding dialplan number with this custom module. To do this, click on “Create Dialplan Entry” and enter a dialplan number.
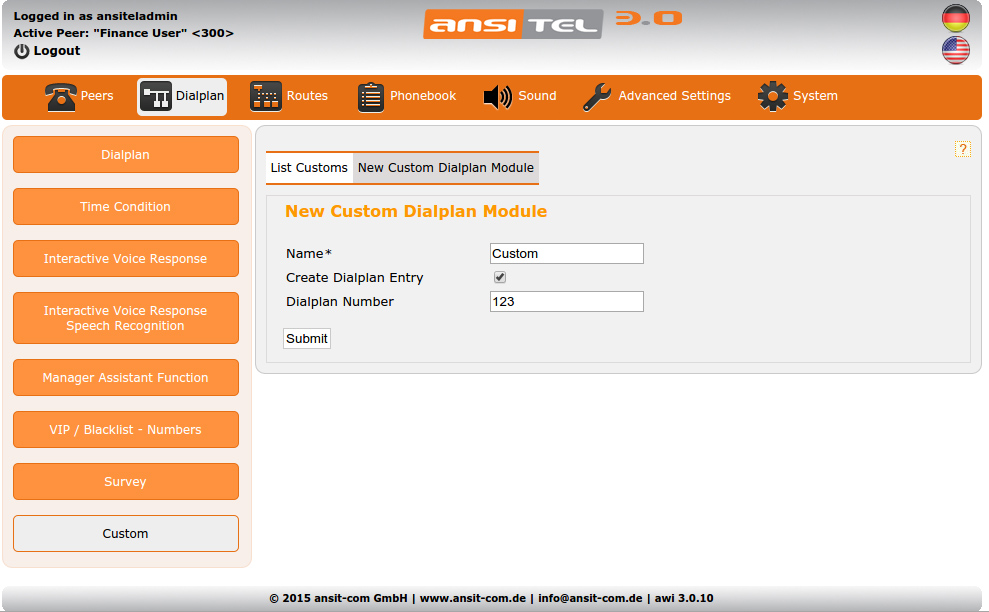
Figure: New custom dialplan module
Add Asterisk dialplan entries
You can add Asterisk dialplan entries by clicking on the green plus button in the overview module.
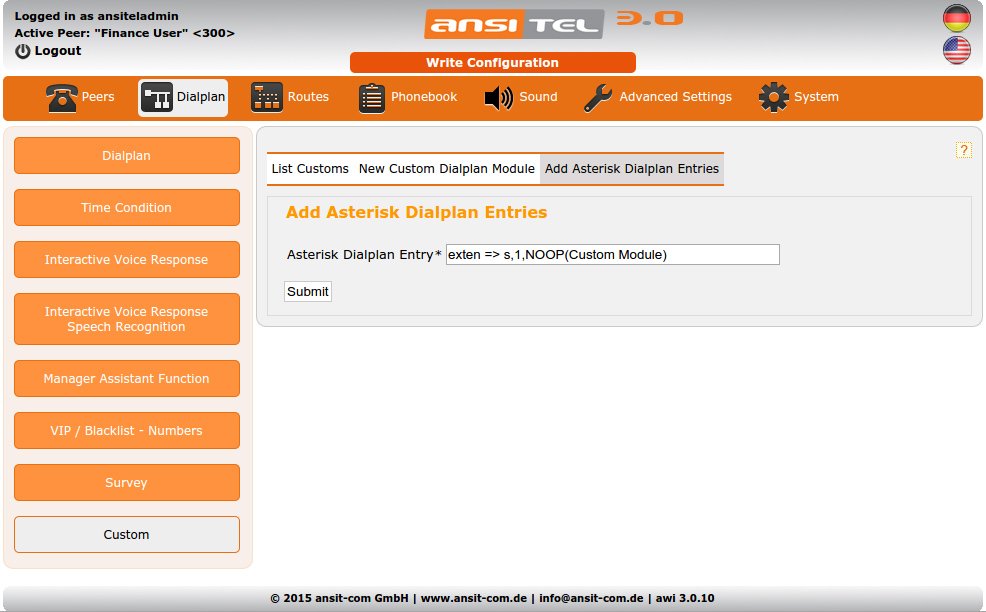
Figure: Add Asterisk dialplan entries
Overview of custom modules
In the overview, the name and the Asterisk dial plan entries are shown.
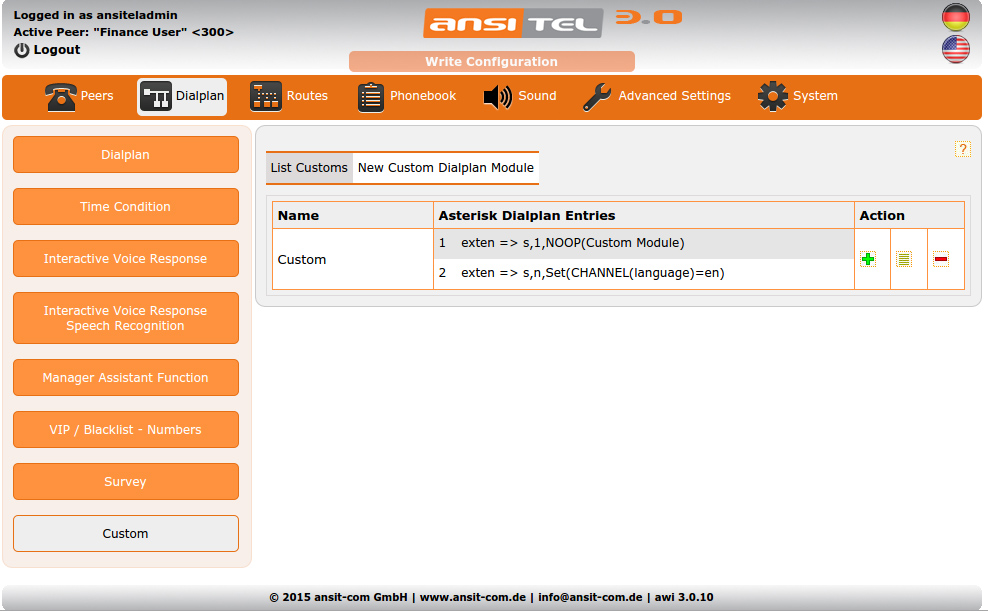
Figure: Overview of custom modules
Edit custom modules
On this page you can edit or delete all the rows.

Figure: Edit custom modules
2.5.16 Night switching
Night switchings enable functions of ansitel pbx by pressing a key on connected phones. An example is the activation of a voicemail after business hours directly on phone.
Calls can be forwarded to other dialplan numbers by night switchings in case of the night switching is active.
Each night switching creates a key and a night switching module. These modules can be used in dialplan.
The key module can be added to a dialplan number and used as blf key in phones.
The night switching module is used in dialplan sequences. It checks the active status of the night switching. If it is active the call will be forwarded to the dialplan number in night switching module.
Create night switching
To create night switchings click on "New Night Switching" enter a valid name and define the dialplan destination number. In our example the dialplan number of the voicemail is used.
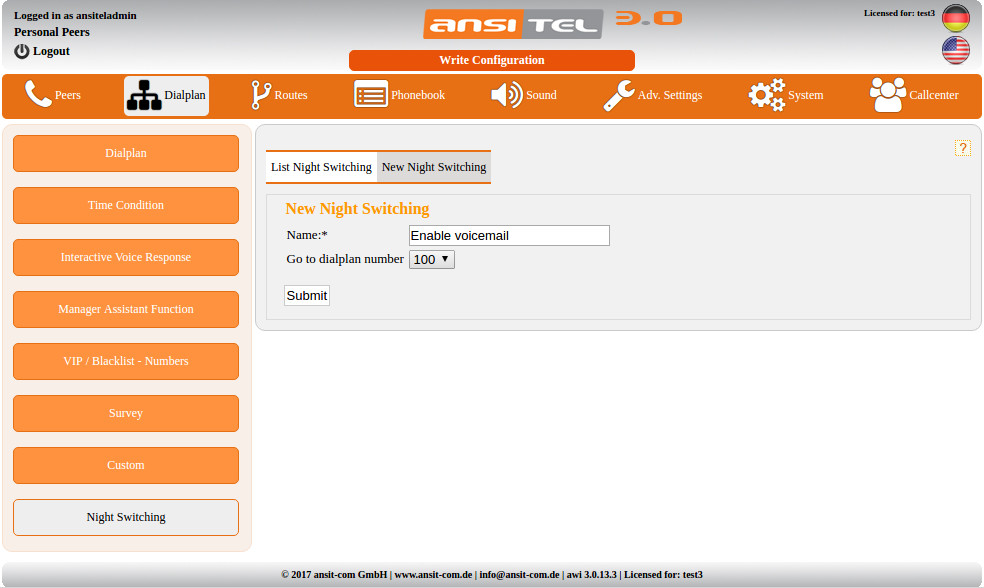
Figure: Create night switching
Overview of night switchings
In the overview the night switchings and destination dialplan numbers are shown.

Figure: Overview of night switchings
Edit night switching
All parameters can be changed, if you click on button.
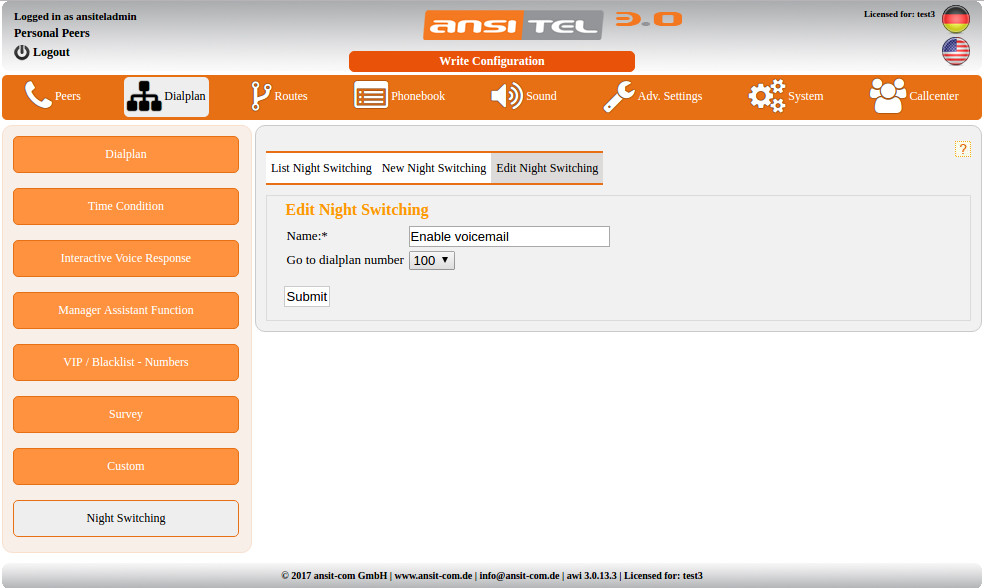
Figure: Edit night switching
Night switching used in dialplan
After creation of night switching it can be used in dialplan. Per each night switching two modules will be created.
- The night switching itself. It can be used in sequences of dialplan numbers.
- The key of night switching should be added to a dialplan number. This number can be used as blf key on phones. The activation of the night switching is shown via led on phone key.
Example: Create a dialplan number "90" und add a night switching (on first place of sequence) and a peer to it. If the night switching is enabled the peer won't be called because the forwarding to the dialplan number in night switching is placed. If the night switching is disabled the peer is called.
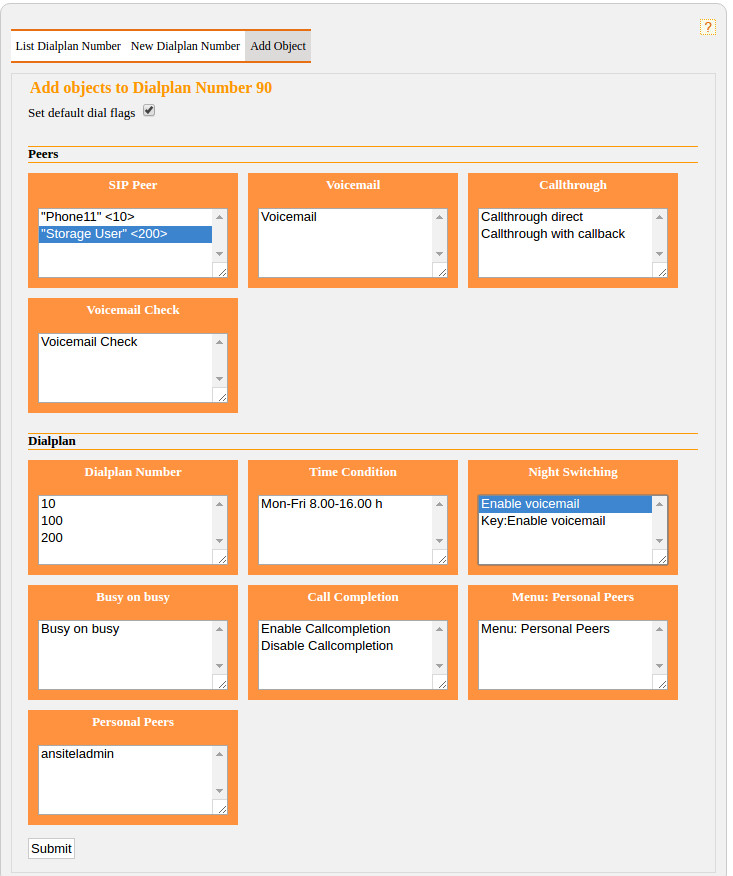
Figure: Night switching used in dialplan sequences
Additionally create a dialplan number 91 and add the night switching key.

Figure: Night switching key used in dialplan
Add the key "91" as blf on phone. Press this key once the night switching is enabled. If press twice it is disabled. The led indicates the status too.
The night switching key can be used as blf on multiple phones.

Figure: Night switching key on phone
2.5.17 Trunks
Trunks / Lines are connections to the public telephone network. The ansitel 3.0 telephone system supports lines of different technologies. These include:
- SIP trunks: Lines over your internet connection (VoIP provider e.g. ansitline, VoIP-gateways).
- IAX2 trunks: Lines over your internet connection (ansitel connection, VoIP provider, VoIP gateways)
- ISDN lines: Lines over your telephone connection (through ISDN expansion card)
- Analogue based lines: Lines over you telephone connection (trough analogue expansion card)
In the ansitel web interface, trunks can be set up easily in the main menu "Routes".
Apart from the protocols and trunk names you can also see the line type in the overview.

Figure: Trunks / Lines
In this view, you can create, edit and delete all different lines of the technologies.
2.5.17.1 SIP trunks
To access the ansitel telephone system over the SIP trunks, you can log on to the SIP-based lines (e.g. VoIP providers and VoIP gateways).
The access data for the SIP lines are to be retrieved from the VoIP-provider after registration.
New SIP trunks
To create a new SIP trunk, first select a template that suits your provider. The templates ask only the most important parameters to your VoIP provider. This will help you make the installation go as quickly as possible. In case your VoIP provider is not included in the template list, you can choose the option "Custom" to choose all the parameters required to be queried.
The following templates are provided:
ansitlineSingle
ansitlineSingle is a VoIP telephone connection from ansit-com, suitable for small companies and private use. It contains one DID number and one voice channel.
Enter a unique provider name. The data for this extension, password and phone number you will receive after registration by ansitline. The phone number has to meet the following format 0049XXXXXXX (e.g. 0049123456789). This phone number is used as sender number in case the peer does not contain a external caller Id entry (peers↑).
Enter the area code of this trunk to dial without area code. It will be added automatically.
On the right side you can find the direct links of information about the ansitlineSingle connection and your login page by ansitline.
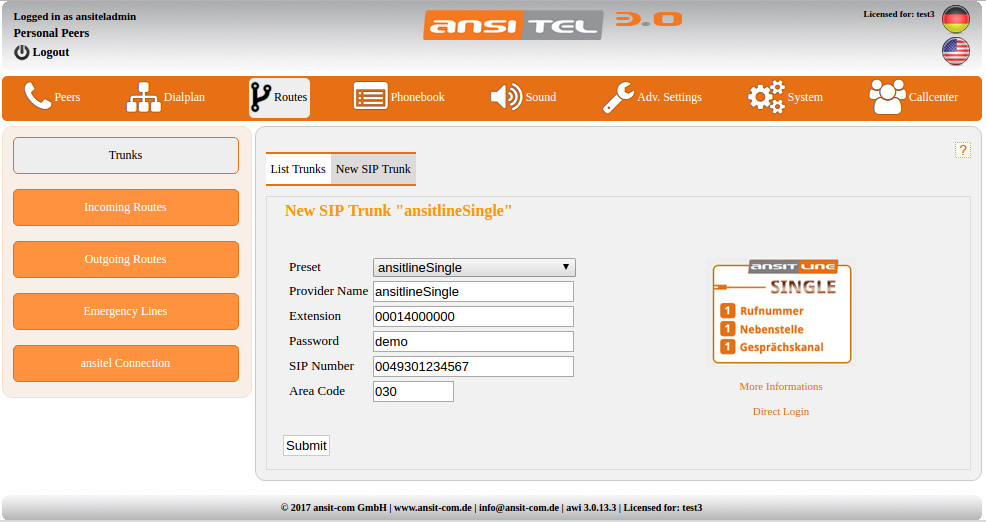
Figure: ansitlineSingle
ansitlineSmallBusiness
ansitlineSmallBusiness is a VoIP telephone connection from ansit-com, specialized for small companies. It contains 3 DID numbers and 6 voice channels.
Enter a unique provider name. The data for this extension, password and phone number you will receive after registration by ansitline. The phone number has to meet the following format 0049XXXXXXX (e.g. 0049123456789). This phone number is used as sender number in case the peer does not contain a external caller Id entry (peers↑).
Enter the area code of this trunk to dial without area code. It will be added automatically.
On the right side you can find the direct links of information about the ansitlineSingle connection and your login page by ansitline.

Figure: ansitlineSmallBusiness
ansitlineTrunk
ansitlineTrunk is a VoIP telephone connection of ansit-com, specialize for clients who need at least 10 phone numbers. It contains 10 DID numbers and 10 voice channels.
Enter a unique provider name. The data for this extension, password and phone number you will receive after registration by ansitline. The phone number has to meet the following format 0049XXXXXXX (e.g. 0049123456789). This phone number is used as sender number in case the peer does not contain a external caller Id entry (peers↑).
Enter the area code of this trunk to dial without area code. It will be added automatically.
On the right side you can find the direct links of information about the ansitlineSingle connection and your login page by ansitline.
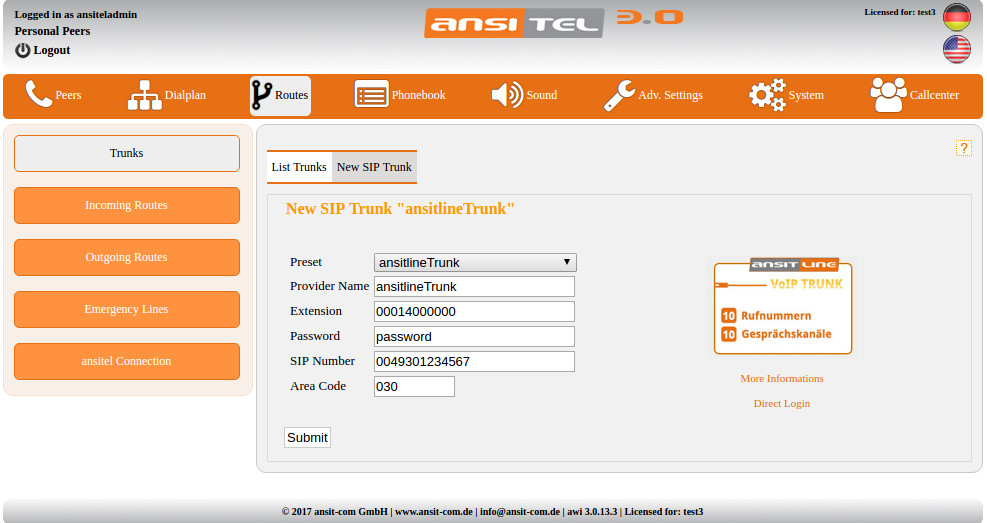
Figure: ansitlineTrunk
ansitline Flat
Enter a unique provider name. The data for this extension, password and phone number you will receive after registration by ansitline. The phone number has to meet the following format +49XXXXXXX (e.g. +49123456789). This phone number is used as sender number in case the peer does not contain a external caller Id entry (peers↑).
Enter the area code of this trunk to dial without area code. It will be added automatically.
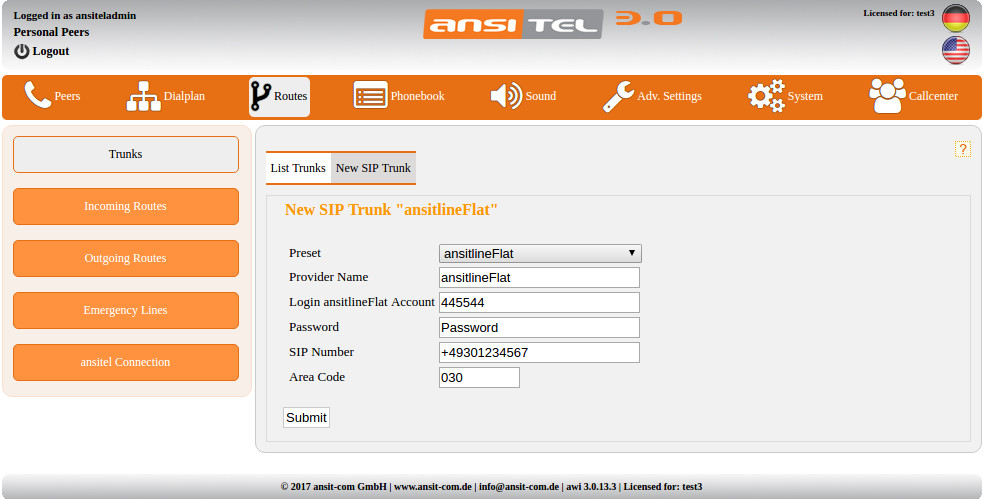
Figure: ansitline Flat
ansitline IP
ansitlineIP is a VoIP telephone connection from ansit-com. The big difference with ansitlineSingle, ansitlineSmallBusiness and ansitlineTrunk is that the authentication to the VoIP provider is not going over username and password but over the external IP address.
Enter a unique provider name. The data for this extension, password and phone number you will receive after registration by ansitline. The phone number has to meet the following format 0049XXXXXXX (e.g. 0049123456789). This phone number is used as sender number in case the peer does not contain a external caller Id entry (peers↑).
Enter the area code of this trunk to dial without area code. It will be added automatically.
Sipbase
Sipbase is a VoIP telephone connection of the company Reventix.
Enter a unique provider name. The data for this extension, password and phone number you will receive after registration by Reventix. The phone number has to meet the following format 0049XXXXXXX (e.g. 0049123456789). This phone number is used as sender number in case the peer does not contain a external caller Id entry (peers↑).
Enter the area code of this trunk to dial without area code. It will be added automatically.
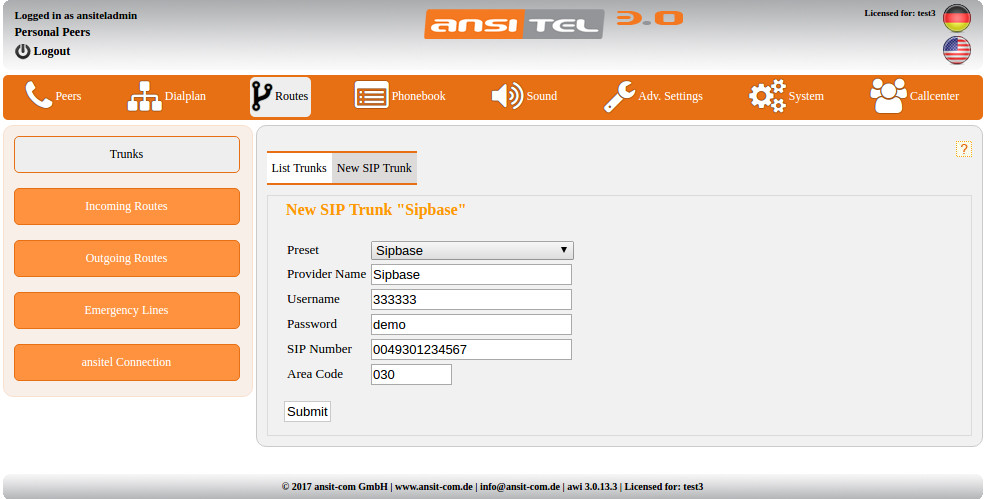
Figure: Sipbase
SipbaseIP
SipbaseIP is a VoIP telephone connection from reventix. The big difference to Sipbase is that the authentication to the VoIP provider is not going over username and password but over the external IP address.
Enter a unique provider name. The data for this extension, password and phone number you will receive after registration by Reventix. The phone number has to meet the following format 0049XXXXXXX (e.g. 0049123456789). This phone number is used as sender number in case the peer does not contain a external caller Id entry (peers↑).
Enter the area code of this trunk to dial without area code. It will be added automatically.
Sipgate
Enter a unique provider name. The data for this extension, password and phone number you will receive after registration by Sipgate. The phone number has to meet the following format 49XXXXXXX (e.g. 49123456789). This phone number is used as sender number in case the peer does not contain a external caller Id entry (peers↑).
Enter the area code of this trunk to dial without area code. It will be added automatically.
Use the SIPID in incoming routes to recognise the incoming calls.
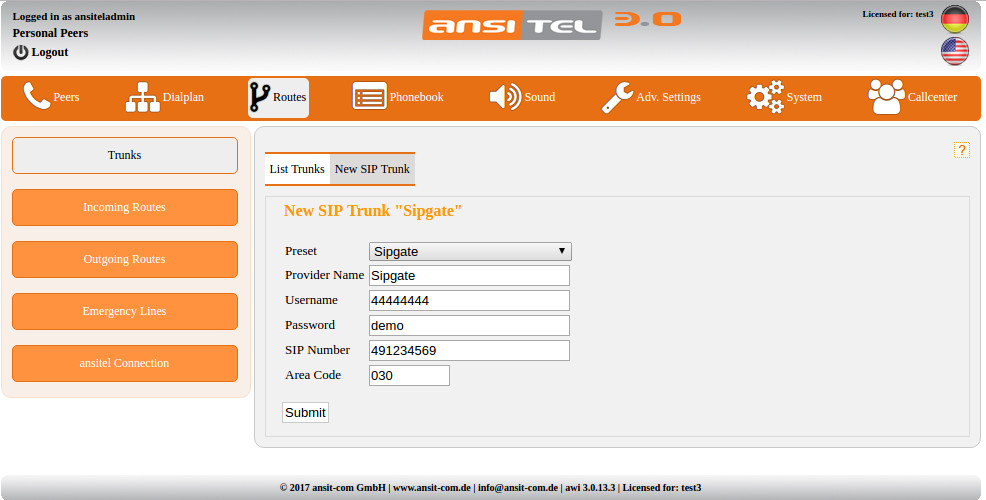
Figure: Sipgate
SipgateTrunk
Enter a unique provider name. The data for this extension, password and phone number you will receive after registration by Sipgate. The phone number has to meet the following format 49XXXXXXX (e.g. 49123456789). This phone number is used as sender number in case the peer does not contain a external caller Id entry (peers↑).
Enter the area code of this trunk to dial without area code. It will be added automatically.

Figure: SipgateTrunk
PBXNetwork
Enter a unique provider name. The data for this extension, password and phone number you will receive after registration by PBXNetwork. The phone number has to meet the following format 49XXXXXXX (e.g. 49123456789). This phone number is used as sender number in case the peer does not contain a external caller Id entry (peers↑).
Enter the area code of this trunk to dial without area code. It will be added automatically.
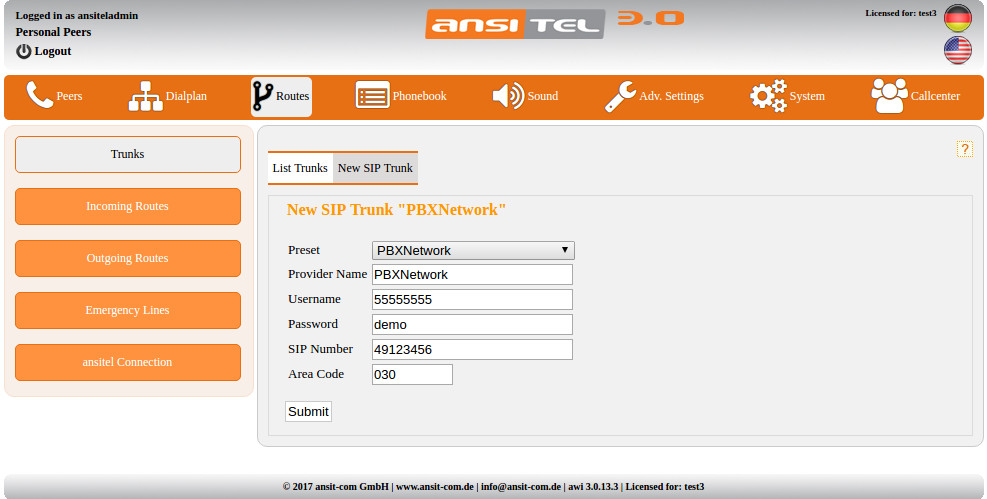
Figure: PBXNetwork
Versatel
Enter a unique provider name. The data for this extension, password, gateway and phone number you will receive after registration by Versatel. The phone number has to meet the following format 0049XXXXXXX (e.g. 0049123456789). This phone number is used as sender number in case the peer does not contain a external caller Id entry (peers↑).
Enter the area code of this trunk to dial without area code. It will be added automatically.
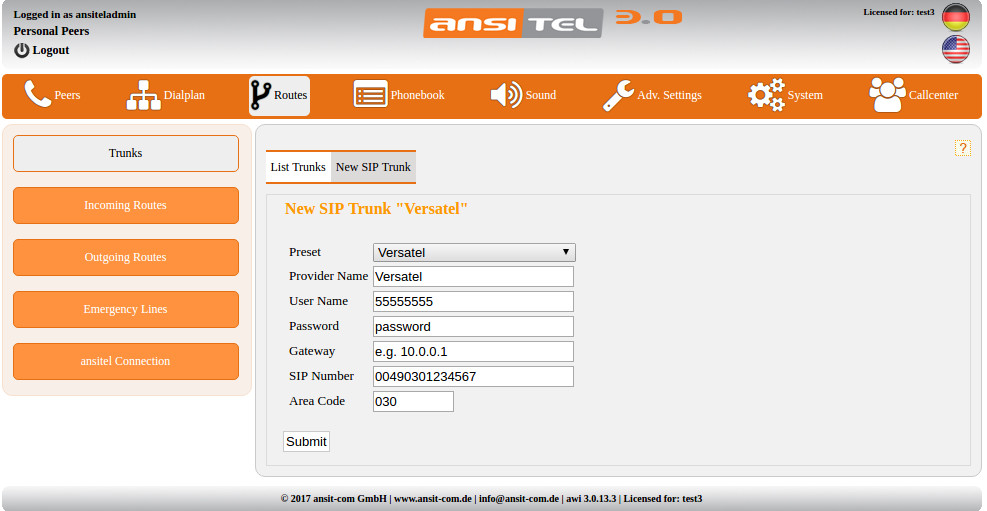
Figure: Versatel
Colt
Enter a unique provider name. The data for this extension, password, ip address / domain and phone number you will receive after registration by Colt. The phone number has to meet the following format +49XXXXXXX (e.g. +49123456789). This phone number is used as sender number in case the peer does not contain a external caller Id entry (peers↑).
Enter the area code of this trunk to dial without area code. It will be added automatically.
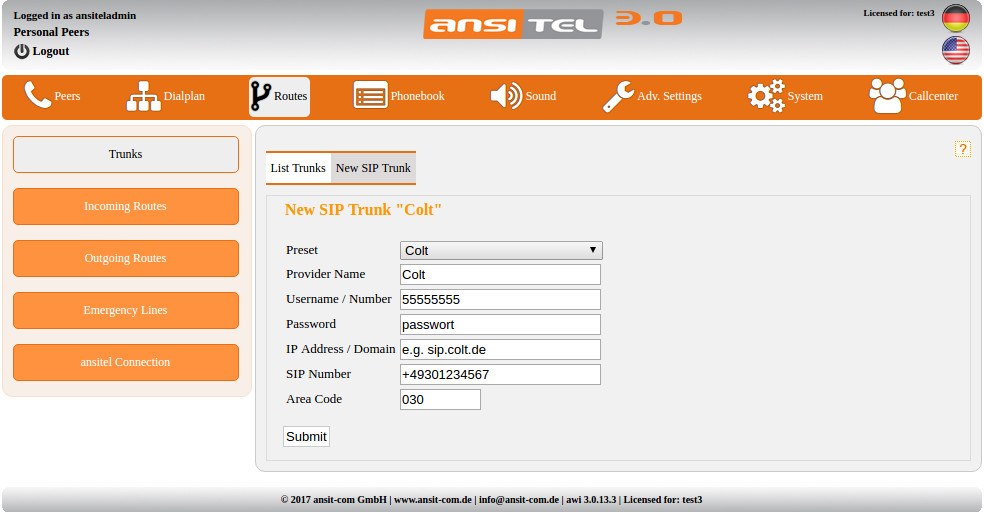
Figure: Colt
didlogic
Enter a unique provider name. The data for this extension, password and phone number you will receive after registration by didlogic. The phone number has to meet the following format 44XXXXXXX (e.g. 44123456789). This phone number is used as sender number in case the peer does not contain a external caller Id entry (peers↑).
Enter the area code of this trunk to dial without area code. It will be added automatically.

Figure: didlogic
QSC IPfonie extended (SIP-DDI)
Enter a unique provider name. The data for this extension, password and phone number you will receive after registration by QSC. After selection of number block size (10, 100 or 1000) enter the numbers based on following scheme:
- number block size 10: "X" (e.g. 030111111111X, X equals digits 0-9)
- number block size 100: "XX" (z.B. 030111111111XX, XX equals digits 00-99)
- number block size 1000: "XXX" (z.B. 030111111111XXX, XXX equals digits 000-999)
To enter more number blocks edit this trunk again.
The callerid has to be set in the peer↑ module with format 030XXXXXXXX.
Enter the area code of this trunk to dial without area code. It will be added automatically.
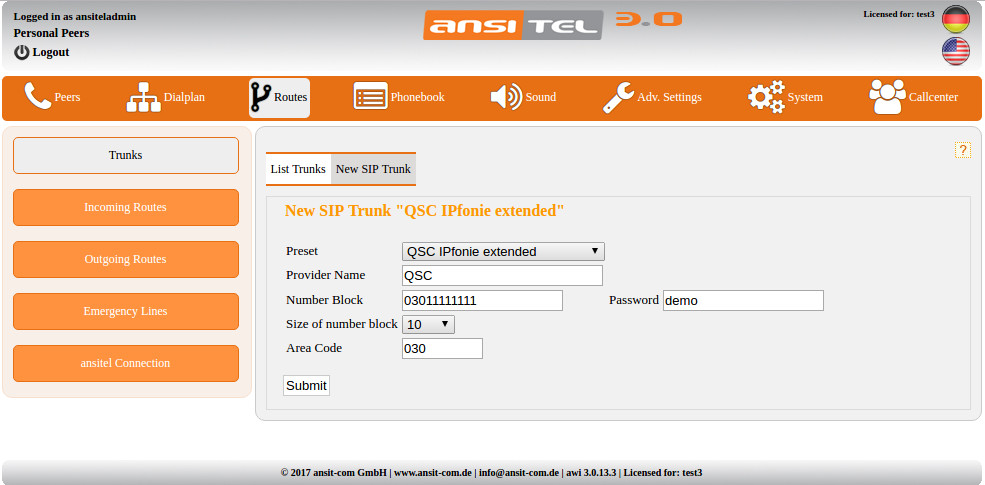
Figure: QSC IPfonie extended (SIP-DDI)
QSC IPfonie extended connect
Enter a unique provider name. The data for this extension, password and phone number you will receive after registration by QSC. The phone number has to meet the following format +49XXXXXXX (e.g. +49123456789). This phone number is used as sender number in case the peer does not contain a external caller Id entry (peers↑).
Enter the area code of this trunk to dial without area code. It will be added automatically.
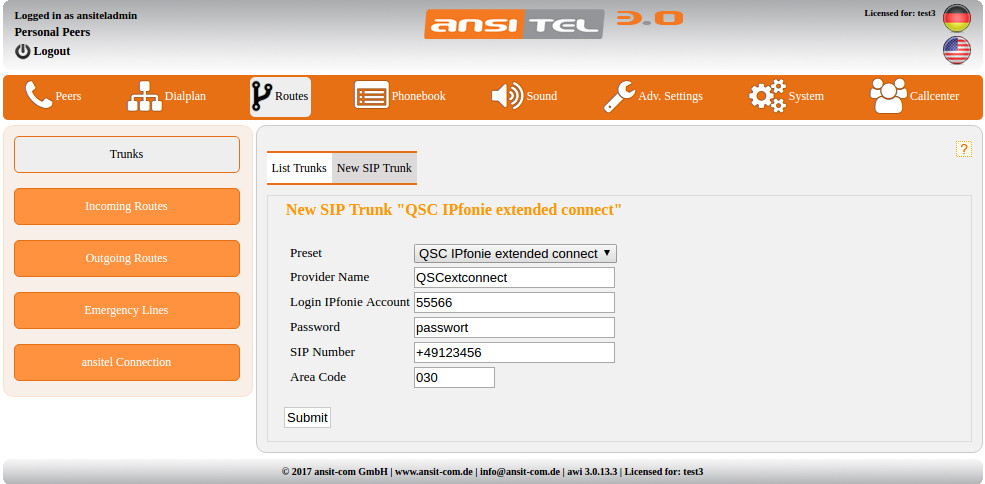
Figure: QSC IPfonie extended connect
Deutsche Telekom All-IP
Enter a unique provider name and select the desired authentication mode. Following modes are possible:
- Authentication by number and password (default)
- Email authentication: Enter your Telekom email address.
- Anonymous authentication
Use the number format +4930123456.
To enter more numbers edit this trunk again.
The callerid for this trunk has to be set in peer module (peers↑).
Enter the area code of this trunk to dial without area code. It will be added automatically.
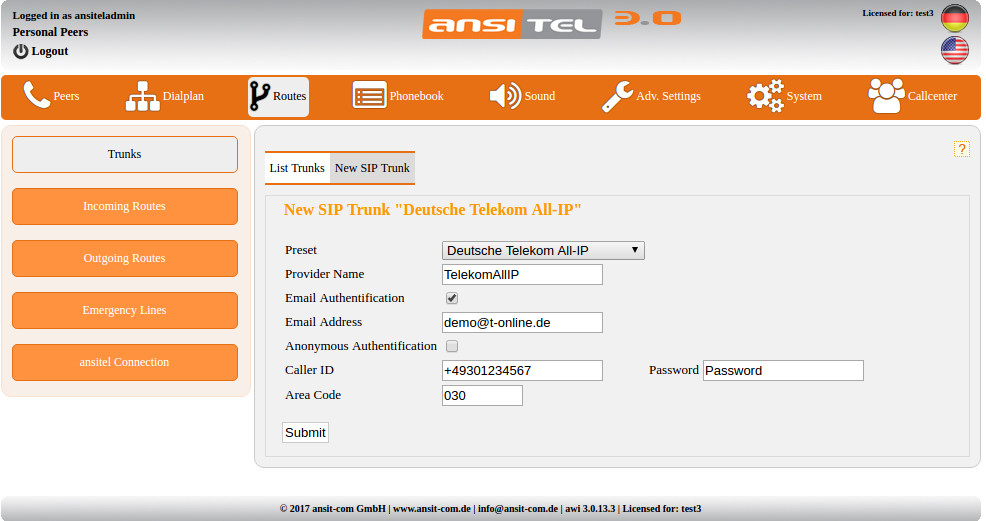
Figure: Telekom All-IP
1und1
Enter a unique provider name and the did number with password.
The number has to set in format 030XXXXXXXX (e.g.: 0301234567).
To enter more numbers edit this trunk again.
The callerid for this trunk has to be set in peer module (peers↑).
Attention: This trunk needs to setup an external ip address or domain in (default settings↓) module.
Enter the area code of this trunk to dial without area code. It will be added automatically.
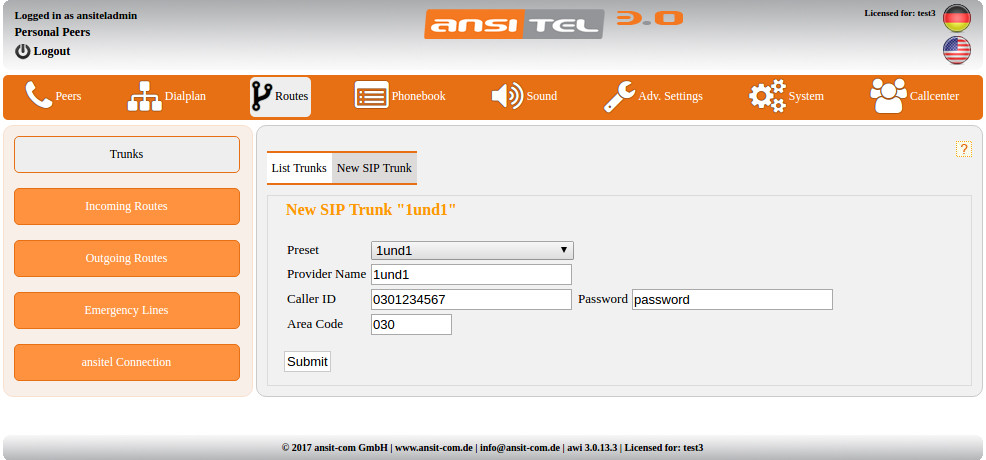
Figure: 1und1
easybell
Enter a unique provider name and the did number with password.
The number has to set in format given by easybell.
To enter more numbers edit this trunk again.
The callerid for this trunk has to be set in peer module (peers↑).
Enter the area code of this trunk to dial without area code. It will be added automatically.

Figure: easybell
Fritz!Box
This preset realizes the easy configuration of Fritzboxes as SIP trunk. Define a sip account in fritzbox (Menü Telefonie > Telefoniegeräte) first.
Enter an individualprovidername and the data of the sip account definded in frizbox.
Enter the area code of this trunk to dial without area code. It will be added automatically.
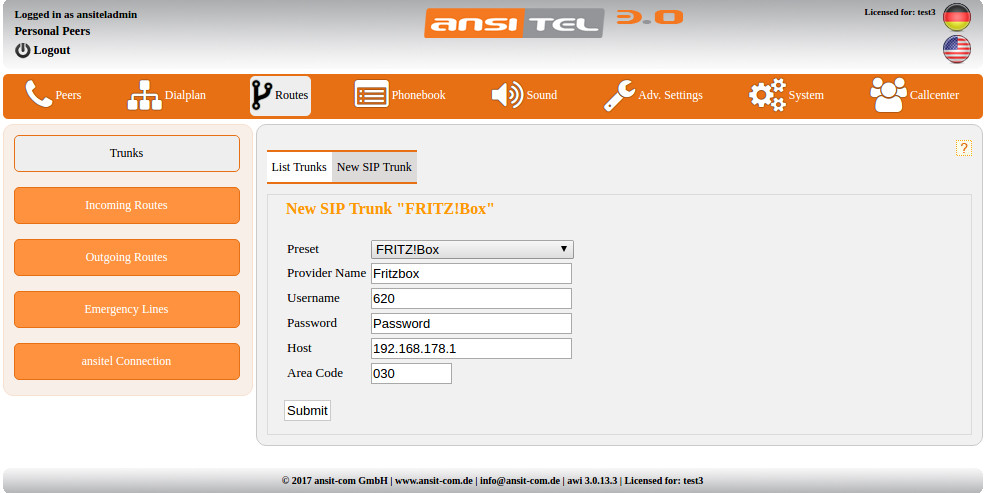
Figure: Fritz!Box
Custom
This contains a VoIP connection that has one phone number. If your provider is not provided in the template, you can also register them to the ansitel telephone system. For this you need the information of registering of a Asterisk based telephone system with your VoIP provider.
Following entries are possible:
- Provider Name: Unique name for this provider.
- Username: You get this user name from your VoIP provider.
- Password: You get this password from your VoIP provider.
- Host: IP address / domain from your provider.
- FromDomain: IP address / domain from your provider.
- FromUser: Usually the same username (see above).
- Registration: The telephone system will register on your VoIP provider with this string. Format: "<username>:<password>@<domain/ip address of the provider>/<username>". For example: 33333:demo@demo-sip-provider.de/33333
- Dial String: The dial string defines what is to be selected for the outgoing calls from this VoIP provider. The variable "::exten::" is a place holder for dialed numbers. Format of the dial string "SIP/::exten::@<provider name>" For example: sip/::exten::@custom
- Format of number: First digits of number (e.g. 0049 ansitline).
- SIP number: The DID number and its format are retrieved by your VoIP provider. This phone number is also used as caller ID in case the peer does not have a caller ID set in peer module (peers↑).
- Area Code: Enter the area code of this trunk to dial without area code. It will be added automatically.
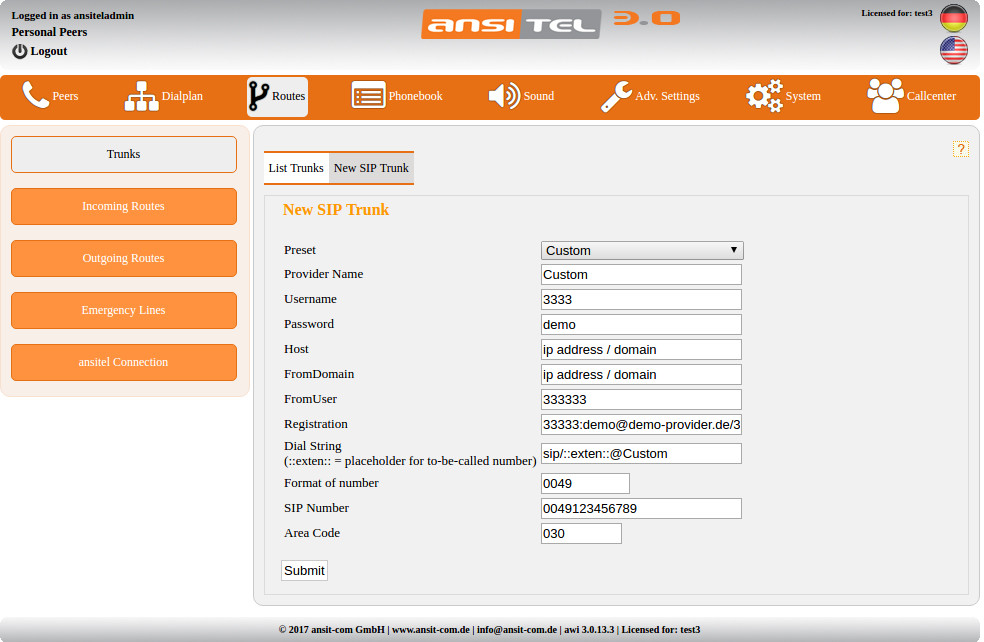
Figure: Custom VoIP provider
Custom SIP-Trunk
This is a VoIP connection with multiple phone numbers. If your provider is not included in the templates you can register it to the ansitel telephone system. To do this you need the information for registering an Asterisk based telephone system with your VoIP provider.
Following entries are possible:
- Provider Name: Unique name for this provider.
- User name: You get this user name from your VoIP provider.
- Password: You get this password from your VoIP provider.
- Host: IP address / domain from your provider.
- FromDomain: IP address / domain from your provider.
- Insecure: Asterisk specified parameter, default value: invite, possible values: invite, port, both, no
- Canreinvite: Asterisk specific parameter, default value: no, possible values: yes, no
- Registration: The telephone system will register on your VoIP provider with this string. Format: "<username>:<password>@<domain/ip address of the provider>/<username>". For example: 33333:demo@demo-sip-provider.de/33333
- Dial String: The dial string defines what is to be selected for the outgoing calls from this VoIP provider. The variable "::exten::" is a place holder for dialed numbers. Format of the dial string "SIP/::exten::@<provider name>" For example: sip/::exten::@CustomTrunk
- Inbound DID number in header: On incoming calls, the called phone numbers are send by the VoIP provider in SIP headers. The telephone system recognise to phone numbers in this header. Choose the appropriate SIP header which is provided by your VoIP provider. Possible values: Remote-Rarty-ID, P-Preferred-Identity, P-Called-Party-ID, TO, DNID, direct
- • CallerID in header: On outgoing calls, the caller id number from the ansitel telephone system gets packed in the SIP header and send to the VoIP provider. Choose the appropriate SIP header which is provided by your VoIP provider. Possible values: P-Preferred-Identity, P-Asserted-Identity, Remote-Party-ID, From, From + P-Preferred-Identity, From + P-Asserted-Identity, From + Remote-Party-ID
- Format of number: First digits of number (e.g. 0049 ansitline).
- SIP number: The DID number and its format are retrieved by your VoIP provider. This phone number is also used as caller ID in case the peer does not have a caller ID set in peer module (peers↑).
- Area Code: Enter the area code of this trunk to dial without area code. It will be added automatically.
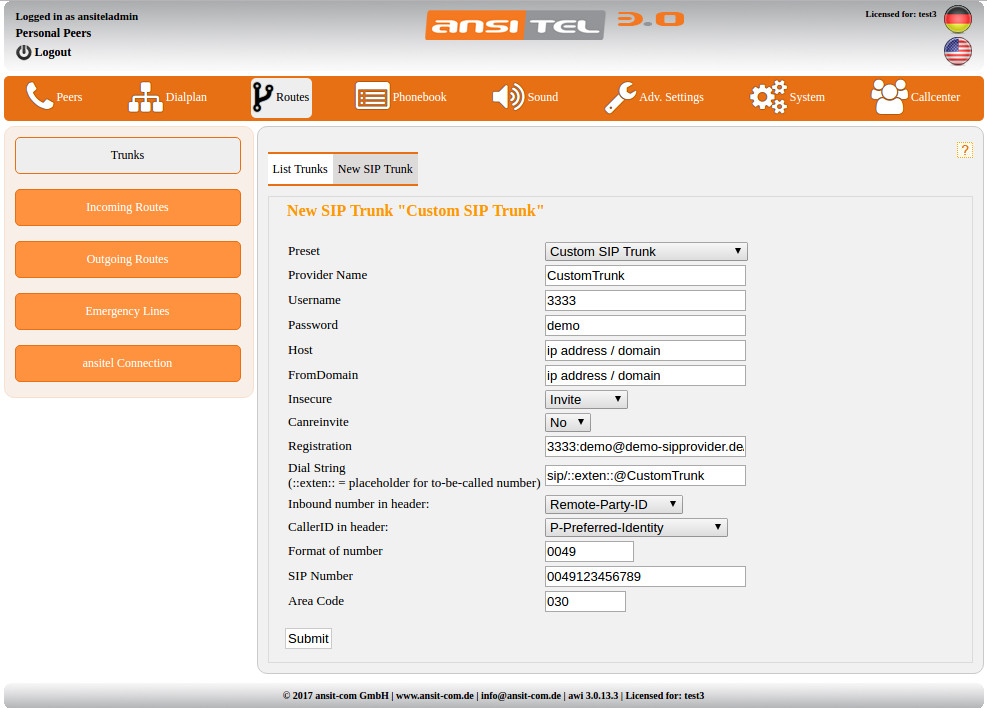
Figure: Custom SIP trunk
Edit SIP trunks
To edit the SIP trunk, click on the corresponding symbol under action in the overview.
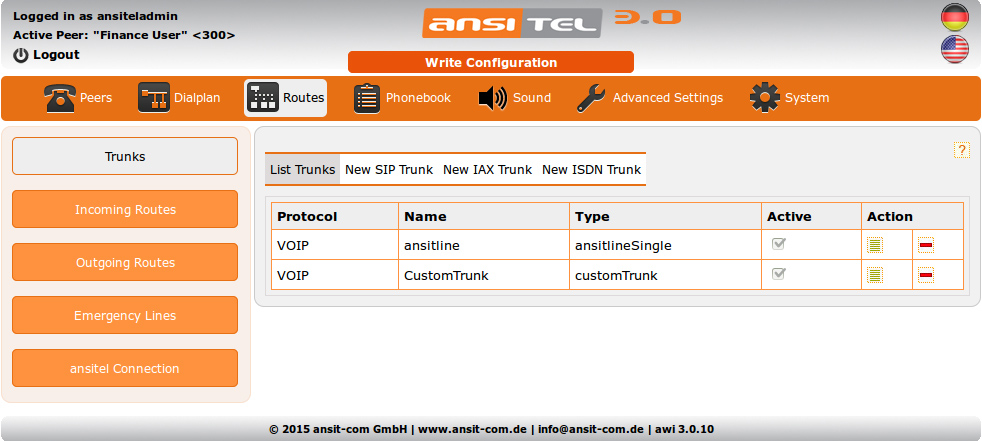
Figure: Overview of SIP trunks
All provider fields can be edited analogous to above.
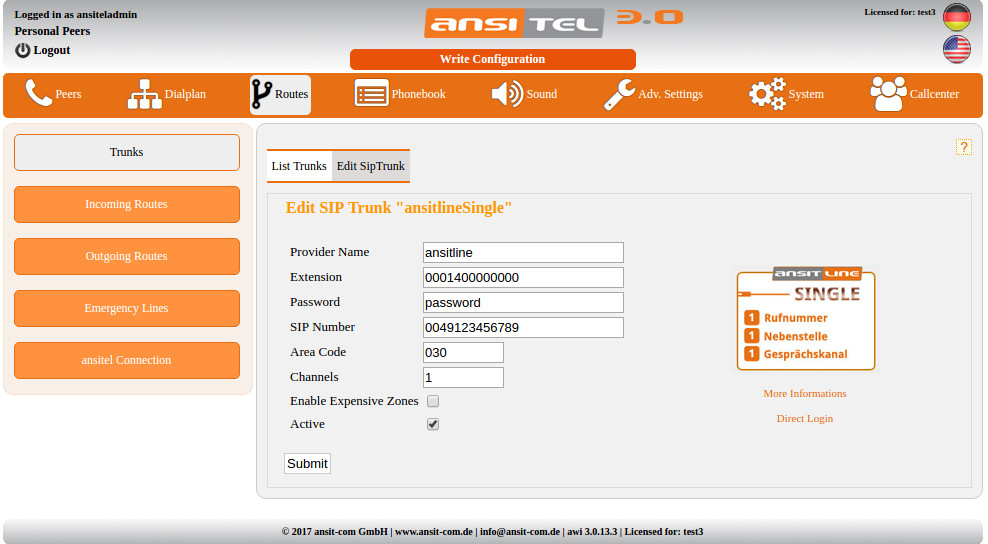
Figure: Edit SIP trunks
The field Channels is only visible when editing the trunk. It is used for the maximum workload and limitation of parallel speech channels. Please enter the amount of your channels provided by your voip provider. The maximum workload of the trunks is shown in module statistics↓).
The field Enable Expensive Zones is only visible when editing the trunk. It realizes a secure feature to prevent expensive calls to overseas. If you want to call to overseas, enable this feature.
All trunks can be enabled or disabled by "Active" option.
2.5.17.4 IAX trunks
In IAX trunks it is about credentials which can be used to log on the ansitel telephone system to the IAX based trunk (e.g. VoIP provider and VoIP gateway).
You retrieve the access data for the IAX trunk from the desired VoIP provider after you have registered with them.
Create and edit IAX trunks
To create a new IAX trunk click on "New IAX Trunk". Doing this the following parameters will be asked:
- Provider Name: Unique name for this provider.
- Username: You get this user name from your VoIP provider.
- Password: You get this user name from your VoIP provider.
- Host: IP address / domain from you provider.
- FromDomain: IP address / domain from you provider.
- FromUser: Usually the same user name (see above)
- Registration: The telephone system will register on your VoIP provider with this string. Format: "<username>:<password>@<domain/ip address of the provider>". For example: 22222:demo@iax-provider.de
- Dial String: The dial string defines what is to be selected for the outgoing calls from this VoIP provider. The variable "::exten::" is a place holder for dialed numbers. Format of the dial string "IAX2/::exten::@<provider name>" For example: IAX2/::exten::@IAXProvider
- IAX number: The DID number and its format are retrieved by your VoIP provider. This phone number is also used as caller ID in case the peer does not have a caller ID set in peer module (peers↑).
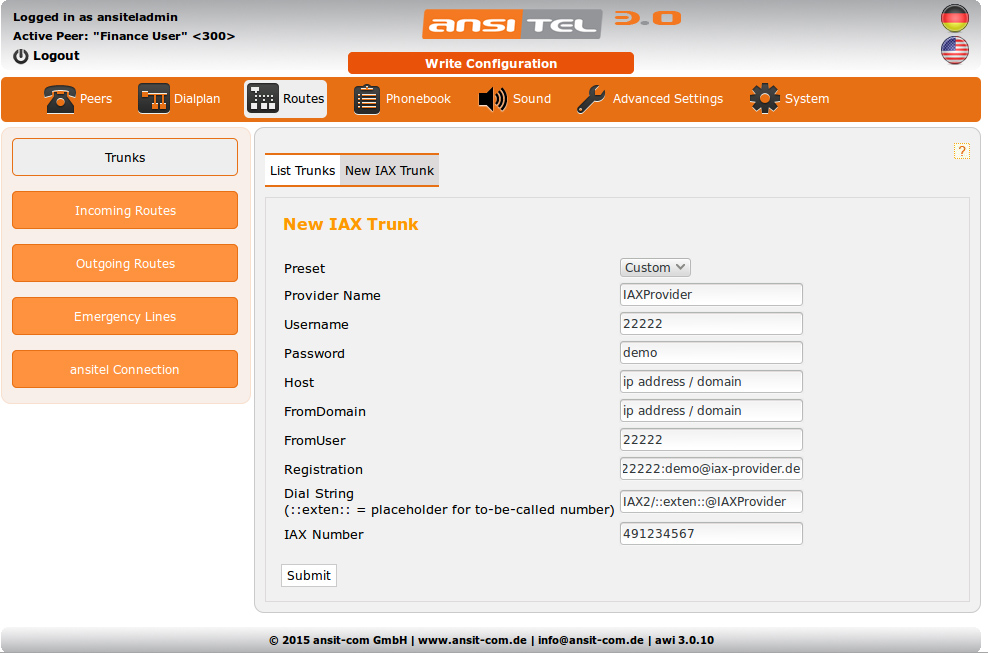
Figure: Create and edit IAX trunks
2.5.17.6 ISDN / analogue trunk
With ISDN / analogue trunk it is about the telephone connection at your company location. The ansitel telephone system contains multiple ISDN or analogue expansion card(s) (Expanson cards↑) depending on the delivery configuration. These cards are used to connect to pstn lines. The expansion cards get configured to the client wishes by ansit-com. Therefore, the expansion card is already configured in web interface at delivery. For all configuration in this area, please contact your ansit-com team.
Create and edit ISDN / analogue trunks
To create a new ISDN / analogue line, please click "New ISDN Trunk" in the overview.
First choose a template that matches the driver for the integrated ISDN / analogue expansion card.
The following templates are selectable:
dahdi/zaptel
dahdi (formerly known as zaptel) is the standard driver used with the expansion cards in the ansitel telephone system (in-house version).
Please enter a name for this line.
ansit-com pre-configures your expansion cards and places a data sheet with your telephone system on which the configuration (ports and channels) is described. It is possible to address only a single channel or a channel group of the expansion card.
Depending on the configuration and number of ports on your expansion card, you specify a group or channel.
If it is an ISDN point-to-point connection, select the "Point-to-Point" box. In the field Caller ID, enter the phone number (without local and national prefix) of your ISDN system connection. If the peers↑ of your ansitel telephone system contain a callerid that fits the telephone number block, the senders callerid will be a combination of number block and peer number.
In case a ISDN multipoint connection exists, select the "Point-To-Multipoint" box. In the field Caller ID, enter the phone number of your ISDN multipoint connection (without local and national prefix).This phone number is used when the peer does not have an entry for the external caller Id.
Figure: dahdi driver
misdn
misdn is a driver for Asterisk based expansion cards that can be used in the ansitel telephone system (inhouse version).
Please enter a name for this line.
ansit-com pre-configures your expansion cards and places a data sheet with your telephone system on which the configuration (ports and channels) is described. It is possible to address only a single channel or a channel group of the expansion card.
Depending on the configuration and number of ports on your expansion card, you specify a group or channel.
If it is an ISDN point-to-point connection, select the "Point-to-Point" box. In the field Caller ID, enter the phone number (without local and national prefix) of your ISDN system connection. If the peers↑ of your ansitel telephone system contain a Caller ID that fits the telephone number block, the senders caller ID will be a combination of number block and peer number.
In case a ISDN multipoint connection exists, select the "Point-To-Multipoint" box. In the field Caller ID, enter the phone number of your ISDN multipoint connection (without local and national prefix).This phone number is used when the peer does not have an entry for the external caller Id.
Figure: misdn driver
custom
The ansitel telephone system supports all Asterisk based expansion cards. In case an expansion card with other drivers is installed, please choose "Custom".
Enter a name for this line.
ansit-com pre-configures your expansion cards and places a data sheet with your telephone system on which the configuration (group and channels) is described. It is possible to address only a single port or a port group of the expansion card.
Depending on the configuration and number of ports on your expansion card, you specify a dial string in following format: “<driver>/<group or channel>/::exten::”.
If it is an ISDN point-to-point connection, select the "Point-to-Point" box. In the field Caller ID, enter the phone number (without local and national prefix) of your ISDN system connection. If the peers peers↑ of your ansitel telephone system contain a Caller ID that fits the telephone number block, the senders caller ID will be a combination of number block and peer number.
In case a ISDN multipoint connection exists, select the "Point-To-Multipoint" box. In the field Caller ID, enter the phone number of your ISDN multipoint connection (without local and national prefix).This phone number is used when the peer does not have an entry for the external caller Id.
Figure: Custom driver
The field Channels is only visible when editing the trunk. It is used for the maximum workload and limitation of parallel speech channels. Please enter the amount of your channels provided by your voip provider. The maximum workload of the trunks is shown in module statistics↓).
2.5.18 Incoming routes
Incoming routes are phone numbers (DID) that ansitel telephone system recognises and forwards to the dialplan. The format of the incoming phone numbers depends on the respective line / trunk (trunk↑) and should be entered like that.
Create and edit Incoming Routes
To create an incoming route, choose "New Incoming Route" in the overview.
Following fields have to be filled out:
- Caller ID Prefix: If outgoing routes (outgoing routes↓) are defined with prefix, the incoming sender phone number (callerid) can be set the selected prefix in front. With this you can see on the peer / phone over which line / trunk the calls come in and can be called back right over this line, unless the call is missed.
- Incoming Route Number: Enter the incoming phone number (DID) in the following format. (for example: ansitline 004930XXXXXXXX, Sipgate 4930XXXXXXXX, ISDN XXXXXXXXX without prefix)
- Dialplan Number: Choose the desired dialplan number, that has to be redirected to, when a call of this incoming phone number arrives.
- Record calls: If call recordung is needed on this number enable this option.
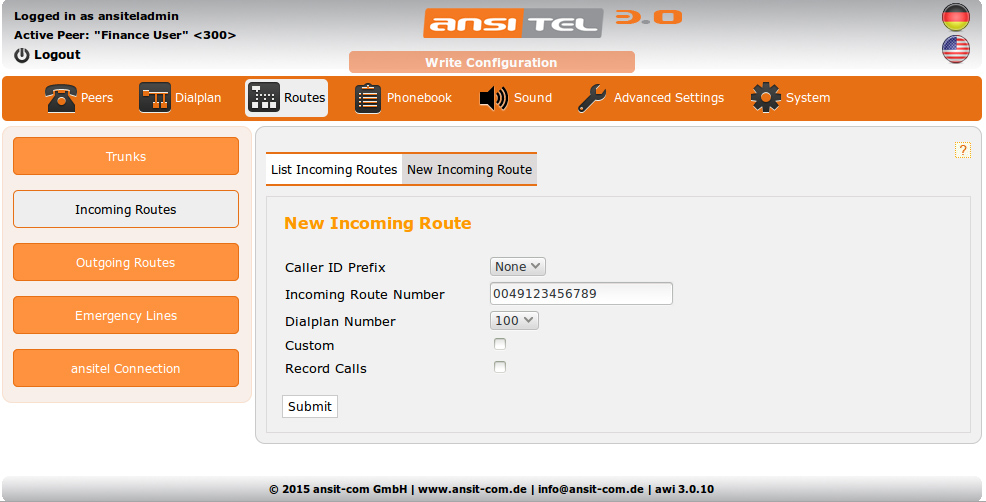
Figure: Incoming route
- Pattern matching: You can use pattern matching to define multiple incoming phone numbers (DID) and dialplan numbers with one entry. For incoming phone numbers:
- "X" recognizes each number from 0 to 9
- "." recognizes one or multiple characters and digits
- e.g. Incoming phone number 1234XXX recognizes all phone numbers between 1234000 to 1234999
- Custom: For dialplan numbers, a placeholder (${EXTEN}) for incoming phone numbers can be used. To select multiple dialplan numbers, the first numbers of the placeholder have to be cut off. This is achieved by defining the number of digits in the placeholder (e.g. ${EXTEN:4}) e.g. incoming phone number: 1234XXX, wildcard to select multiple dial plan numbers: ${EXTEN:4} like this, the first 4 characters get cut off and the dialplan number 000 to 999 gets selected.
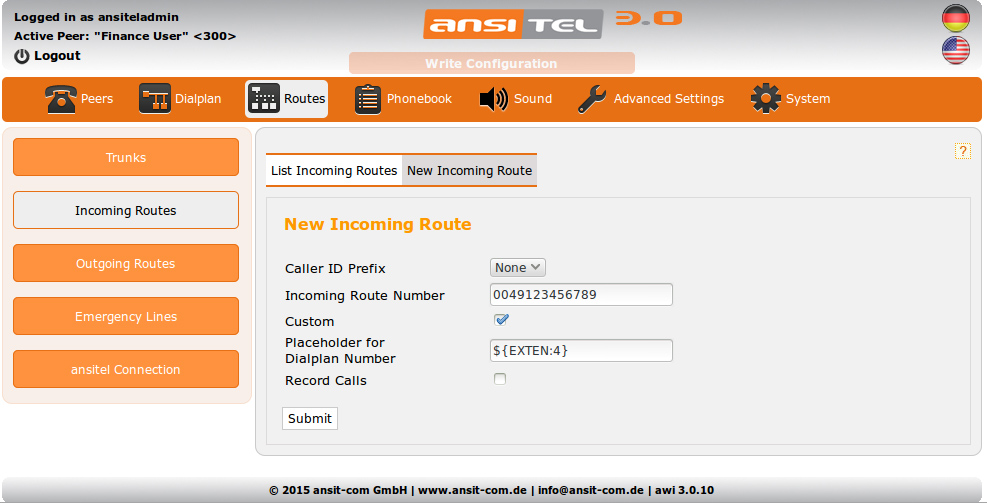
Figure: Pattern matching on incoming routes
2.5.19 Outgoing routes
Because peers at ansitel pbx are able to call to the lines/trunks, outgoing routes have to be created.
Outgoing routes contain one or multiple lines. Like that, fall-back scenarios are possible. For example a ISDN connection and a VoIP line over the internet, like this we can fall back on our ISDN line if the internet line would fail.
Multiple outgoing routes are divided by different prefixes. The settings of the outgoing routes are configurable in the ansitel web interface under the tab “Routes”.
Create outgoing routes
To create outgoing routes, click on "New Outgoing Route".
Provide a name and choose if you want a prefix (0 to 9) or none for this route. In case multiple outgoing routes are created the entry of prefixes per route is mandatory. By dialing prefixes mulitple outgoing routes can be distinguished.
If it is required to record the calls of this outgoing routes, please activate the option "Record Calls".

Figure: Create outgoing route
Add trunks
To add a trunk, click on the green plus button in the overview.
Select the desired trunk to add to the outgoing route.
Information about the option "Set default dial flags" can be found in the section dial flags↓.
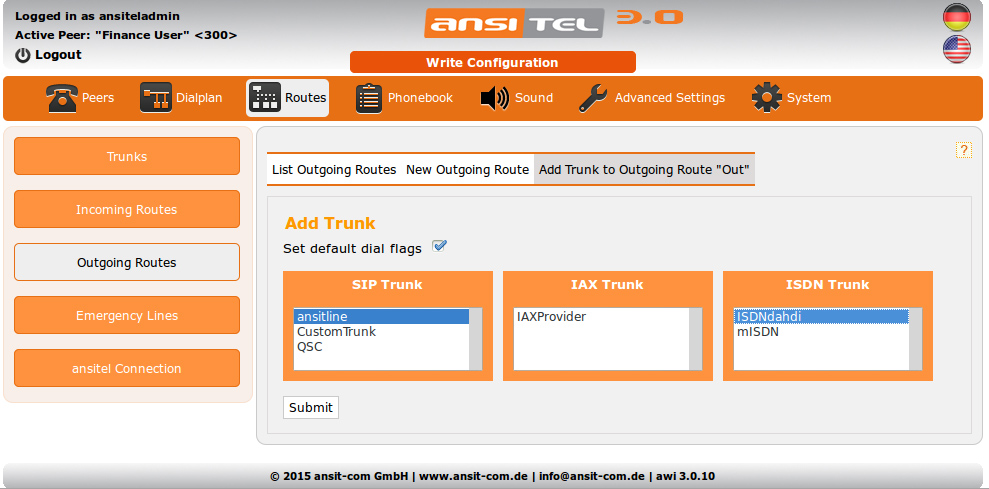
Figure: Add trunk to outgoing route
After submitting the lines of the routes will be added and it will open the edit page of the outgoing route.
Edit outgoing route
On this page, you can edit the name, prefix and option "Record Calls".
If multiple lines are added the order, the ring time and the dial option of each line can be customized.
In the following example "Out" route contains two trunks (ansitline and ISDNdahdi). When a peer do a call over this route , the trunk "ansitline" will be called for 60 seconds first. Only when this trunk is busy or the ring time expires, the trunk "ISDNdahdi" is called for 60 seconds. Afterwards an busy tone will be played.
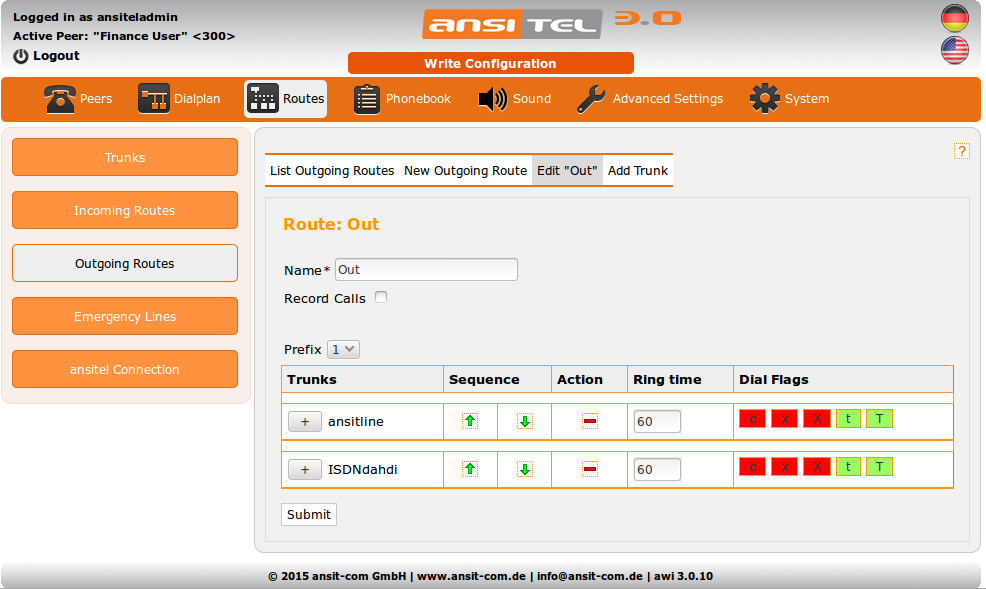
Figure: Edit outgoing route
Additionally it is possible to add special instructions in front of the lines (in Asterisk syntax). To do so, click on the plus sign at the beginning of the trunk line. This will open an empty input field. With this box e.g. the sender can be permanently assigned his callerid for each call via this line, superior to the peer modules (peers↑) or trunks (trunks↑). In this example, the trunk "ansitline" sends the caller ID "00491234567” (Asterisk-Syntax: SET(CALLERID(num)=00491234567)) the trunk “ISDNdahdi” sends the caller ID “1234567” (Asterisk-Syntax: SET(CALLERID(num)=1234567)).
Overview of outgoing routes
In the overview, all outgoing routes are shown together with names, containing trunks/lines (incl. order) and prefixes if existing.
Figure: Overview of outgoing routes
2.5.20 Emergency Lines
Emergency Lines are very important, it have priority to any other call in the ansitel 3.0 system.
Doesn't matter if it ist used with or without prefix. The emergency line can be called in every situation. Emergency line get set and managed in the ansitel web interface under “Routes” menu.
Overview of the emergency lines
The german emergency lines (110 and 112) are already included in the telephone system.
Attention: It is not possible to define an emergency line as dialplan or peer number.
Figure: Overview of the emergency numbers
Create and edit emergency lines
You can add further emergency lines by entering a name and a phone number. Analogue it is possible to edit these emergency lines.
Figure: Create and edit emergency lines
2.5.21 ansitel connection
Many companies have next to their headquarters, multiple smaller offices that are telephonically in contact with each other. If these locations are provided of ansitel telephone systems, these phone systems can be connected together.
The calls between the different telephone systems are free, like this the cost of internal communication between the offices can be reduced severely. Location-based flat rates, can be used by phones at the remote ansitel systems.
Create and edit ansitel connection
To create a connection, press "New ansitel Connection"
Following parameters must be entered:
- Name for the ansitel Connection: unique name
- Prefix: With this prefix the target ansitel server can be reached and it is possible to call over its dialplan to the peers and lines
- Type: Select the protocol over which the connection is build up (SIP or IAX2)
- Username of the ansitel target server:: This username is used by this ansitel server to authenticate with the target server.
- Password of the ansitel target server: This password is used by this ansitel server to authenticate with the target server.
- Host of the ansitel server: IP address or domain name of the target server.
- User name of this ansitel server: This username is used by other ansitel server to authenticate with this ansitel server.
- Password of the ansitel server: This password is used by other ansitel server to authenticate with this ansitel server.
Figure: Add ansitel connection
Calls from the target server to this server are possible, username and password have to be entered vice versa.
Overview of the ansitel connection
The overview shows the available ansitel connections with name and prefix.
Figure: Overview of the ansitel Connection
2.5.22 Phonebook
The ansitel telephone system has two telephone books useable with the devices/phone.
- LDAP phonebook: The global LDAP telephone book is stored on the telephone system. Devices can access the ldap telephone book by thier ldap configuration. The easiest way is the configuration via auto provisioning in SIP peers module (peers↑) einstellen.
Figure: Overview LDAP phonebook
- Local Phonebook: The local telephone book is handled by the ansitel telephone system. The main difference to the LDAP telephone book is the storing in the phone directly. Therefore employee-related and enterprise-global phonebooks can be used with one device.
Figure: Overview local phonebook
Both telephone books administrate several phone book groups and phone book lists. Users can dial directly from the phonebooks contacts (click to dial).
The reverse search is also possible by this system.
Attention: The logged on user needs minimum one active personal peer to dial out of phonebook. The personal peers can be assigned in (users and permissions↓) module.
Overview
The overview shows the administrator view of the telephone book. Here you have the possibility to manage telephone book groups and add contacts to these groups.
By selecting an existing group and click on "Change Group", all contacts of this group will appear.
On the right side of the page you can find the search. With this search you can look trough the contacts on last name, company and telephone. The entry of substrings is possible.
For example: searching on phone number and substring "345" will show telephone numbers that contain "345".
For each entry you see the last name, first name, company name and telephone number. These can be edited, deleted or called directly (active user peer is required).
Figure: Overview phonebooks
Manage groups
Administrators of awi 3.0 have the possibility to create, edit, delete and change user permissions of groups .

Figure: Manage groups
Create and edit groups
The system demands a name for the group.
Figure: Create and edit groups
Edit user permissions
Set the user access who can see this group and add contacts to it. Users are created in the module "(users and permissions↓).
Figure: User permissions
Create and edit contacts
To create a new contact click on “New Contact”.
Please enter the last name, first name, telephone number (incl. prefix if exists) and the company name.
At last you assign this contact to one or several groups. This contact thereby becomes visible in the groups.
Figure: Create and edit contacts
LDAP
The LDAP telephone book of the ansitel 3.0 telephone system contains a LDAP server. This means that LDAP capable devices are able to directly connect to the telephone book or to do a reverse search. Because the device can call back to the LDAP telephone book, many different parameters have to be entered in the device. Administrators can find this data under the tab "LDAP info".
In case different groups are used for a device, the "Base" entry must be changed.
Change in this entry “ou=ansiteladmin,dc=ansitel,dc=local” to the desired group (e.g. Example Group) “ou=Example Group,dc=ansitel,dc=local”.
This means that on this device only contacts out of this group will be shown.
Attention: The username MUST BE “cn=ansiteladmin,ou=users,dc=ansitel,dc=local”, even with the use of other groups.
Figure: LDAP
Custom LDAP
When an external LDAP telephone book or an active directory should be connected per auto configuration on the device, you can do this with a custom LDAP.
Choose the module "LDAP Phonebook" and then "Custom LDAP" and enter the data of your external server.
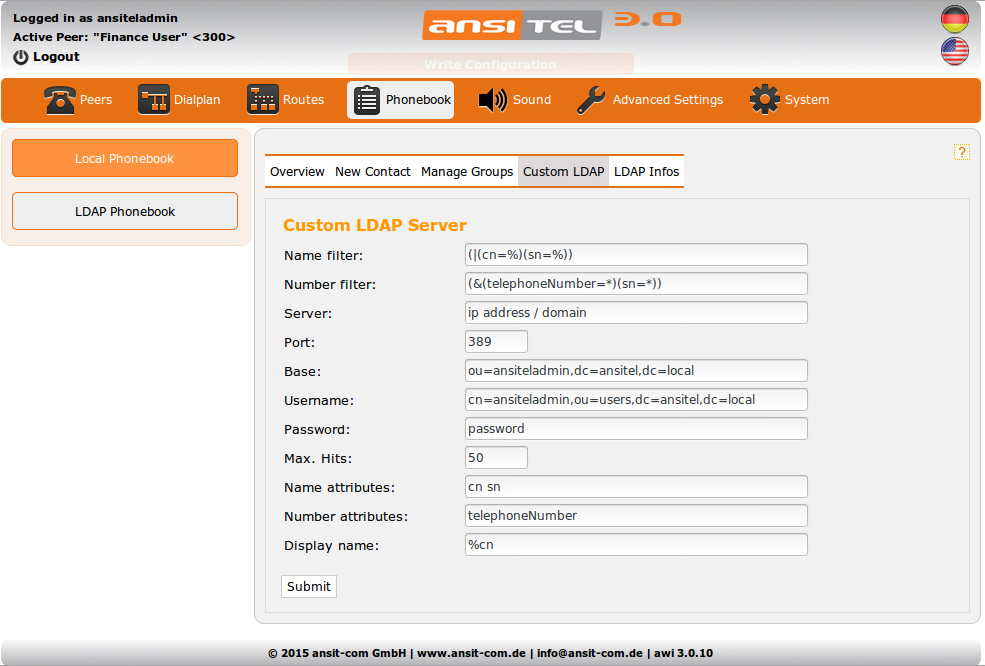
Figure: Custom LDAP
To take over the data of the custom LDAP server to the auto configuration, select "Custom" in the module SIP peers (peers↑) under auto configuration / Add LDAP Directory.
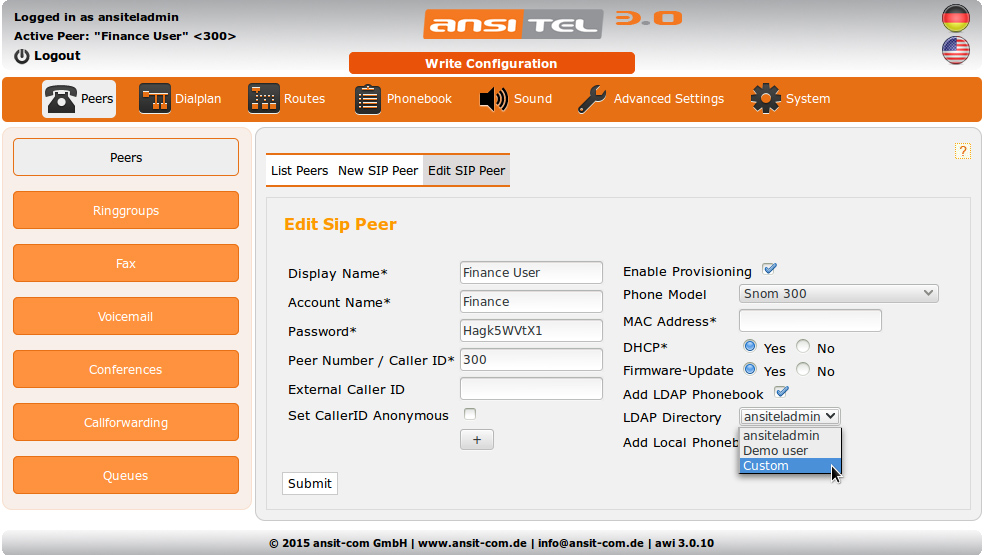
Figure: Set phonebook via auto provisioning
2.5.23 Announcements
Announcements play one or multiple sound files to the caller. These sound files are uploaded via filemanager↓ in the web interface. The announcements can be applied in the dialplan (dialplan↑) or in the module queues (queues↑), interactive voice response (Interactive voice response↑) and survey (survey↑). If an announcement consists of multiple sound files and this announcement is in a sequence in the dialplan, the sequence jumps only at the end of playing all sound files to the next module.
Create announcements
To create a new announcement, click on "New Announcement" and enter a unique name for the announcement.
When a call is redirected over different network (for example from mobile to landlines to telephone system) it can cause delays in the call connection. The caller will notice this because the beginning of the announcement is cut off. If this is the case you can set a break before the announcement (in seconds).
In this module you have the possibility to immediately create a corresponding dialplan number with this announcement. To do this, click on “Create Dialplan Entry” and enter a dialplan number.
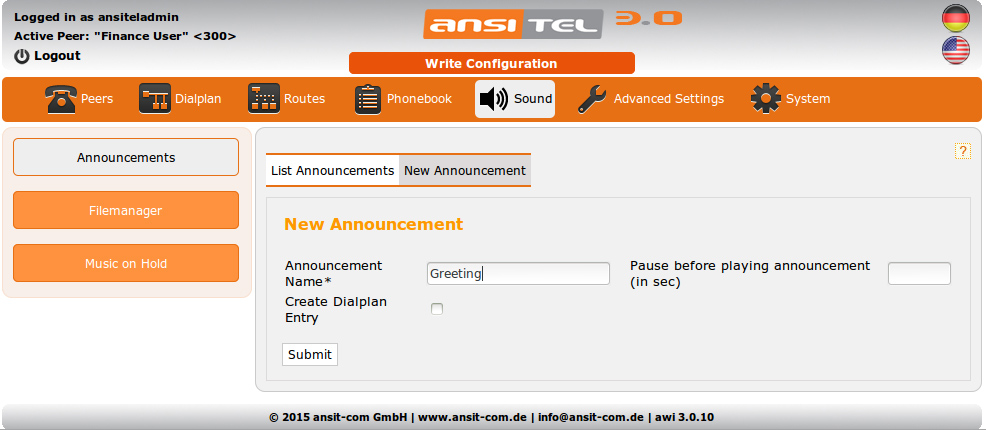
Figure: Create announcement
Add audio files
Announcement modules have to contain one or more sound files.New sound files have to be uploaded over the filemanager ((filemanager↓)). To add sound files to an announcement, click on the green plus button in the overview.
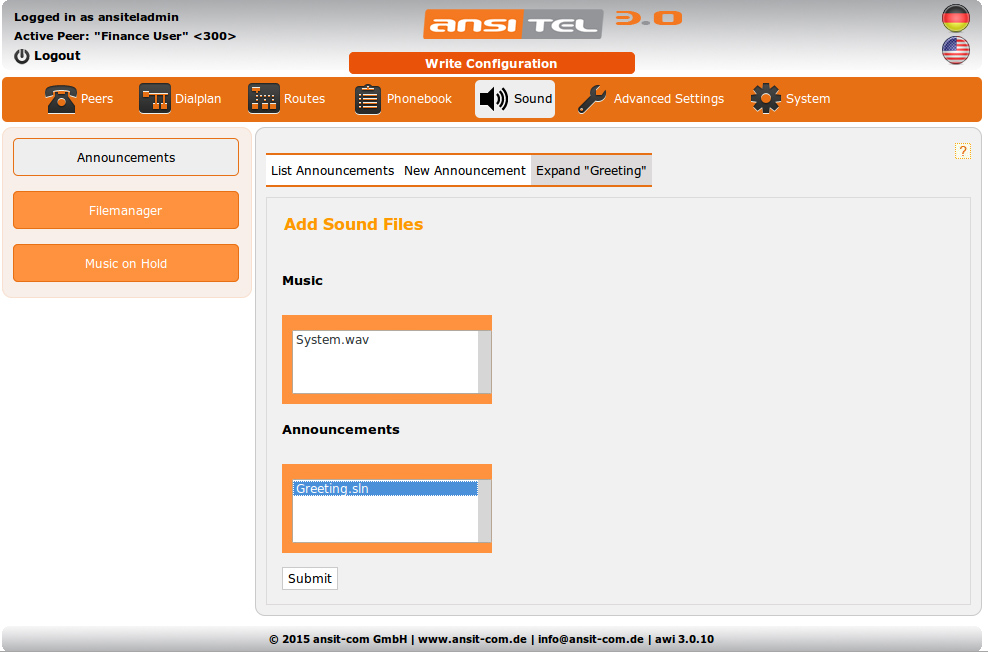
Figure: Add sound files
Edit announcement
On this page you can edit the name, pause before the announcement and sequence of multiple sound files.
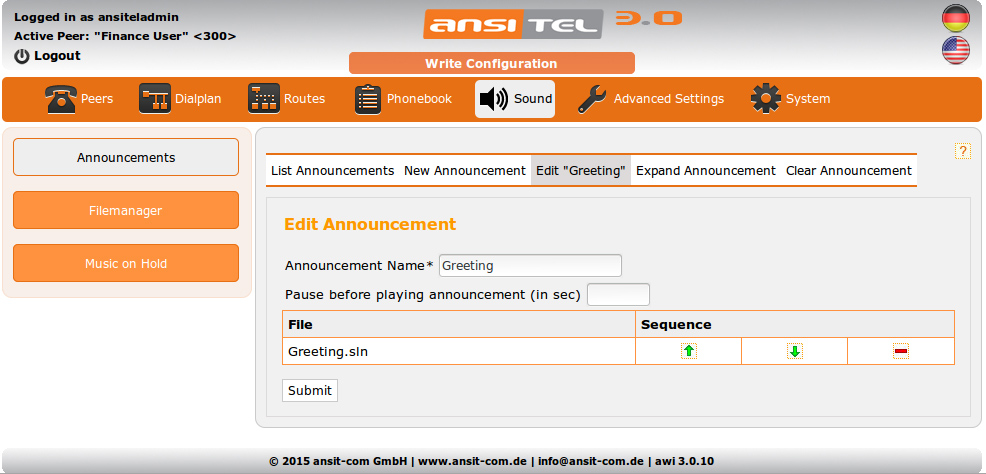
Figure: Edit announcement
Overview
In the overview of the announcements the announcement names, the pause before the announcement and the assigned sound files in selective order are shown.
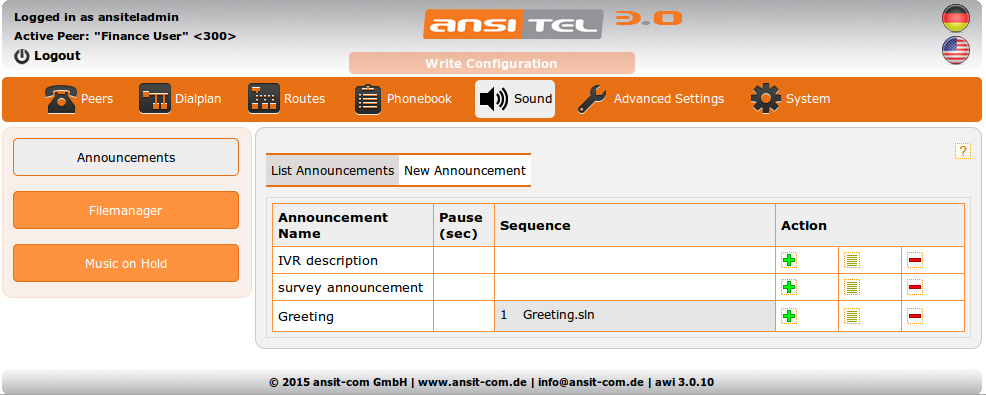
Figure: Overview of the announcements
2.5.24 Filemanager
Through the file manager, sound files, license files and firmware files can be uploaded to the ansitel 3.0 telephone system. The uploads are administered in the ansitel web interface under the main menu "Sound". The sound files in wav and mp3 format will be automatically converted for the telephone system.
Upload File
In the filemanager, you can upload sound files, license files and firmware files of Snom, Yealink and Grandstream phones. To do this, click on "Upload File" and choose the desired category. The categories will allocate the files on the right place in the system.
The following categories are available:
- Music: Music on hold, music for alternative ringtones
- Announcements: Announcements are usable in the modules announcements↑, queues↑, IVR↑) and (surveys↑)
- License: The ansitel web interface is liable to license. Over the licenses, the possible usable modules are enabled. Did you purchase extra licenses from ansit-com than it is possible to upload the licenses in this module.
- Snom firmware: You can build up a firmware management for snom devices. Generally you can find the actual firmware on websites of the manufacturer. Upload the firmware files in .bin format for your devices here (e.g. snom710-8.7.5.44-SIP-r.bin). It can be assigned in auto provisioning configuration of (sip peers↑). The devices load the firmware on provisioning process.
- Yealink firmware: You can build up a firmware management for Yealink devices. Generally you can find the actual firmware on websites of the manufacturer. Upload the firmware files in .rom format for your devices here (e.g. T42-29.80.0.130.rom). It can be assigned in auto provisioning configuration of (sip peers↑). The devices load the firmware on provisioning process.
- Grandstream firmware: You can build up a firmware management for Grandstream devices. Generally you can find the actual firmware on websites of the manufacturer. Upload the firmware files in .bin format for your devices here (e.g. gxp2140fw.bin). It can be assigned in auto provisioning configuration of (sip peers↑). The devices load the firmware on provisioning process.
For sound files you enter a name and description.
Please make sure the uploaded files do not have any special characters or spaces in their name.
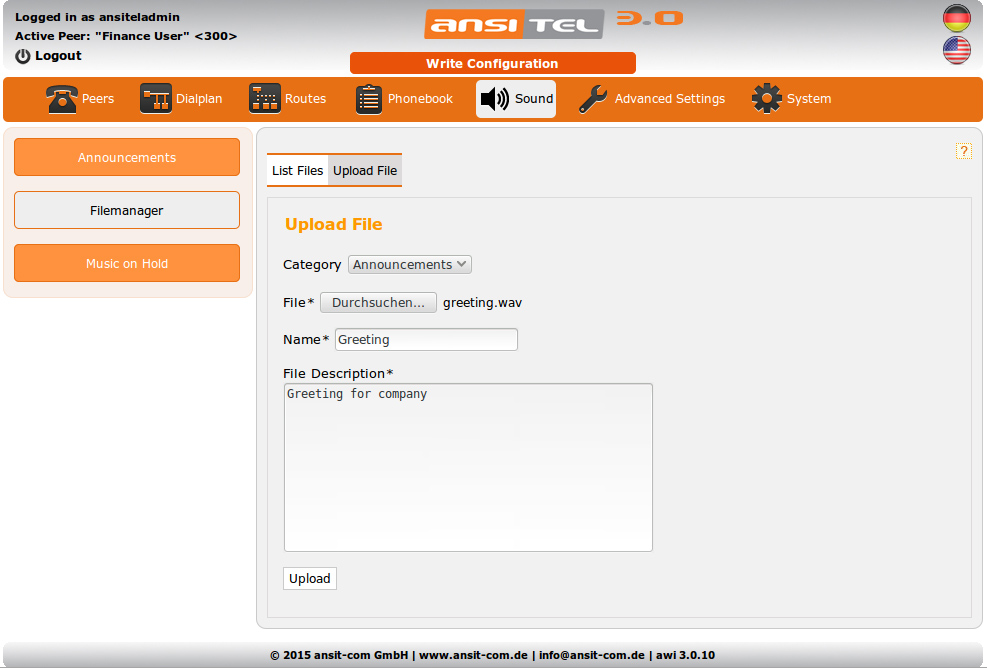
Figure: Upload file
Edit file description
On this page, you can change the category of the files and also description.
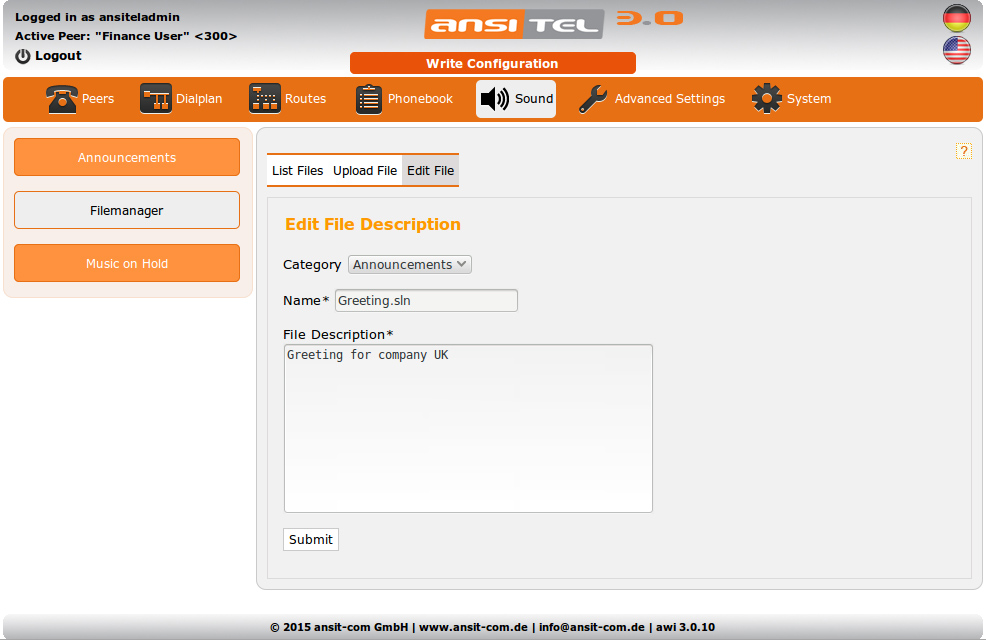
Figure: Edit file description
Files overview
In the overview, all system files are displayed. They can be edited or deleted. When a sound file is used in a different module, it is impossible to delete this. Click the symbol behind the license data to obtain information about the licensed modules.
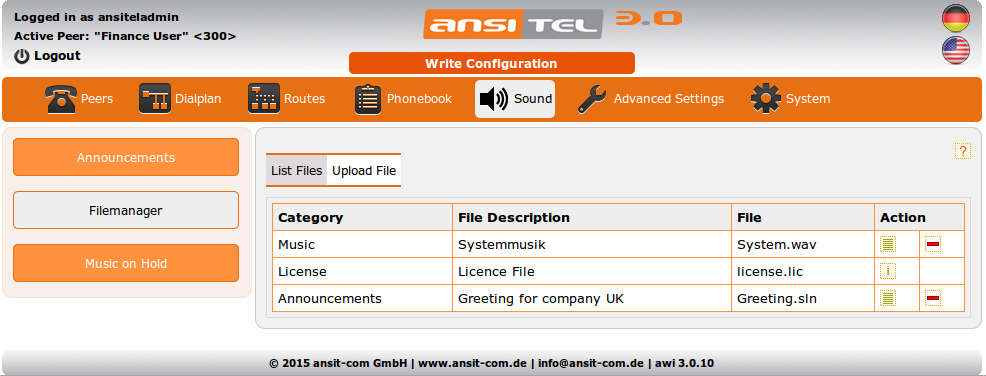
Figure: Files overview
2.5.25 Music on hold
Music on Hold will be played to the caller when the call is on hold, redirected or in queue. The sound files are uploaded over the filemanager↑ of the web interface.
You can also use music on hold as alternative to the ring tone when peers are calling.
Overview
In the overview you see all the available music on hold. The standard hold music "system.wav" is available on every ansitel telephone system. It is impossible to change or delete this.
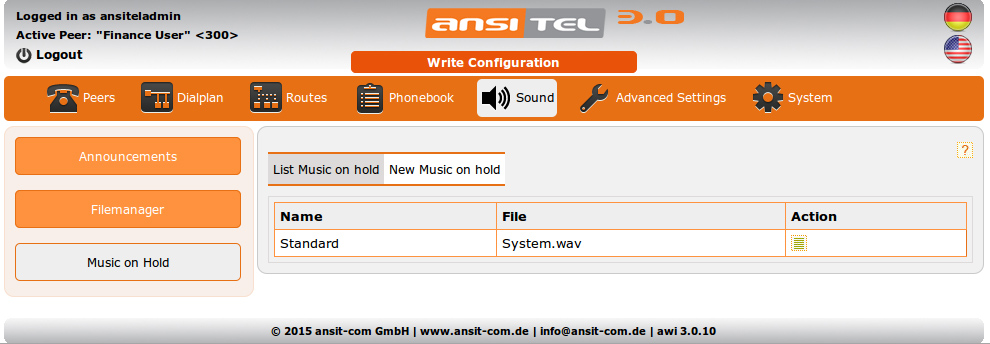
Figure: Overview music on hold
Create music on hold
To set a new music on hold, click on "New Music on Hold". You can now specify a name and a sound file for this music on hold (the file must have been previously uploaded by filemanager). It is only possible to assign files of the category music. When pressing "Submit", the new music on hold is created for the system.
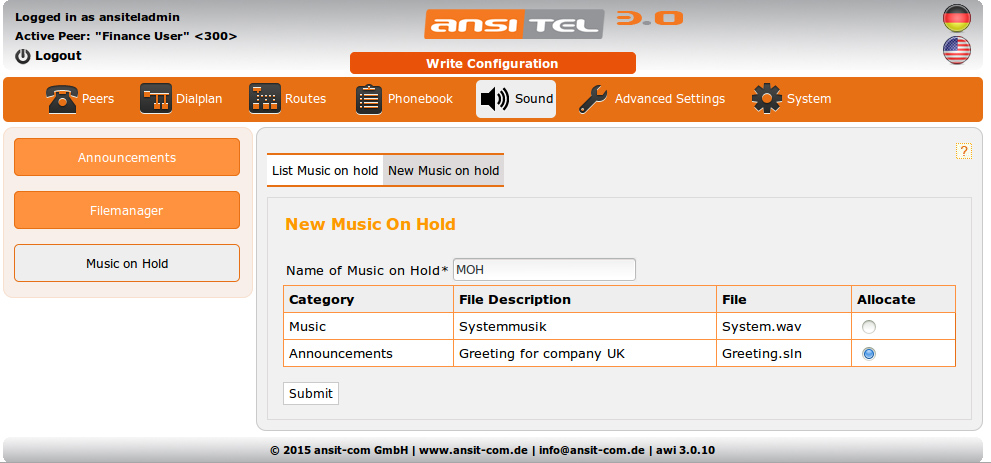
Figure: Create music on hold
Edit music on hold
To edit the music on hold, in the overview, click on the edit symbol next to the hold music. On the next page, you will be able to click on the set symbol next to the desired sound file.
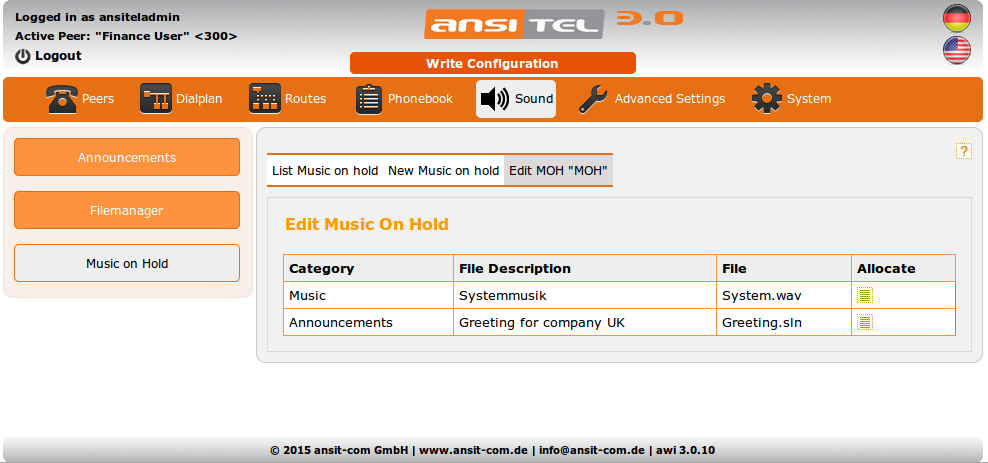
Figure: Edit music on hold
2.5.26 Assistant
The assistant gives support to set up the ansitel 3.0 telephone system. The setup goes quick and easy.
The assistant gradually leads the user trough the system. Every step that is done gets explained clearly to make the set up of the telephone solution as straight forward as possible.

Figure: Assistant
As soon as the assistant is activated, you have the possibility to end the assistant or to simply go to another step. This is to be done in the upper parts of the module.

Figure: Assistant step
All steps of the assistant can be found in the section "Getting started with the awi 3.0↑".
2.5.27 Default settings
In the default settings, following function can be defined:
- awi Language: Please set the default language for your ansitel web interface. This language will be set after login.
- Dial method for outgoing routes: Here you can choose between 2 dial methods, to call over different outgoing routes with different lines to the pstn. A detailed description of the function can be found under chapter
dial methods for ansitel pbx↓.
- Based on the selected prefix: The distinction between the outgoing routes is based on the selected prefix. (e.g. ISDN 0, 1 ansitline)
- Based on the selected phone number: The distinction of the outgoing routes is based on the first 4 international digits of the dialed phone number (for example: 0049 Germany, +44 England, 0033 France).
- Enable SIP Fax Detection: In case you want to receive faxes on a peer, activate the SIP fax detection. Additionally you have to enter an email address and activate the parameter "Enable fax receive" in the peer↑ module.
- Notify CID: Notify CID allows broadcasting call informationen to phones supervising other phones by blf.
- Activate Failover Mode: If the ansitel telephone system is provided as high availability solution, the parameter "Activate Failover Mode" must be activated. With this, the files on the ansitel telephone systems are kept synchronous.
- Virtual IP address: To use the failover-modus, the entry of a virtual IP address is required. Please ask your ansit-com partner for configuration of the failover-modus.
- Default SIP Port for Peers: Define a standard SIP port. When a new SIP peer gets created, this port will be used.
- External IP Address / Domain: External IP address of your internet connection. This is required by different VoIP providers or IVRs with speech recognition.
- Peer Call Timeout (in sec.): The ring time is predefined when adding a peer to the dialplan number.
- Trunk Call Timeout (in sec.): This ring time is predefined when adding a trunk to an outgoing route.
- Maximum Time of Callers in Queue (in sec.): This time is predefined when adding a queue to a dialplan number.
- General Digit Timeout (in millisec.): Number of milliseconds the system waits for a digit input.
- Transfer Digit Timeout (in sec.): Amount of seconds the system waits for a digit input on transfer function.
- Attended Transfer Timeout (in sec.): Amount of seconds the call is dialed (on attended transfer). If no one answers the call will be redirected back to caller.
Many devices have buttons for pickup, transfer and park. For devices do not have these buttons, these functions must be performed by typing short function codes.
- Pickup: With pickup, calls can be picked up from another peer. Enter the code here that can be dialed at the peer to pickup a call. There are two ways <pickup code> or <pickup code> + <peer number>
- If only the <pickup code> is dialed, a call can be picked up from a peer, located in the same callgroup as the telephone where the pickup code is execute. For example *8: Contains the pickup peer of call group "1", can be called with *8 from peer that are also in callgroup "1".
- If the <pickup code> + <peer number> is dialed, the call to this peer with this peer number can be picked up directly. For example *8100: The call on the peer 100 gets picked.
- Direct Transfer: With this function you can transfer the call directly to another conversation partner. For example: #1100: You answers a call and choose #1. Then you hear "Transfer" and enter "100". Then the call will be forwarded to peer with number 100.
- Attended Transfer: With this function code, you transfer the call to another conversation partner after speacking to him. For example: *7100: You answers a call and choose "*7". Then you hear a dial tone. Now enter "100". If the caller with 100 answers, you can speak to your partner. After you hang up, the call will be forwarded to the conversation partner 100.
-
Callforwarding: Define the code for callforwarding. Activate callforwarding of your peer by entering <code> + <forwarding number> (e.g. *5017311111111). The telephone system response with one beep tone and the digits of your number. To disable the callforwarding enter <code> + <one, two digit number or more > (e.g. *500). The response of the system will be three beep tones. An overview of active forwardings can be found in statistic↓ module. It is also possible to delete forwardings there.
-
Do not disturb: Set the "do not disturb" feature for your peer in the ansitel pbx directly. Enter the code for do not disturb (e.g. *2) The response of the system will be three beep tones. Disable this feature by dialing this code again. An overview of active forwardings can be found in statistic↓ module. It is also possible to delete do not disturb there.
- Park Number: With this function code you can park a current call in a park position. The park position must be predefined. For example *9: You have a call. With *9 you put it in the park position. The park position goes from <number> to <number>. Like this, multiple calls can be parked. The call partner will hear the music on hold.
- Park Positions: Enter the park positions here from <number> to <number>. These will count every parked call. By calling the appropriate number, the call can be resume. For example 702: resume a conversation with partner in park position 702.
- Alternative Snom provisioning server: If you wish to use an alternative Snom provisioning server, enter the link without file name (e.g. http://192.168.1.11/directory/). The file name for this link is generated automatically and have the following format "snom320-0011223344.htm".
- Monitor calls (Chanspy Entry Number): When you want to hear conversations, you define a function code for the monitoring menu and enter a PIN. Afterwards you can access monitoring menu by dialing the function code in a phone and entering the pin. By dialing the peer number of the telephone you want to listen into, you will be able to listen to the telephone. Activate "beep" on the beginning of the monitoring to give a beep when the monitoring starts.
- Chanspy (Whispermode): When you want to listen in a conversation but you only want to speack to the agent and not the caller, you can do this from whisper mode. Activate "beep" on the beginning of the monitoring to give a beep when the monitoring starts to the caller.
- Record calls: To record a current call, dial the function code on the device. You hear key tones while you type. After retyping entry of the function codes, the recording is stopped. Prerequisite for this function is to activate the dialplan flags "w" or "W" for these peers in the dialplan↑).
- Record Announcements: You can record announcements on phone and use it in ansitel pbx. Dial this feature code (e.g. #2) and record your announcement. After this it is available in (filemanager↑) to use in several ansitel modules.
- Hotdesking: Enable/Disable hotdesking for peers. Calls can be forwarded to another peer with this function. The callerid of source peer will be also set on outgoing calls. An overview of active hotdeskings can be found in statistic↓ module. It is also possible to delete hotdeskings there.
- Renew TLS Certificate: With this option new tls certificates for sip encyption will be created.

Figure: Default settings
2.5.28 Dial options / Dial flags
With dial options you can change properties and permissions of different modules in dial plan. All dial options are default settings for modules created in the dialplan↑ or in the outgoing routes↑ ("Set default dial options / flags"). Trough clicking on the appropriate option, this option is activate (green) or inactive (red). If you hover the mouse over an option, the function of this option will be described.
2.5.28.1 Intern
Internal dial options for peers and ring groups are set in the dialplan. You can change these by editing the corresponding dialplan number in the dialplan.
The following dial options are possible:
t: Allow transfer for the called user. This applies for transfers using feature codes (default settings↑).
T: Allow transfer for calling users. This applies for transfers using feature codes (default settings↑).
o: Send the original caller ID for transfer. In this way, the caller ID of the caller is sent when forwarding and not the peer that answered the call.
x: Allow the called user to start recording by pressing feature code defined in default settings↑.
X: Allow the called user to start recording by pressing feature code defined in default settings
m: Play hold music "default" instead of the ring tone.
g: Jump to next step in dialplan sequence if called peer hangup
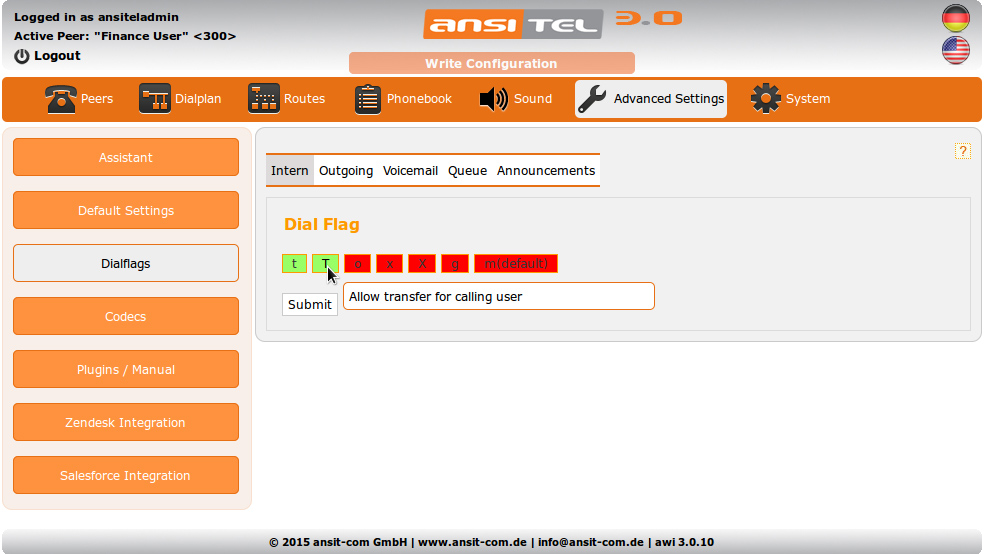
Figure: Internal dial flags
2.5.28.2 Outgoing
Outgoing dialling options are used for lines in outgoing routes. You can change this by editing the appropriate route in the outgoing routes.
Following dial options are possible:
t: Allow transfer for the called user. This applies for transfers using feature codes (default settings↑).
T: Allow transfer for calling users. This applies for transfers using feature codes (default settings↑).
o: Send the original caller ID for transfer. In this way, the caller ID of the caller is sent when forwarding and not the peer that answered the call.
x: Allow the called user to start recording by pressing feature code defined in default settings↑.
X: Allow the called user to start recording by pressing feature code defined in default settings
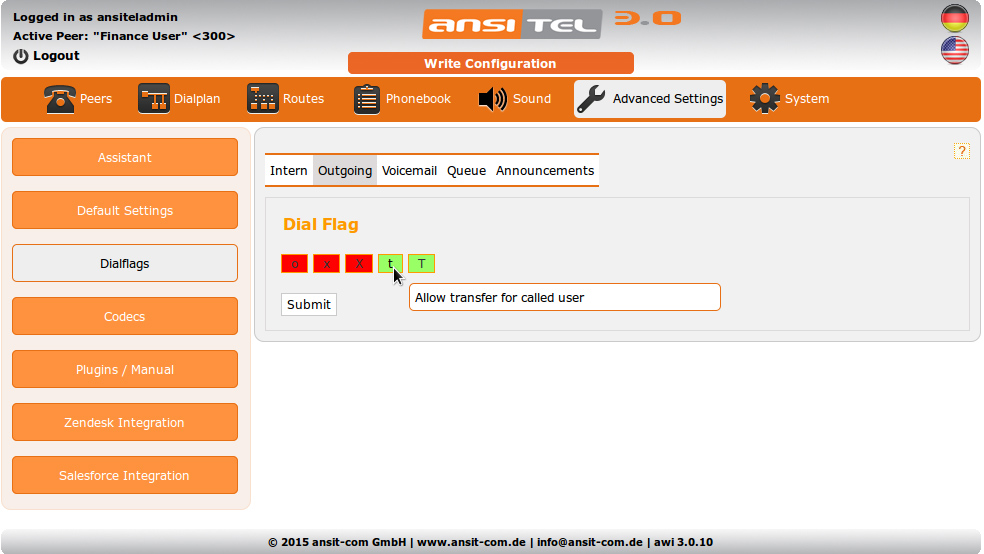
Figure: Dial options for outgoing route
2.5.28.3 Voicemail
The dialing options for the voicemail are set in the dialplan. You can change this by editing the appropriate dialplan number in the dialplan.
Following dial options are possible:
s: Disable the default voicemail announcement. This option is useful if you want to use your own announcement for the voicemail. Since the voicemail contains a standard message by itself, this can be switched off.
u: Plays the "unavailable" announcement. The caller will hear the system message "The called party is not reachable". The message can be overwritten with a personal record. It can be recorded by voicemail check menu.
b: Plays "Busy" message. The caller will hear the announcement "The called party is busy". The message can be overwritten with a personal record. It can be recorded by voicemail check menu.

Figure: Dial options for voicemails
2.5.28.4 Queue
The dial options for the queue are set in the dialplan. You can change this by editing the appropriate dialplan number in the dialplan.
The following dial options are possible:
t: Allow transfer for the called user. This applies for transfers using feature codes (default settings↑).
T: Allow transfer for calling users. This applies for transfers using feature codes (default settings↑).
r: Play ringtone instead of music on hold. With this function, the caller does not realize that he calling a queue.
noanswer: Play sound files without answering the channel. With this function, a greeting announcement is played to the caller without answering the channel. This means the caller does not have to pay any fees. This is usefull for call centers with FREE phone number advantage. The "noanswer" function depends on whether the selected line (VoIP providers, ISDN) is supported.
c: Jump to next step in the dial plan when the agents hangs up. If a queue is used in a sequence in the dial plan, a survey module can be used for this queue. The dial option "c" causes that after the agents hangs up at the end of the call, the call does not get hungup. The caller is redirected to a survey.
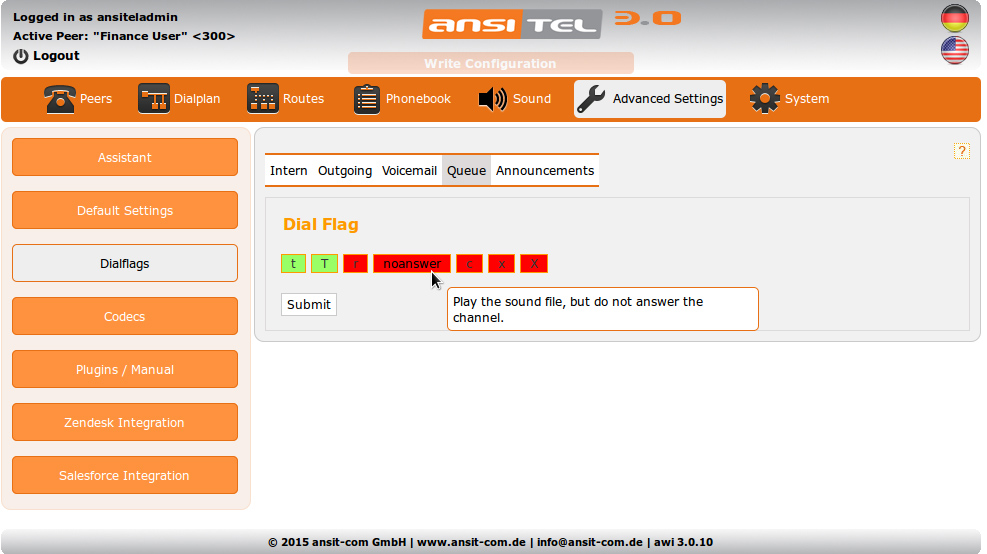
Figure: Dial options for queues
2.5.28.5 Announcement
This dial option is set for announcements in the dialplan. You can change this by editing the appropriate dialplan number in the dial plan.
Following dial options are possible:
noanswer: Play sound files without answering the channel. With this function, a greeting announcement is played to the caller without answering the channel. This means the caller does not have to pay any fees. This is usefull for call centers with FREE phone number advantage. The "noanswer" function depends on whether the selected line (VoIP providers, ISDN) is supported.
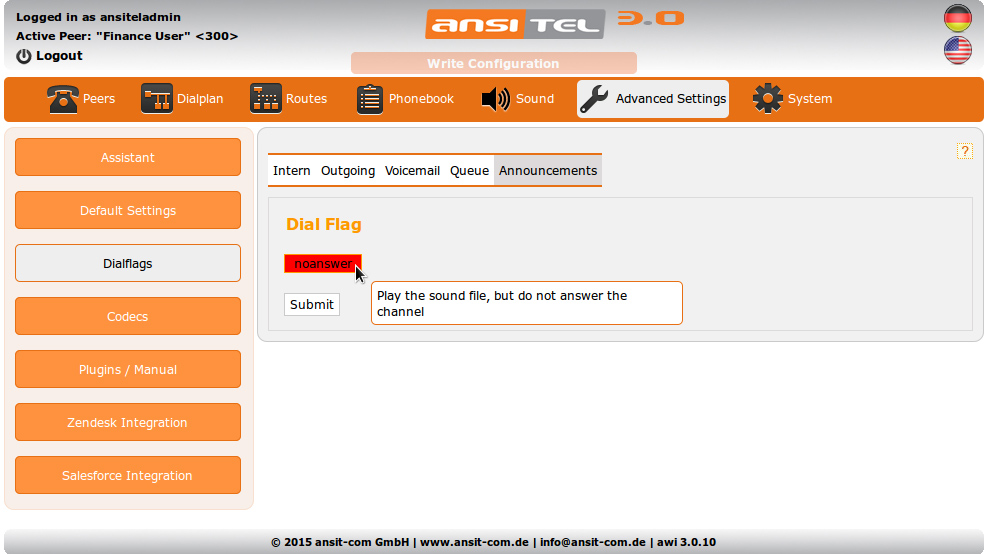
Figure: Dial options for announcements
2.5.28.6 Dial options in the dialplan
Dial options can be edited in the dial plan by editing the corresponding dialplan number.
In the following example, a sequence is shown.
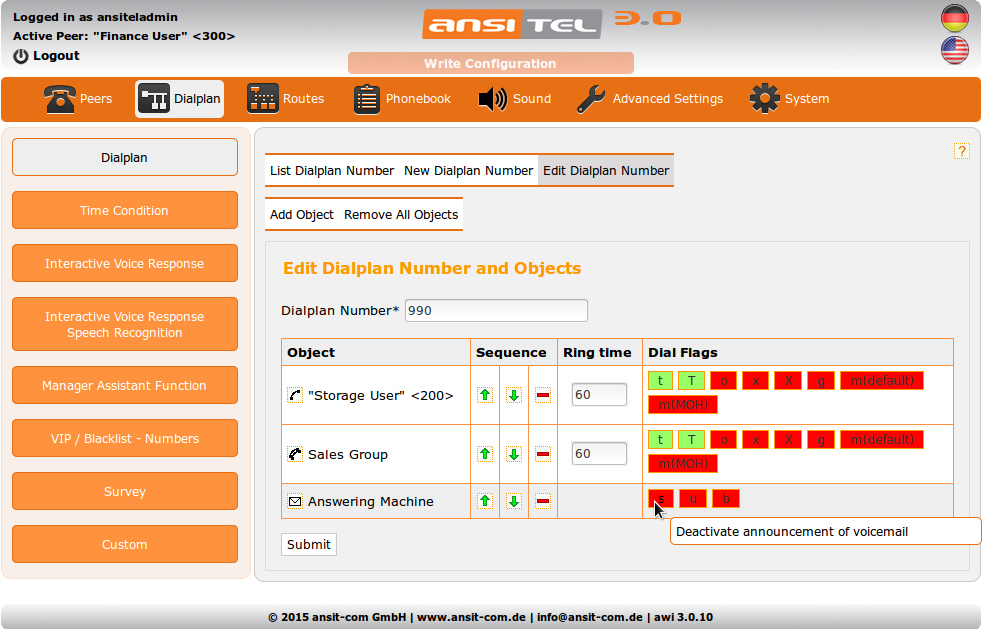
Figure: Dial options in dialplan
2.5.28.7 Dial options in outgoing routes
Dialing options in outgoing routes can be changed by editing the corresponding outgoing route.
In the following example, an outgoing route is shown.

Figure: Dial options in outgoing route
2.5.29 Codecs
Codecs change the required bandwidth of a call and therefore have a significant influence on the call quality. Codecs use different types of compression and codecs. Each SIP, IAX or ISDN extension uses codecs. In this module codecs are enabled or disabled by default. When creating a peer, this setting will be taken over.
The ansitel 3.0 telephone system uses the following audio codecs:
- G.711 a-law (ISDN-Gesprächsqualität)
- G.711 u-law
- GSM (Mobilfunk-Gesprächsqualität)
- G.729
- G.722 HD
- iLBC
- G.723.1
- G.726
Many devices have cameras for video. The ansitel 3.0 telephone system uses the following video codecs (passthrough):
- H.261
- H.263
- H.263P
- H.264
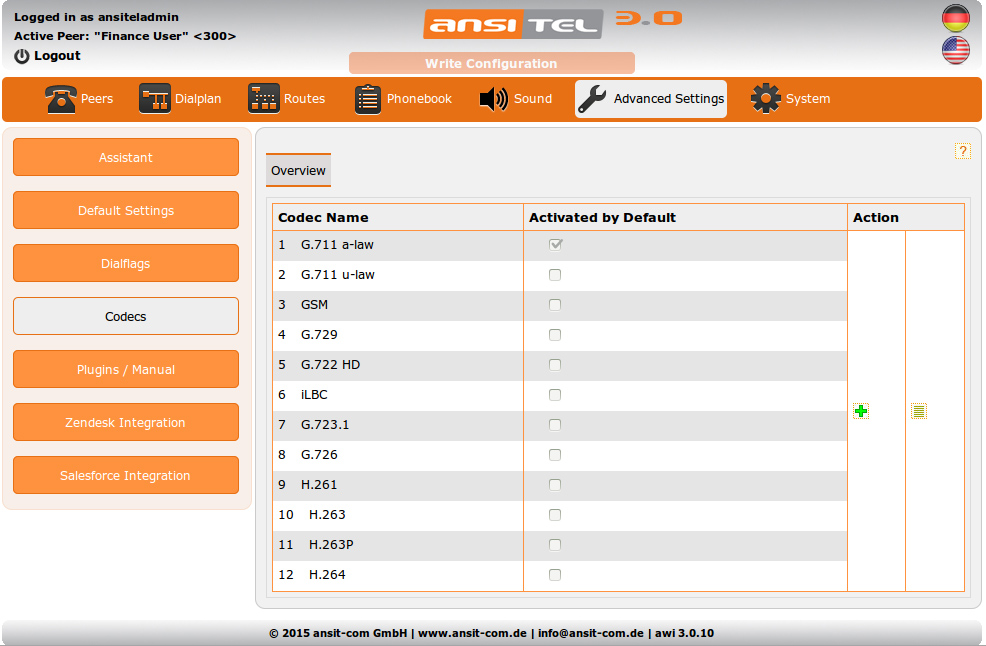
Figure: Codecs
2.5.30 Plug-ins / Manual
ansitel plug-ins are additional functions for workstations.
The ansitel click to dial plug-in allows an easy dial function for google and Mozilla browsers and also for Mozilla Thunderbird email client. Afterwards when a telephone number gets selected in a browser or email client, it can be dialed by clicking the right mouse button and pressing "Call number". All characters that are not numbers are automatically removed from the highlighted section. Then the associated peer will ring. After the call gets answered, the call to the selected number will be established.
You can find the link to the current version of the manual under "ansitel Manual". For a detailed description of the ansitel plug-ins, see chapter Plugins↓.
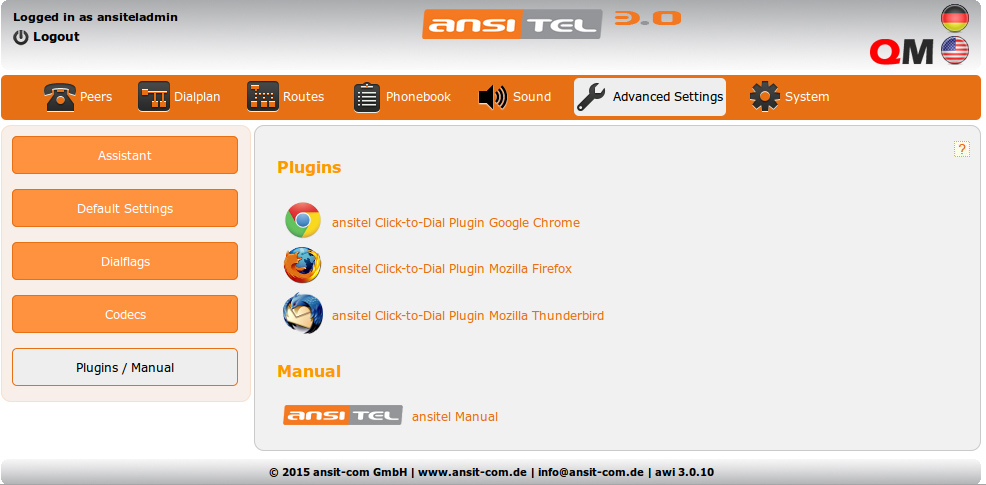
Figure: ansitel plugins and manual
2.5.31 Zendesk integration
Zendesk is a web based ticketing system that offers a ticket management and a help desk.
The ansitel telephone system provides an interface for this ticket system. It logs incoming calls to the peer and outgoing call from peers of the ansitel telephone system in Zendesk (tickets).
- Login with your Zendesk account.
- Click on the admin symbol on the left down side.
- On the left side choose the area API.
- Enable the access token.
- Now you have the token.

Figure: Zendesk token
Now configure the interface in the ansitel web interface.
Enter your Zendesk domain, user name and above mentioned token.
Choose the language of the tickets in Zendesk (possible values: Deutsch, English)
The creation of a ticket only happens at the selected peers (multiple selection with crtl).
The following actions are possible:
- Create tickets if calls cannot assign to a zendesk peer.
- Incoming: Creates new user accounts for callers, if they do not exist. The user account contains the name "caller:<sender caller Id>" and the sender phone number.
- Incoming: Create ticket in zendesk for each answered call.
- Incoming: Open new ticket for answering agent.
- Incoming: Create ticket in zendesk for each missed call.
- Outgoing: Create user account if not exists.
- Outgoing: Create ticket in zendesk for each answered call.
- Outgoing: Open new ticket for answered call.
- Outgoing: Create ticket in zendesk for each failed call.
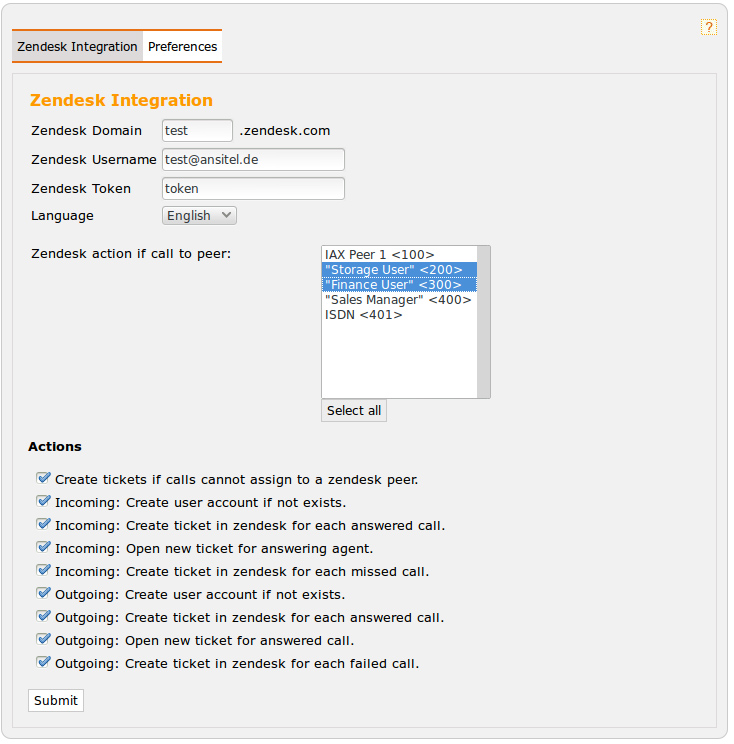
Figure: Configure zendesk ansitel integration
Next, you can link your Zendesk users with your phone (sip account) to automatically open tickets for this user. Enter the account name of your SIP peer in the box "details" of your Zendesk user.
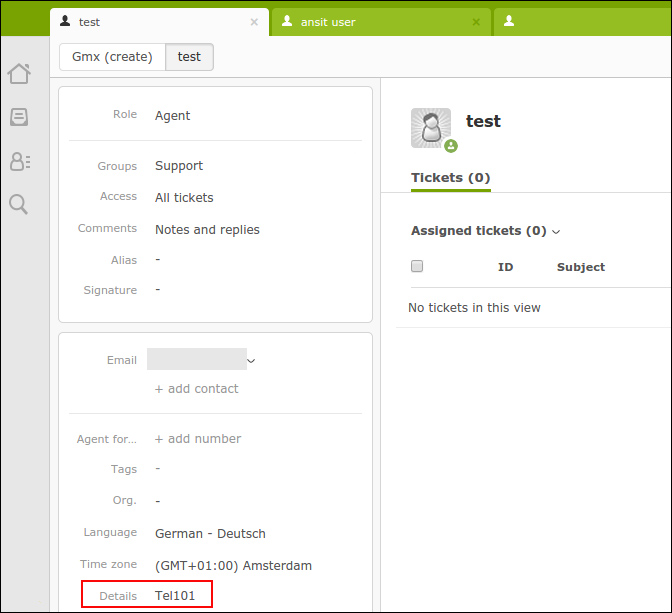
Figure: Zendesk user peer connection
Attention: Zendesk requireds for the takeover of the "Details" data approximately 3 minutes. In this time, the Zendesk interface is unable to create tickets for user.
At the end, you can activate your Zendesk interface.
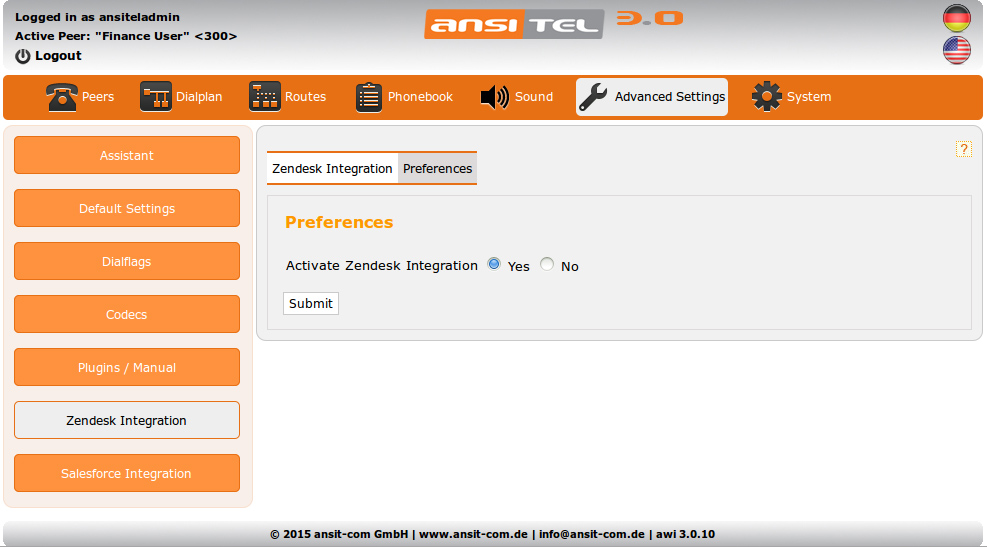
Figure: Start Zendesk integration
If the corresponding permission is activated, a ticket will be opened automatically with every incoming or outgoing call of the agents.
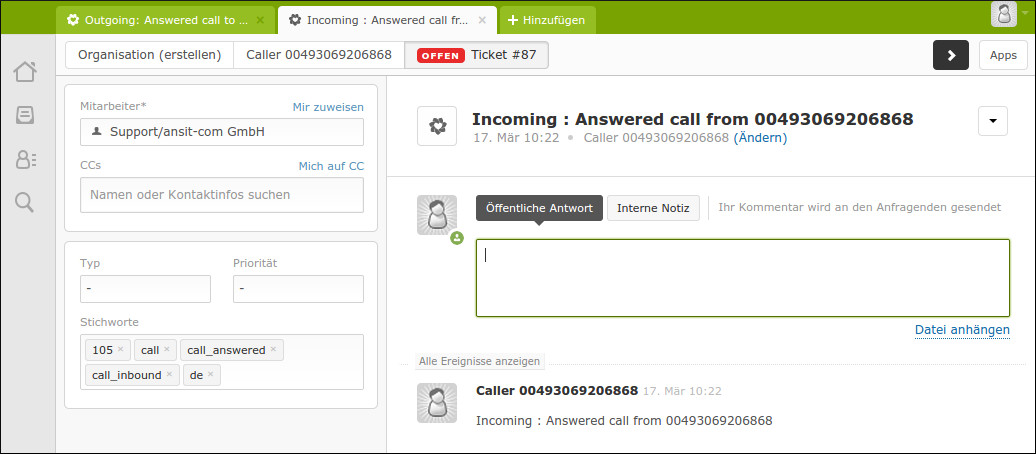
Figure: Zendesk ticket
The Zendesk tickets gets tagged as:
- <peer>: peer that has answered the call.
- <call>: ticket that gets generated trough a call.
- <call_answered>: call answered.
- <call_missed>: lost call, unanswered.
- <call_inbound>: incoming call.
- <call_outbound>: outgoing call.
- <countrycode>: if multiple international phone numbers are registered at the ansitel telephone system, the country where to was called is marked with the "country code".
With these tags, individual reports of the tickets can be set in Zendesk.
2.5.32 Salesforce interface
Salesforce is an online based customer relationship management (CRM).
The ansitel telephone system provides an interface for this system.
With this, incoming calls are logged on peers of ansitel telephone system in Salesforce.
The following information is needed for the configuration of the Salesforce interface in the ansitel web interface.
- Salesforce username / email address
- Salesforce password
- Salesforce domain
- Security token for the Salesforce user.
2.5.32.1 2.5.31.1 Salesforce domain and security token
Please log on to Salesforce with your user name.
Figure: Salesforce login
You receive the Salesforce domain after logging with your browser address bar.
The domain contains the following format.
<XX>.salesforce.com
(Example: eu5.salesforce.com)
You will receive your security token by clicking in Salesforce on the right top of your name, "My settings" and on the left side "Reset my security token". Enter an email address for your Salesforce user.
Figure: Salesforce security token
2.5.32.2 Salesforce interface in anistel web interface
Log on to the ansitel web interface and choose Salesforce interface in the menu "Advanced settings". Create a "New Salesforce User" and enter the required data.
Choose the language of the Salesforce messages that are generated by the Salesforce interface.
Choose the peer that will be assigned to this Salesforce user. For calls to this peer cases entries in Salesforce for this user will be created.
The default salesforce user gets messages of calls, which can not assign to a salesforce user. Example: Incoming call to queue, no agent rings and caller hang up.
Define the desired action for the Salesforce user. Possible actions are:
- Incoming: Create account if not exist and assign to case.
- Incoming: Create case for each answered call. The account of caller in salesforce will be assigned based on callerid.
- Incoming: Create case for each missed call. The account of caller in salesforce will be assigned based on callerid.
- Outgoing calls: Create account if not exist and assign to case.
- Outgoing calls: Create case for each answered call. The account of caller in salesfoce will be assigned based on callerid.
- Outgoing calls: Create case for each failed call. The account of caller in salesforce will be assigned based on callerid.
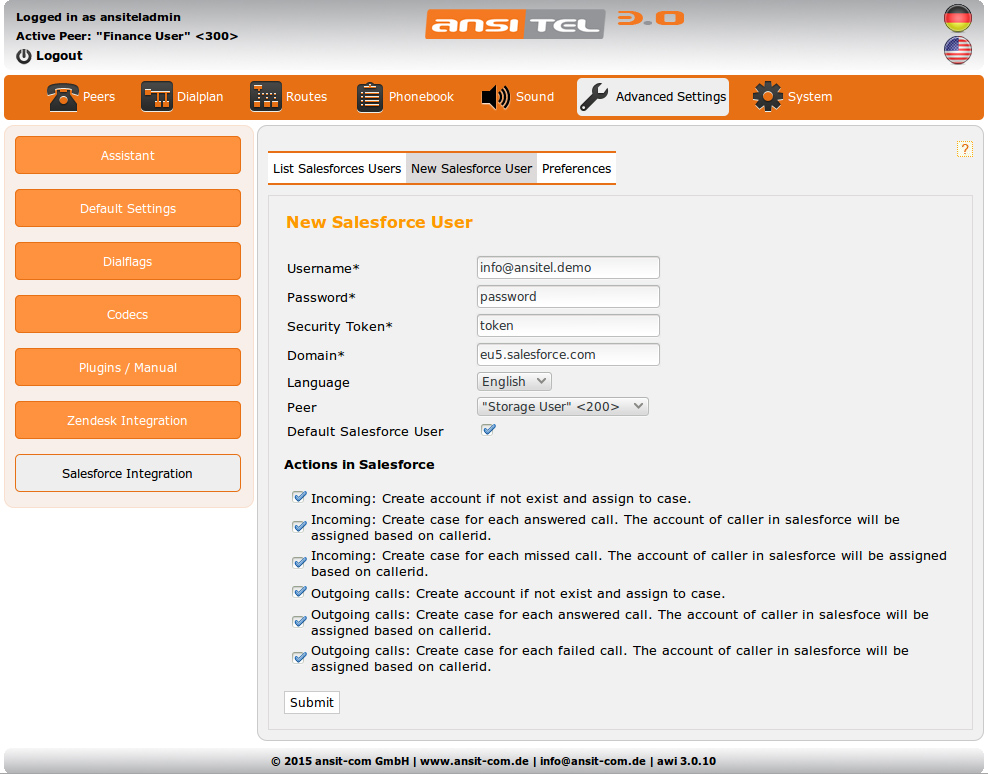
Figure: Salesforce user in ansitel webinterface
Attention: The permission "API" must be activated for your Salesforce user to use this interface.
After the users is created, the interface can be started under the tab "Preferences".
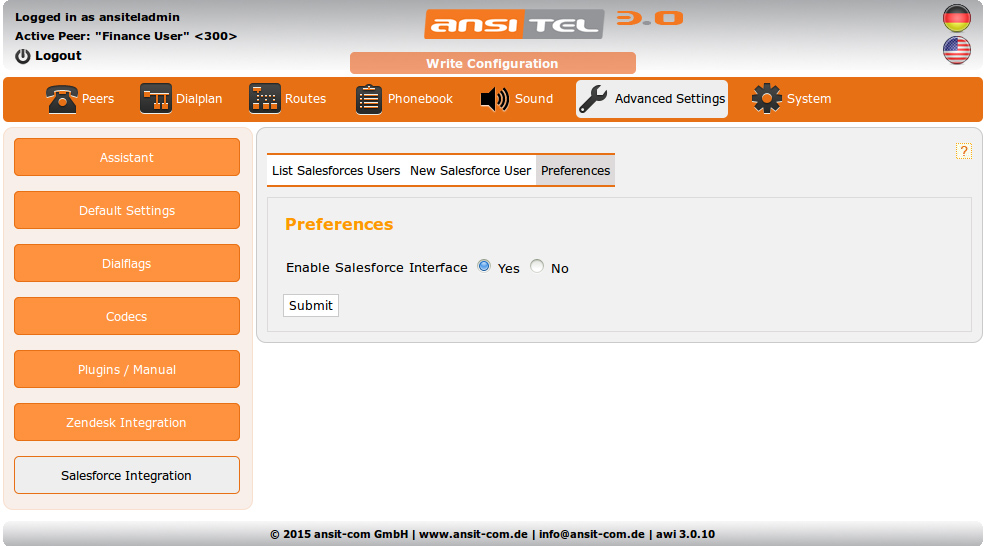
Figure: Start salesforce interface
2.5.32.3 Messages in Salesforce
Due to action settings of Salesforce users in the ansitel web interface, cases are created when there are unanswered or missed calls in Salesforce. When an account with the sender number (caller Id) exists, it gets linked to the cases.
Figure: Cases after calls
If no account is available, an account can be automatically created. The account name will have the following format:
Caller <sender phone number (Caller ID)>
Figure: Account in Salesforce
2.5.33 2.5.32 vTiger interface
vTiger is an online based customer relationship system.
The ansitel telephone system provides an interface for this system.
Enter the IP address of your vTiger connector. If it is running on the same machine use “127.0.0.1”.
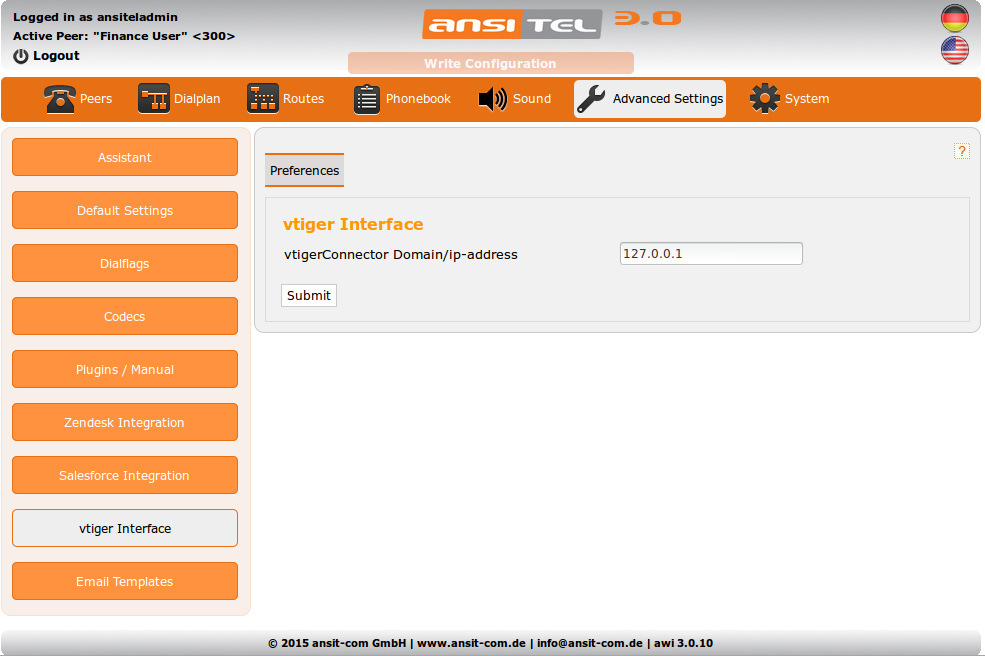
Figure: vTiger interface
Add the vTiger interface to a dialplan number.
Figure: vTiger interface in dialplan
2.5.34 Email templates
The ansitel telephone system sends different types of emails with the following modules:
- Voicemail (Voicemail↑)
- SIP peers (Peers↑)
- Send busy email
- Send missed call email
- Send email on forwardings
- Send email if no voicemail left
In the email template module, the subjects and the text content of emails can be customized.
Click on the “Edit”-symbol.

Figure: EEmail templates
The following place holders can be used in the template:
- ::DATETIME:: = Date and time
- ::CALLERIDNUM:: = Sender telephone number (Caller Id)
- ::CALLERIDNUM_NO_PREFIX:: = Sender telephone number (Caller Id) without prefix
- ::CALLERIDNAME:: = Sender name
- ::CID_DESTINATION:: = Destination number
- ::VM_CALLERID:: = Sender telephone number (Caller Id) in voicemail email
- ::VM_NAME:: = Name of voicemail box
- ::VM_MAILBOX:: = Number of voicemail box
- ::VM_DUR:: = Duration of voicemail
- ::VM_CIDNUM:: = Sender telephone number (Caller Id) in voicemail email
- ::VM_CIDNUM_NO_PREFIX:: = Sender telephone number (Caller Id) in voicemail email without prefix
- ::VM_CIDNAME:: = Sender name in voicemail email
- ::VM_DATE:: = Date and time in voicemail email
- ::VM_MSGNUM:: = Amount of voicemail messages
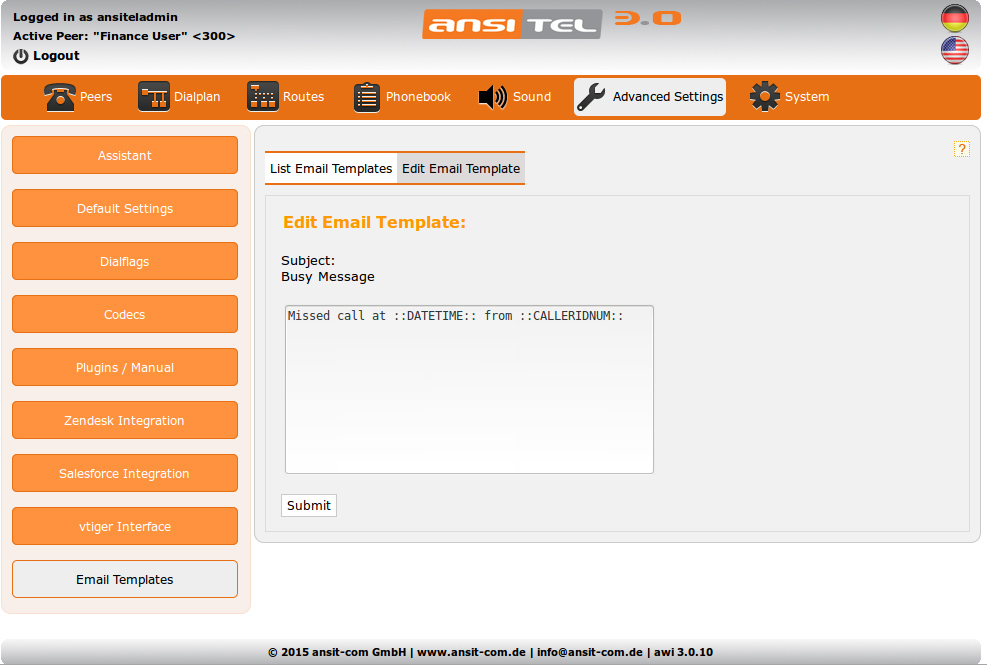
Figure: Edit email template
2.5.35 Phone Templates
Phone templates store additional configuration (e.g. second identity or custom keys) for snom, Yealink and Grandstream phones. The phone templates will be assigned to a peer and transmitted by to the device via auto provisioning.
Phone templates can be defined for a single phone (snom ,Yealink and Grandstream) or for all phones of a vendor (only snom and Yealink).
Overview
The several phone templates are listed based on type and valid for peer in the overview You can create, edit, copy and delete phones templates on this page.
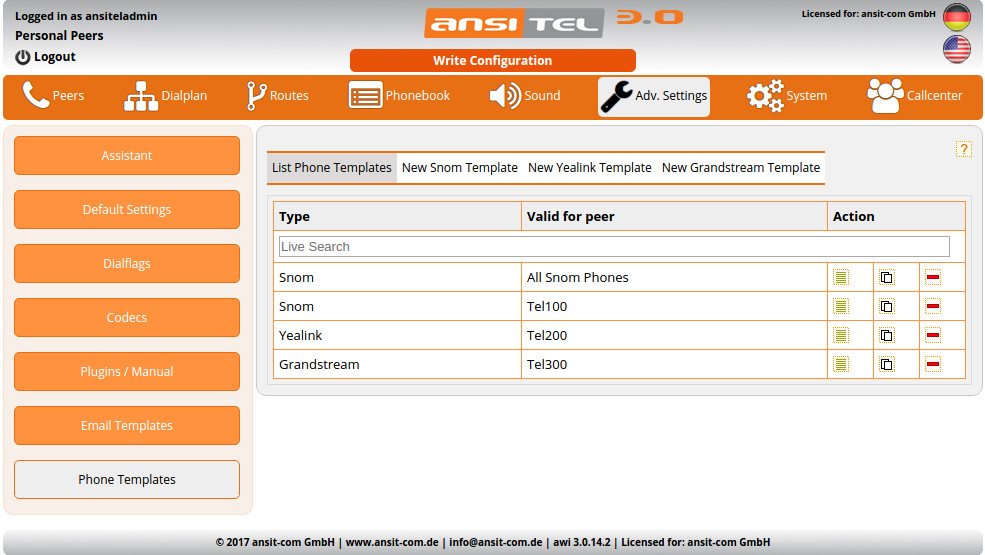
Figure: Overview available phone templates
Snom phone templates
Select a peer and add multiple keys to it.
The select field "Type" provides following possibilities:
-
BLF: Other peers can be supervised with busy lamp fields (BLF).
- Value: Enter the peer number of peer you want to supervise.
- Label: The label will be shown on phones with digital label.
- Pickup Code: Enter the pickup code in this field. It is defined in Default Settings↑ module (e.G. *8). With this code calls to supervised phones can be picked up.
-
Speed Dial: The number in value field can be dialed directly.
- Value: Enter the desired number.
- Label: The label will be shown on phones with digital label.
-
DTMF: With dtmf a chain of key tones can be send in call.
- Wert: Enter key chain.
- Label: The label will be shown on phones with digital label.
-
Redirect to: Redirection to the number containing the value field.
- Wert: Destination number
- Label: The label will be shown on phones with digital label.
-
Line Account 1: Line key for identity account 1.
-
Line Account 2: Line key for identity account 2.
You can enable the advanced phone templates by clicking on the "+"-Symbol.
In this fields a configuration in syntax of snom configuration file (.xml) is possible. You can add multiple identities or other special configuration. It will be transmitted by autoconfiguration to the snom phone.
For the configuration following section of snom configuration file are available:
- <phone-settings>: Base configuration of snom phone (e.g. for second identity)
- <function_keys> : Additional key definition
- <tbook>: Entries of local phonebook
You will get the complete parameter list by export xml-file on snom phone.
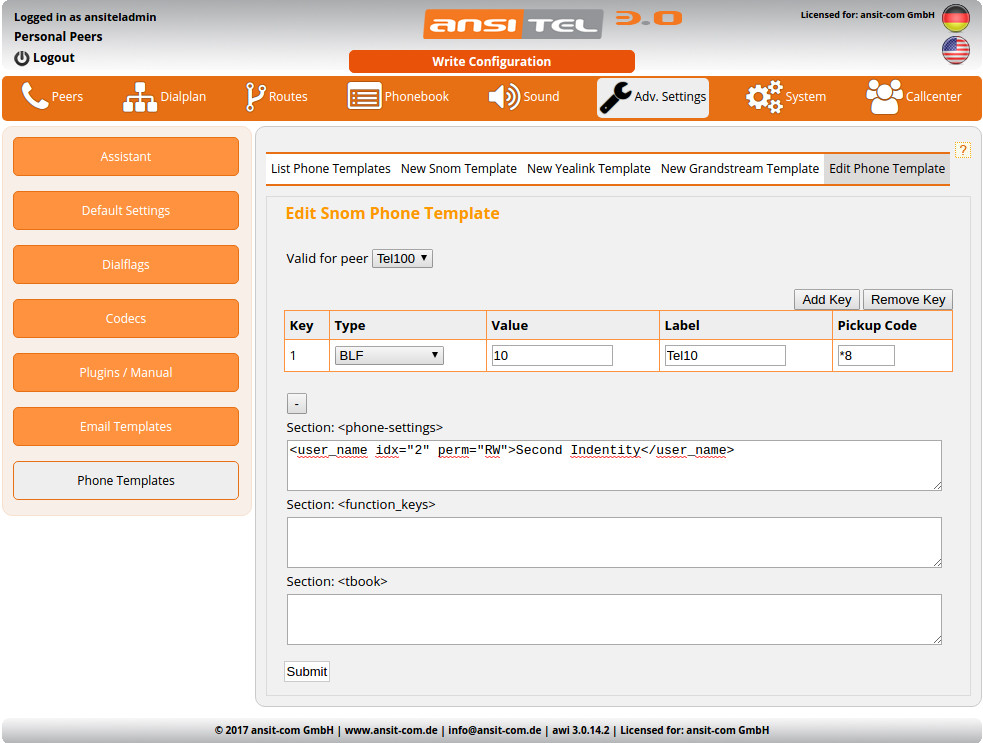
Figure: Snom phone template
Yealink phone templates
Select a peer and add multiple keys to it.
The select field "Type" provides following possibilities:
-
BLF: Other peers can be supervised with busy lamp fields (BLF).
- Value: Enter the peer number of peer you want to supervise.
- Label: The label will be shown on phones with digital label.
- Pickup Code: Enter the pickup code in this field. It is defined in Default Settings↑ module (e.G. *8). With this code calls to supervised phones can be picked up.
-
Speed Dial: The number in value field can be dialed directly.
- Value: Enter the desired number.
- Label: The label will be shown on phones with digital label.
-
DTMF: With dtmf a chain of key tones can be send in call.
- Wert: Enter key chain.
- Label: The label will be shown on phones with digital label.
-
Redirect to: Redirection to the number containing the value field.
- Wert: Destination number
- Label: The label will be shown on phones with digital label.
-
Line Account 1: Line key for identity account 1.
-
Line Account 2: Line key for identity account 2.
You can enable the advanced phone templates by clicking on the "+"-Symbol.
In this fields a configuration in syntax of Yealink configuration file (.cfg) is possible. You can add multiple identities or other special configuration. It will be transmitted by autoconfiguration to the Yealink phone.
You will get the complete parameter list by export cfg-file on Yealink phone.
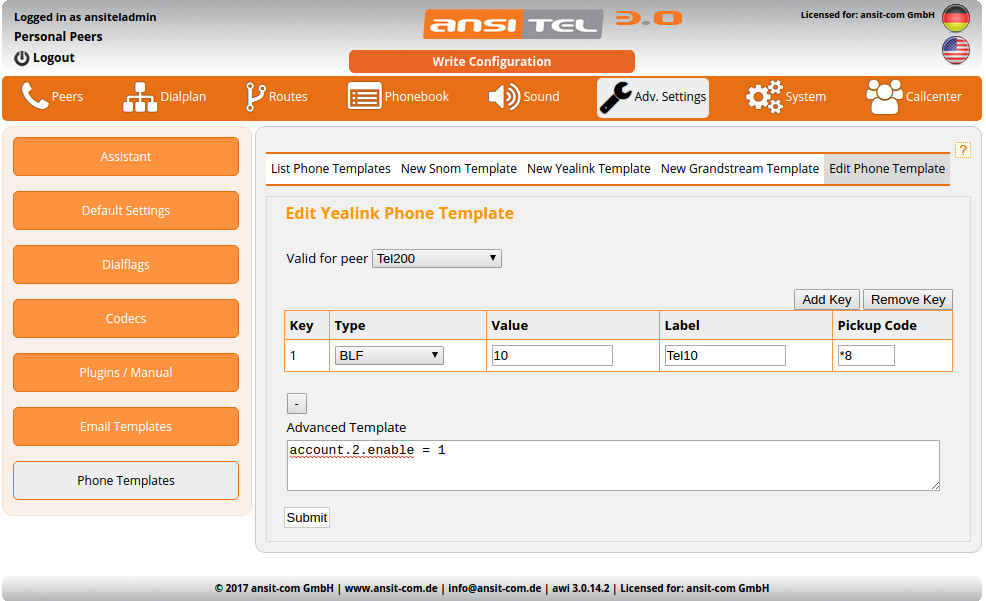
Figure: Yealink phone template
Grandstream phone templates
Select a peer and add multiple keys to it.
The select field "Type" provides following possibilities:
-
BLF: Other peers can be supervised with busy lamp fields (BLF).
- Value: Enter the peer number of peer you want to supervise.
- Label: The label will be shown on phones with digital label.
- Pickup Code: Enter the pickup code in this field. It is defined in Default Settings↑ module (e.G. *8). With this code calls to supervised phones can be picked up.
-
Speed Dial: The number in value field can be dialed directly.
- Value: Enter the desired number.
- Label: The label will be shown on phones with digital label.
-
DTMF: With dtmf a chain of key tones can be send in call.
- Wert: Enter key chain.
- Label: The label will be shown on phones with digital label.
-
Redirect to: Redirection to the number containing the value field.
- Wert: Destination number
- Label: The label will be shown on phones with digital label.
-
Line Account 1: Line key for identity account 1.
-
Line Account 2: Line key for identity account 2.
You can enable the advanced phone templates by clicking on the "+"-Symbol.
In this fields a configuration in syntax of Grandstream configuration file (.xml) is possible. You can add multiple identities or other special configuration. It will be transmitted by autoconfiguration to the Grandstream phone.
The complete parameter list is available on Grandstream website.

Figure: Grandstream phone template
Please click on red blinking bar on top to write the configuration.
If the peer is registered to the ansitel phone system, you can easily reload the configuration via Helper↓ module with button "Reload provisioning for all phones".
2.5.36 System settings
In this module, system settings for the ansitel 3.0 telephone system can be made.
2.5.36.1 System language
Language: The internal language can be set on “Deutsch” or “English”. This is necessary for sounds and predefined announcements.
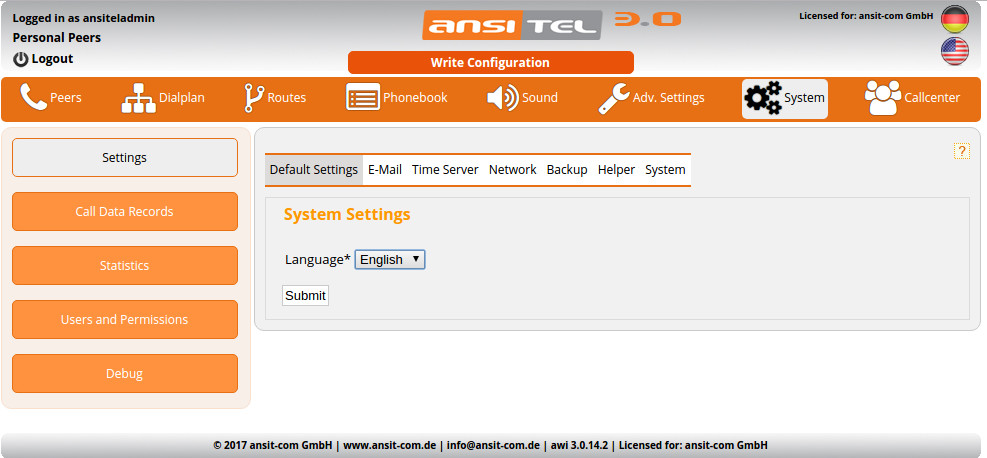
Figure: System language
2.5.36.2 E-Mail settings
The ansitel PBX requires an external email account to be able to send emails. The modules voicemail, peers and fax use this account to send emails to the email addresses defined in these modules.
The required data are server name, port number, user name, password and sender address.
Please select the type of your email authentication.
Verify your email settings by sending a test email.
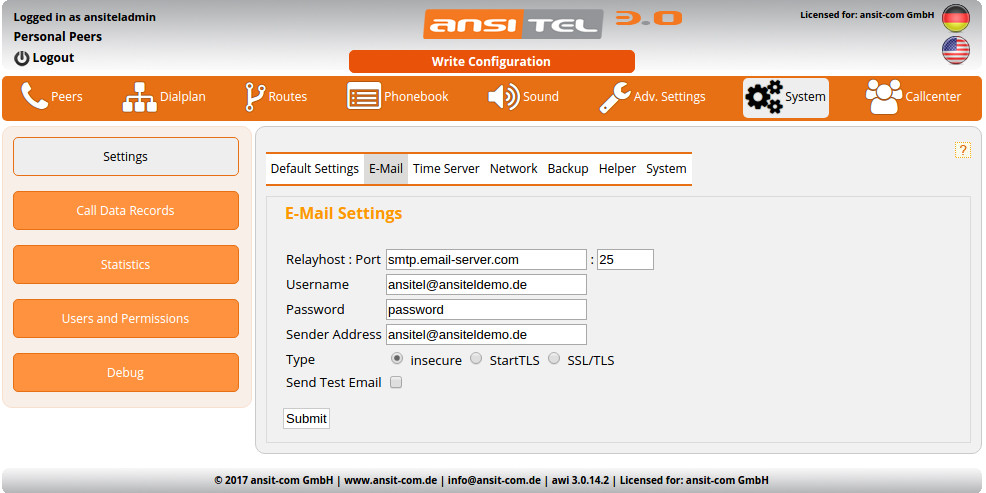
Figure: E-Mail setings
2.5.36.3 Time server
The ansitel PBX has an internal time server. This synchronises with an external time server (e.g. time.fu-berlin.de) and provides the actual time and date to all connected VoIP devices.
If no time server is available, the telephone system will allow the time to be set manually. To do this, click on “set system time” and enter the current date and time and click on “save”.
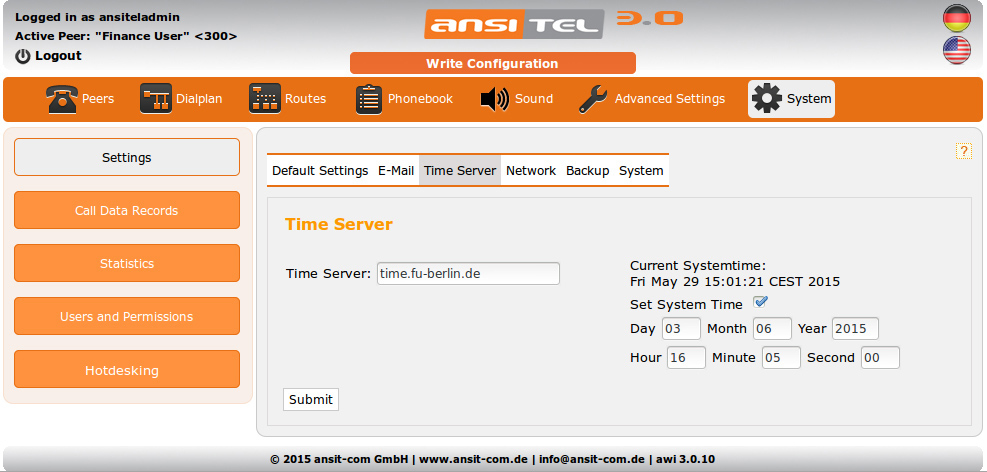
Figure: Time server
2.5.36.4 Network
The network setting of your ansitel Telephone PBX can be changed under the tab “Network”.
Your ansitel PBX has one or multiple networkinterfaces based on factory configuration.
The ansitel pbx expects its ip address form a dhcp server in the network. In case of multiple network interfaces use the left one.
On the right side of the "Network" tab, the current ip address(es) of the network interface(s) is(are) shown.
You can enter fixed ip adresses or use dhcp on each network interface.
To change the IP address of the telephone system, go to section Change the ip address of your ansitel telephone solution↑.
The emergency IP address is available in case you are no more able to reach the telephone system.
In case of multiple network interfaces are used, select the interface for provisioning.
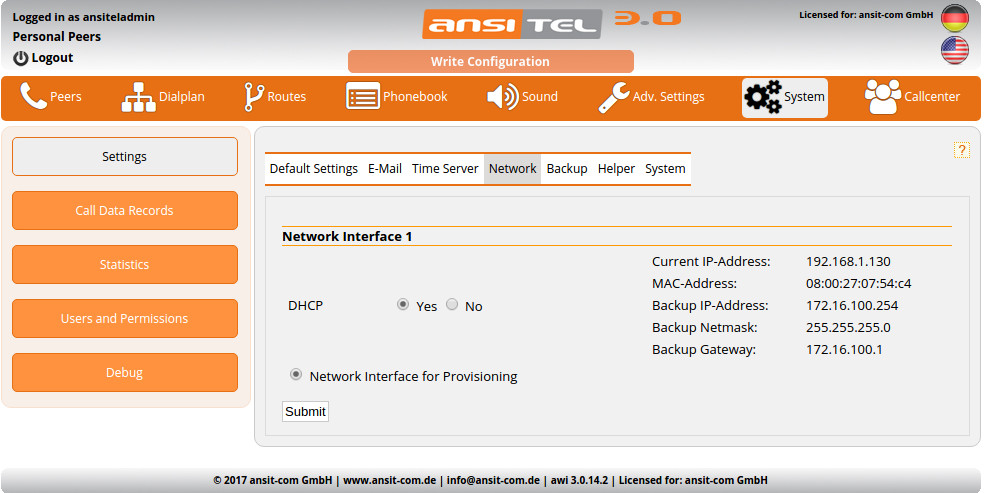
Figure: Network
2.5.36.5 Backup
In tab “Backup” you have the following possibilities:
- Download Configuration: It is possible to download your settings of the ansitel PBX to a local desktop.
- Upload configuration: You can upload backups to your ansitel PBX. Doing this, the existing configuration will be deleted and all conversations will be interrupted. To upload a backup, please enter your security code. Please wait until the file upload is finished.
- Upload Update File: ansit-com provides updates for the ansitel PBX in several intervals. You can upload the update file here. To upload, please enter your security code. Please wait until the file upload is finished.
- Factory Reset: When you reset to factory settings, all calls will be interrupted and the configuration will be overwritten. To reset to factory settings, enter the security code!
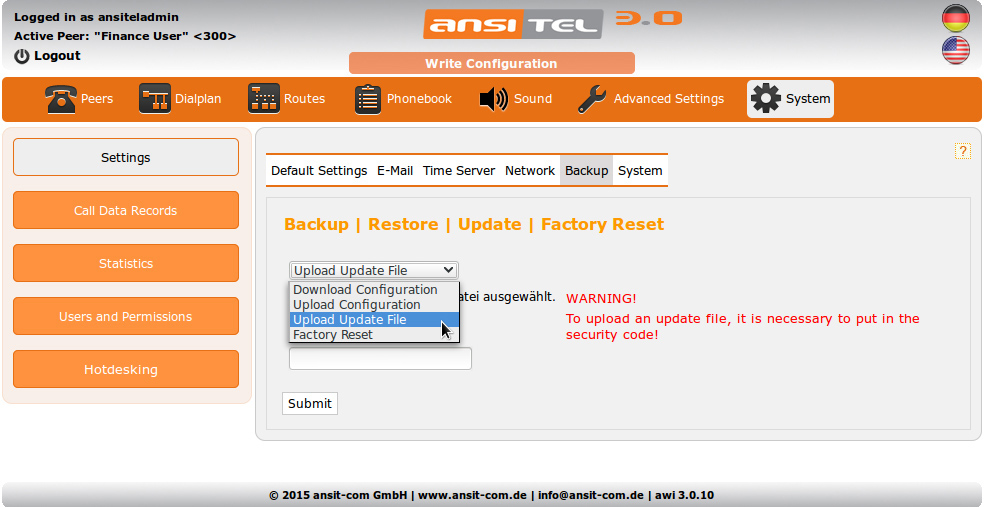
Figure: Configuration, updates and factory reset
Since release 3.0.13.3 the upload of different ansitel phone systems is possible. Please consider the source system has to own the same release as the destination system.
2.5.36.6 Helper
Helper programms provide interfaces to external software systems or devices. In this module these programms can be enabled, disabled or restarted.
Following helpers are available:
- ansitel Loader active: The ansitel loader is used for the ansitel callcenter suite. If there is no data in ansitel callcenter suite check the state of the loader.
- Multicast-Server active: The multicast server is used for auto provisioning of phones.
- Zendesk Interface active: The zendesk interface realizes the connection to zendesk helpdesk system.
- Salesforce Interface active: The Salesforce interface realizes the connection to Salesforce CRM.
-
Restart ansitel Protect Server: Each phone system using the internet is a potential target for attacks. The ansitel Protect Server analyzes several registration tries. After to many registration tries the source ip address of the attacker will be blocked.
-
Reload provisioning for all phones: This function sends a request to all registered phones to reload thier auto configuration.
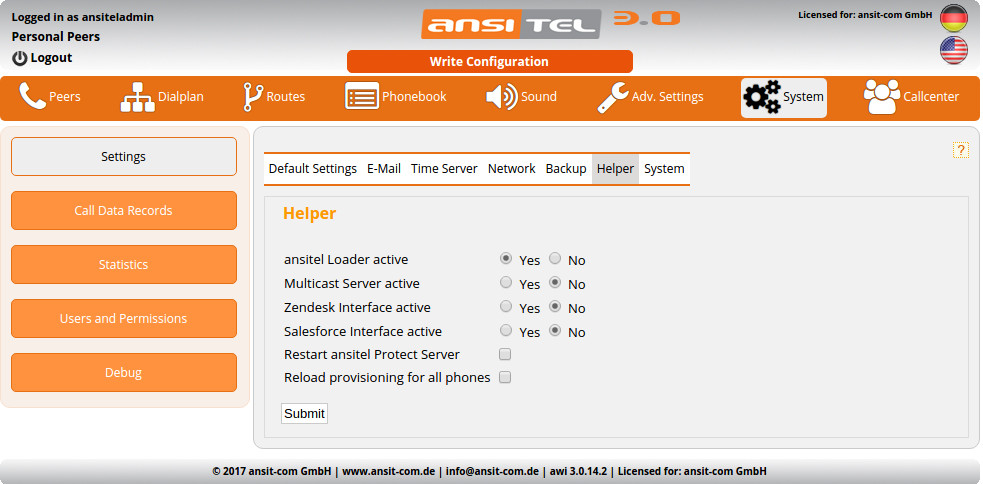
Figure: Helper
2.5.36.7 System
Under “System” you can do system actions:
- ansitel reload: The configuration of ansitel system will be read again.
-
ansitel restart: The ansitel process will be restarted. Attention: All current calls will be interrupted.
-
System reboot: The ansitel PBX will be restarted. Please enter the security code. Attention: All current calls will be interrupted.
- System shutdown: The ansitel telephone system will shutdown. Please enter the security code.
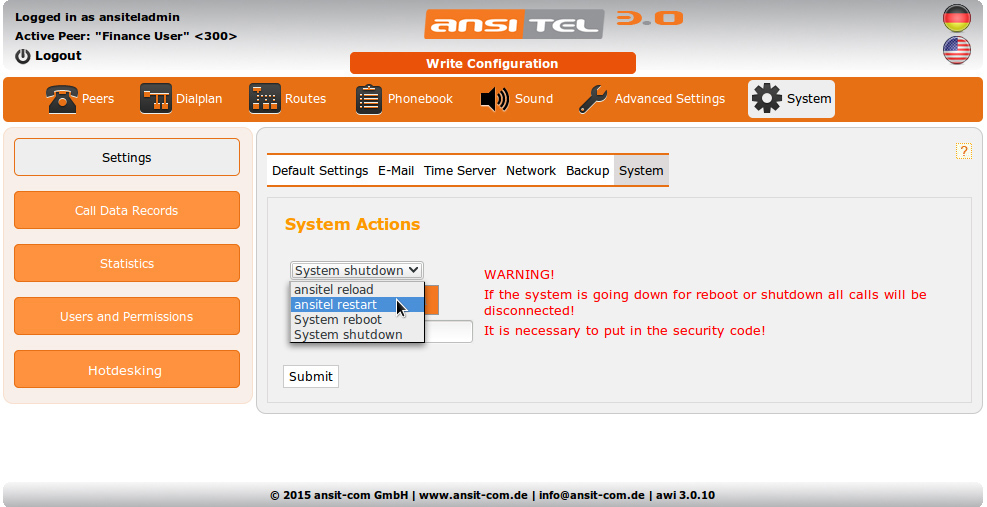
Figure: System actions
2.5.37 Call data records
All call data records of the ansitel 3.0 PBX can be sorted and searched trough by date and time, source, Caller Id, target, status and length. Recorded calls have a green speaker symbol. To hear the conversation, simply click on the green speaker icon.
For further reports, an export (download) in CSV format is possible.
The download is a compressed file (zip), that contains all recordings and call data records.
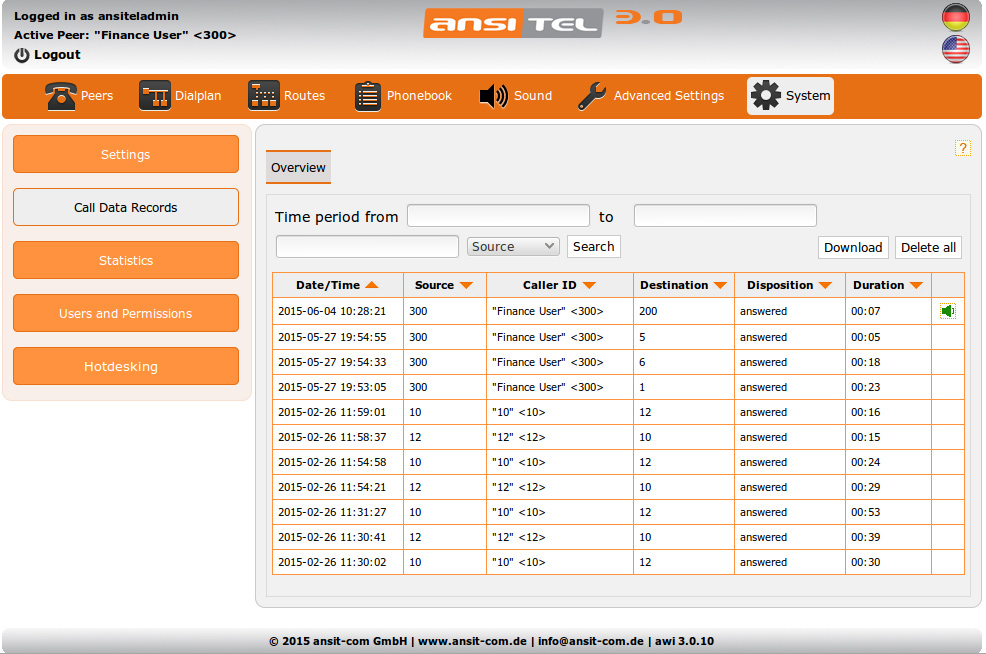
Figure: Call data records
2.5.38 Statistics
Over the module statistics, actual system information can be demanded:
- Which SIP and IAX2 peers are logged on?
- Which SIP and IAX2 lines/trunks are logged on?
- How many calls are currently active?
- Who speaks with who?
- Active Hotdeskings
- Active Callforwardings
- Active Do Not Disturb
- Active Night Switching
- Maximum utilization of the lines/trunks.
- Queue and logged on agents.
- Answered calls for each agent.
- Last call of each agent.
Below you will see the main page of the statistics. This shows an overview of the above mentioned points. For details, please click on the respective “i” icon.
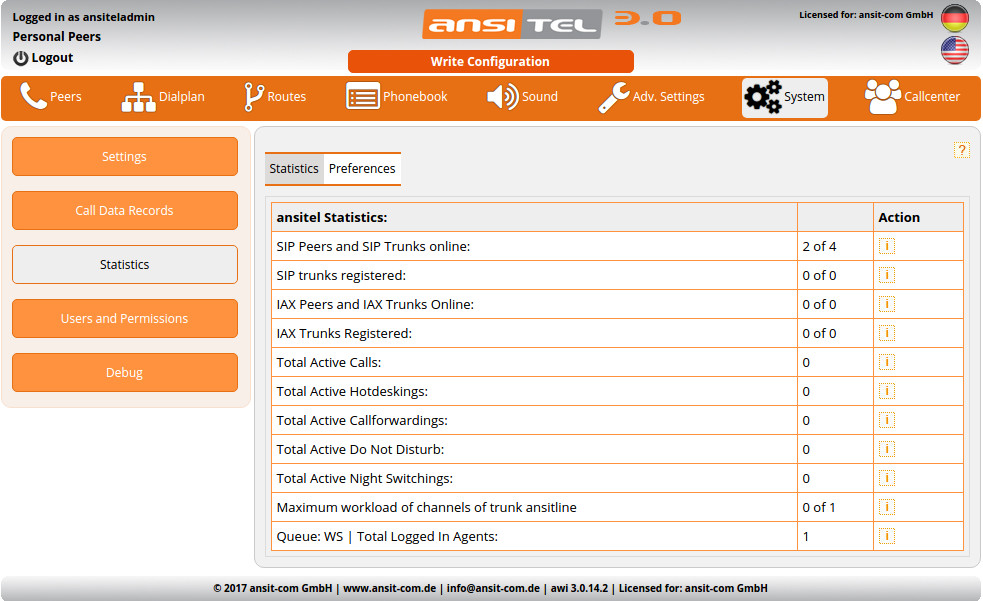
Figure: Statistics
Details: SIP peers and SIP trunks online
On this page you see the status of all SIP peers and SIP lines/trunks.
When a peer gets registered, it's IP address, port and status (OK) are shown. By clicking once on IP address, the web interface of the logged on devices can be called immediately over the browser. When the status says “unknown”, then the peer is not registered to the ansitel PBX. Reason for this might be incorrect login credentials. When you try to log on a device with invalid credentials multiple times, the IP addresses of this device will be blocked from the ansitel PBX. In case of a block, you can see the reason of the block and you have the possibility to unblock the device.
Figure: Details: SIP peers and SIP trunks online
Details: SIP trunks registered
On this page you see the status of the registered on SIP lines/trunks.
When a line is logged on, the status “OK” is shown. When the status says “Not registered / Auth. Sent”, the telephone system is not registered to the SIP line (e.g. VoIP provider). The reason for that might be invalid login credentials.
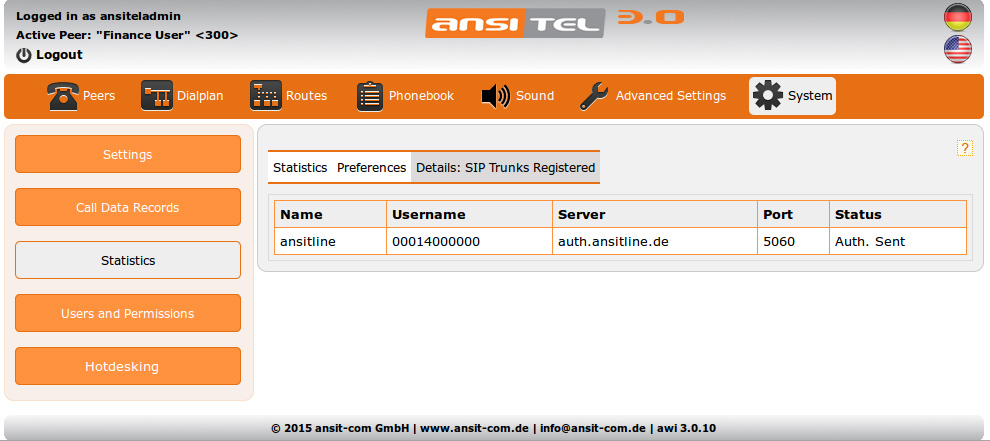
Figure: Details: SIP trunks registered
The details of the registered IAX lines/trunks are build according to the same scheme.
Details: IAX peers and IAX trunks Online
On this page you see the status of all IAX peers and IAX lines/trunks.
When an peer gets registred, the IP address, port and status (OK) are shown. When the status shows “Unknown” or the IP address is (null), the peer is not registered to the ansitel telephone system. Reason for this mightbe invalid login credentials.
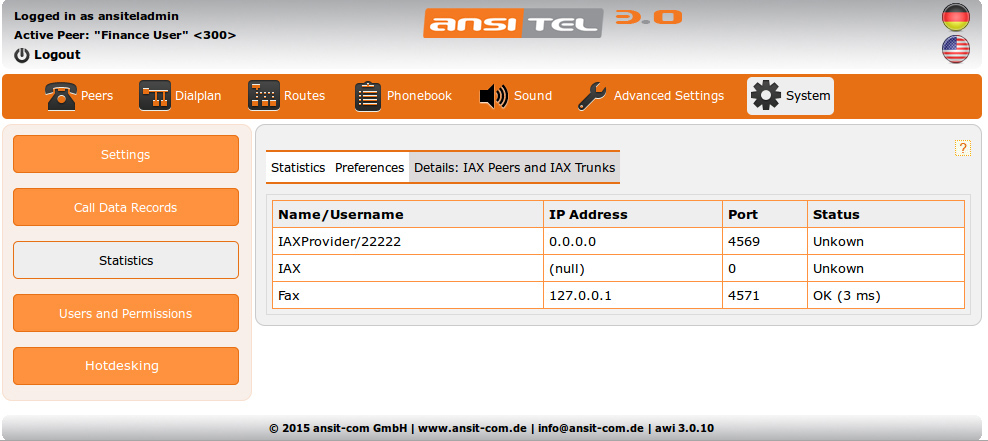
Figure: Details: IAX peers and IAX trunks Online
Details: Active calls
In the details of the active calls, all calls are shown order by source, target and duration.
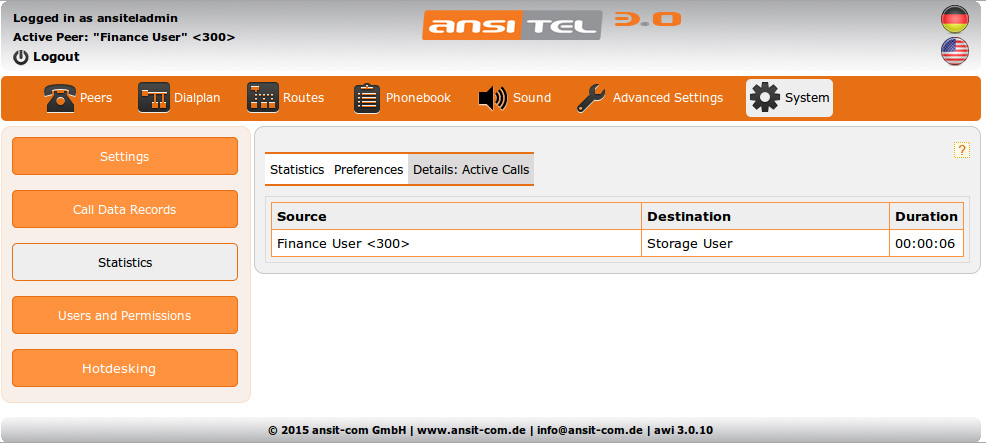
Figure: Details: Active calls
Details: Active hotdesking peers
On this page all active hotdesking peers are shown. Hotdesking peers contain an active forwarding to other peers. The hotdesking forwarding can be deleted by clicking the delete button.

Figure: Active hotdesking peers
Details: Active forwardings on peers
All callforwardings on peers are shown here. It can be deleted by clicking the delete button.
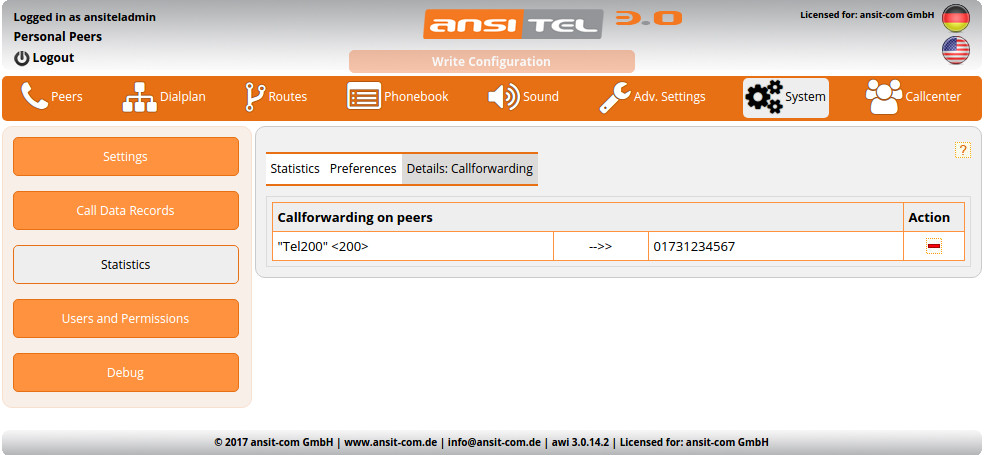
Figure: Active forwardings on peers
Details: Active do no disturb on peers
All active do no disturb on peers are shown here. It can be deleted by clicking the delete button.

Figure: Active do no disturb on peers
Details: Maximum utilization/workload of the voice channels of lines/trunks
In the details of the maximum utilization of voice channels, the following information can be viewed per line.
How many channels are used up to maximum?
When are these maximum values reached?
How many channels where used then?
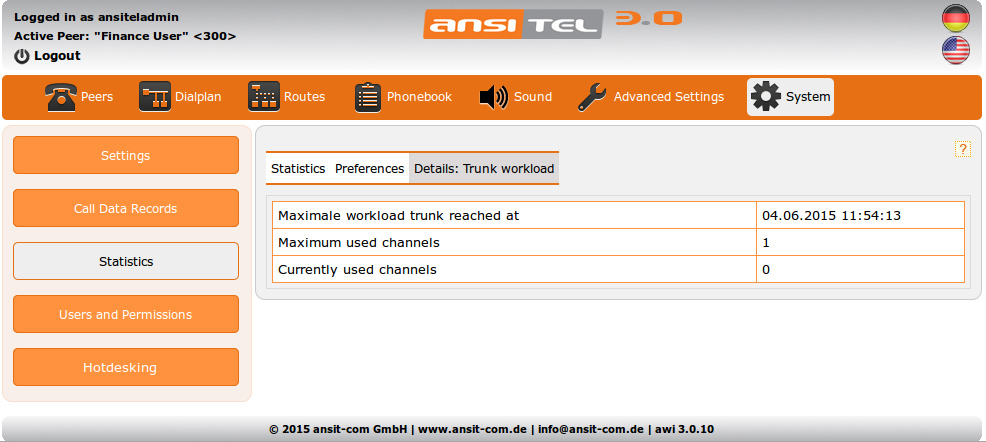
Figure: Maximum utilization/workload of the voice channels of lines/trunks
Details: queue
In the details, all logged on agents of the queue are shown with the following information:
The current user of the peer is listed in the column user. Static peers are permanently logged into the queue (Queues↓) and do not have a user.
The weight of the peer can be influenced on the allocation of the calls. Peers with lower weight receive calls earlier than peers with higher weigth.
The following columns contain the number of calls received and the time of the last call.
In the pause column is shown whether a peer is in break. In this mode, the peer does not receive calls.
Possible status of the extension:
- Available: Peer receives calls (depending on the queue call strategy).
- In call: Peer is in conversation.
- Busy: Peer is busy.
- Not registered: The peer is not logged on to the queue nor to the ansitel PBX. It will not receive any calls.
- Receives call: Peer is ringing.
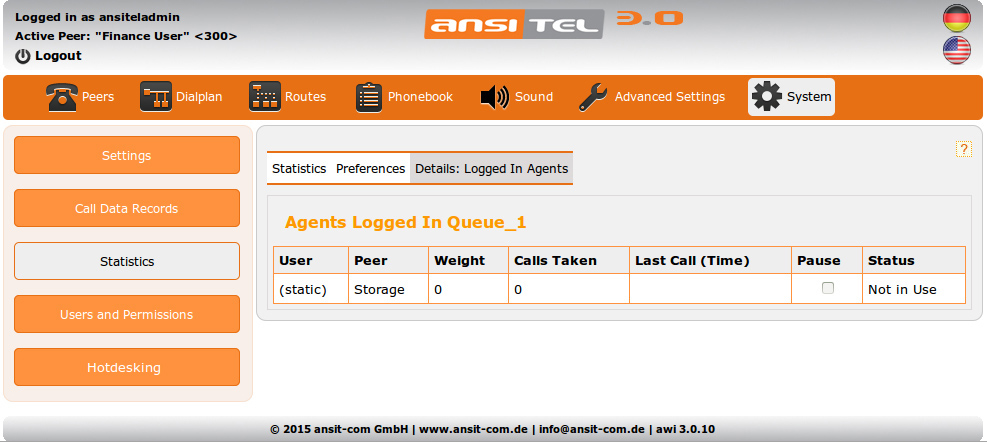
Figure: Queue
2.5.39 Users and permissions
In this module you can manage users, permissions and the personal peers.
The overview shows all users, the personal peers and the allowed modules. If a new user is created, assign one or more peers to this user. The user can switch these peers to active in his module to be reachable.
Active personal peers are show in green and inactive peers in red.
Click on
symbol to reach the personal peers menu.
In this menu you can edit the preferences of personal peers, personal forwardings and the personal voicemail.
The menu for assignment of permission can be reacht over symbol.
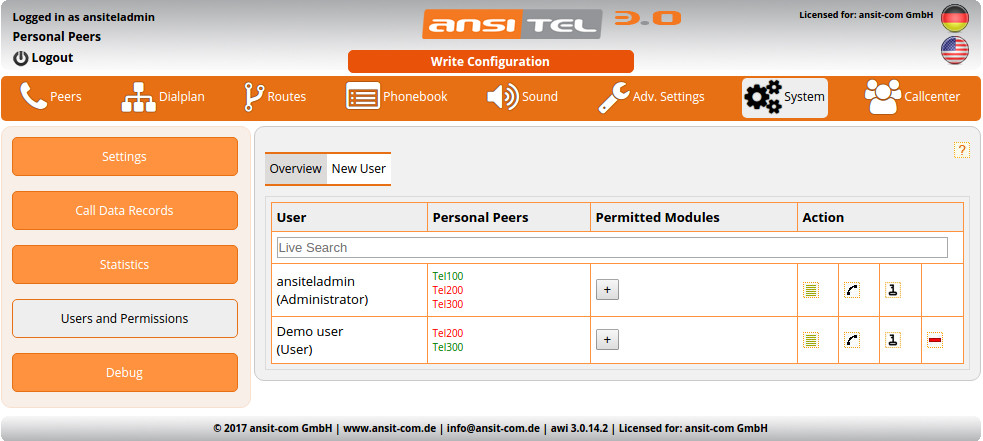
Figure: Users and permissions
Create a user
To create a new user, click on “New User”. Enter a user name and a secure password.
Would you like to use Tapi software on your windows computer (e.g. ansitel TAPI oder ansitel CTI Client), select “Activate TAPI”.
The ansitel telephone system provides browser plug-ins for browsers (Firefox, Chrome) or email programs (Thunderbird). These plug-ins require a security token. These is created after the activation of the Click-to-Dial function.
The password for the Tapi access and the Click-to-Dial security token can be found when editing the user on right side.
Select the language of this user to get the menu of personal peers and voicemail in this language.
Following user states/permissions are possible:
- awi-User: User with resticted access to the ansitel webinterface.
- Administrator: User with administrative permissions to the ansitel webinterface and ansitel Callcenter Suite.
- CS-User: Default user for ansitel Callcenter Suite.
- CS-Wallboard: User to show wallboards of ansitel Callcenter Suite.
- CS-Visitor: Visitor view of ansitel Callcenter Suite.
- CS-Agent: Agent access with agenten panel in ansitel Callcenter Suite.
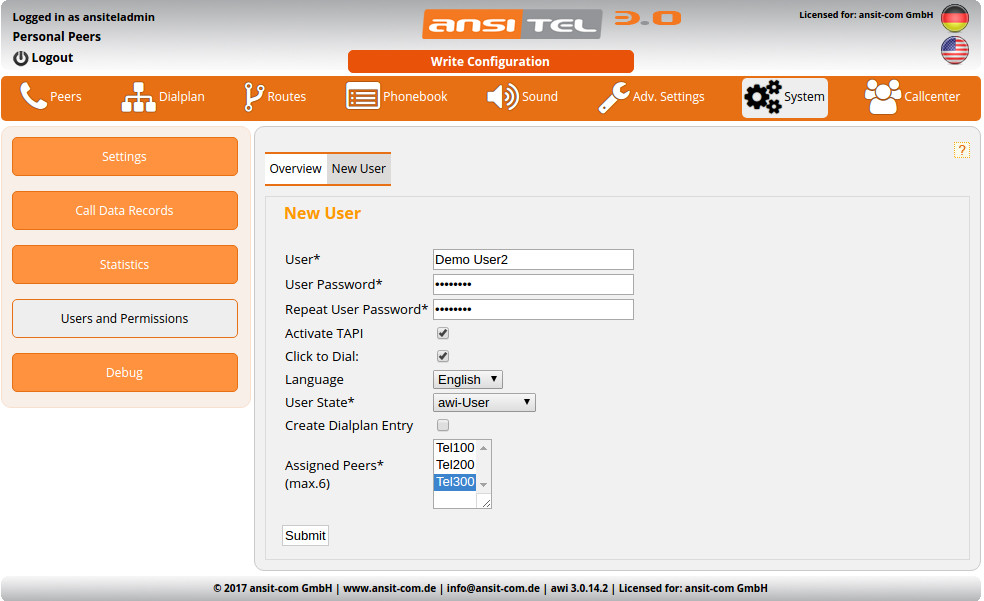
Figure: create awi-user
If Administrator or awi-User is selected up to six peers (multiple selection with ctrl) should be assigned. The user can activate these peers for to personal peer to be reachable under one single number.
If CS-Agent is selected, enter an agent login number and assign up to six peers (multiple selection with ctrl). After this an agent with permissions for the ansitel Callcenter Suite will be created in hotdesking module (Hotdesking↓).
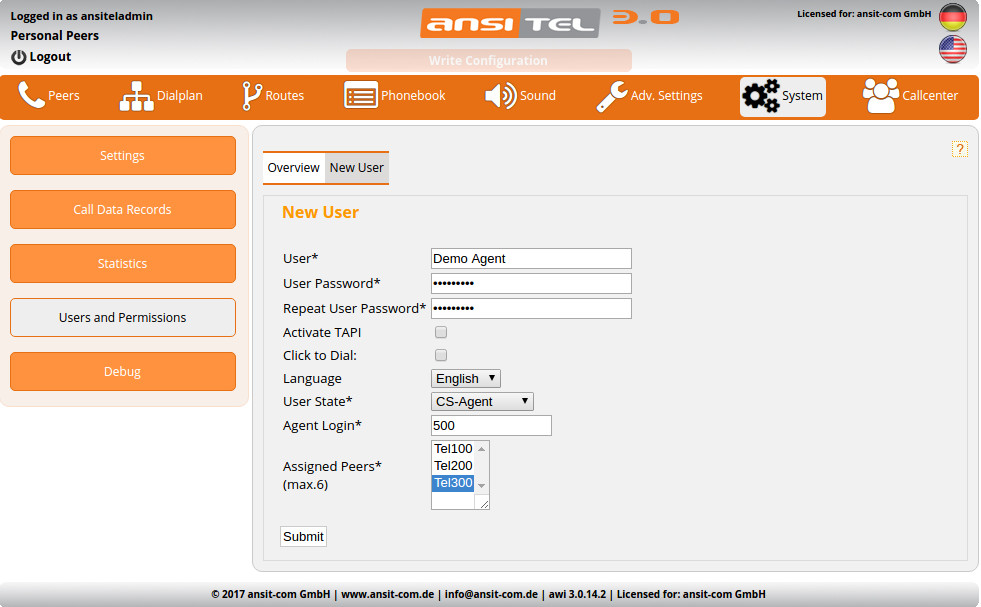
Figure: create CS-Agent
The module "personal peers" can create an assigned dialplan entry if "Create Dialplan Entry" is enabled.
Activate peers for the personal peer module
If an "awi-User" or an "Administrator" was created, you will fordwarded to the personal peer module. In this module all assigned peers of new user are shown. Please activate (green) one or multiple peers for this user and press "Submit".
Peers in grey color are currently used by other users and cannot be activated.
Figure: Activate peers for the personal peer module
These settings can be edited by symbol.
All active peers will be dialed by using Click-to-Dial function in phonebook modules. If a peer answers the call, the destination number will be called.
More Information and manuals for personal peers can be found in section Personal peers (One Number Concept)↓.
Assign queues
If the new user is creted with the state "CS-Agent", one or multiple queues with queue weight can be assigned to this user in the next step. The agent is now available and have access to the ansitel Callcenter Suite.
Figure: Assign queues to new user
Benutzer bearbeiten
You can edit the user (), password, user status, TAPI and click-to-dial function and the personal peers.
If you want to use Tapi software (e.g. ansitel CTI Client or ansitel TAPI), please enter the username and the TAPI password on the right side.
Additionally the click-to-dial token is available if this function is enabled.
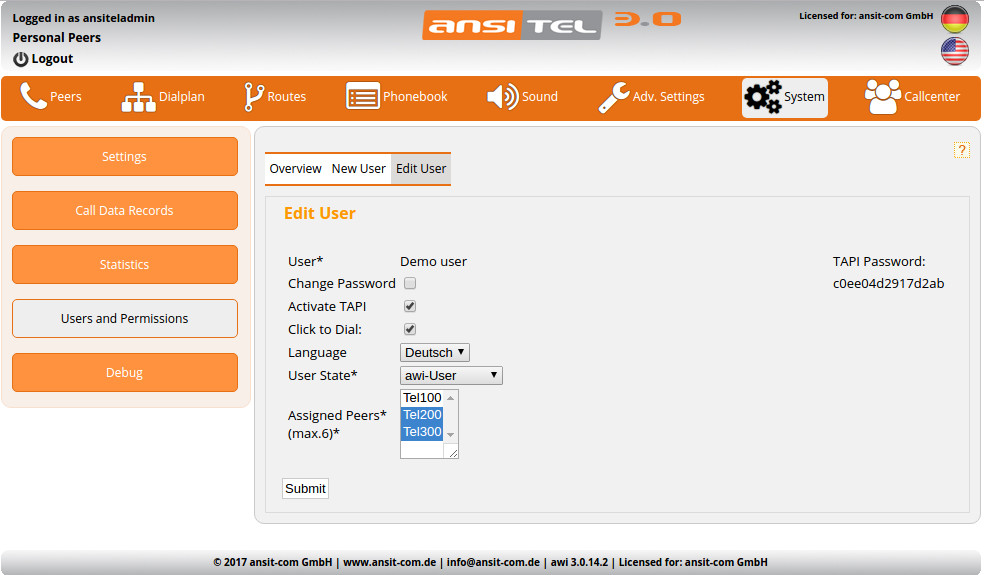
Figure: Edit awi-User
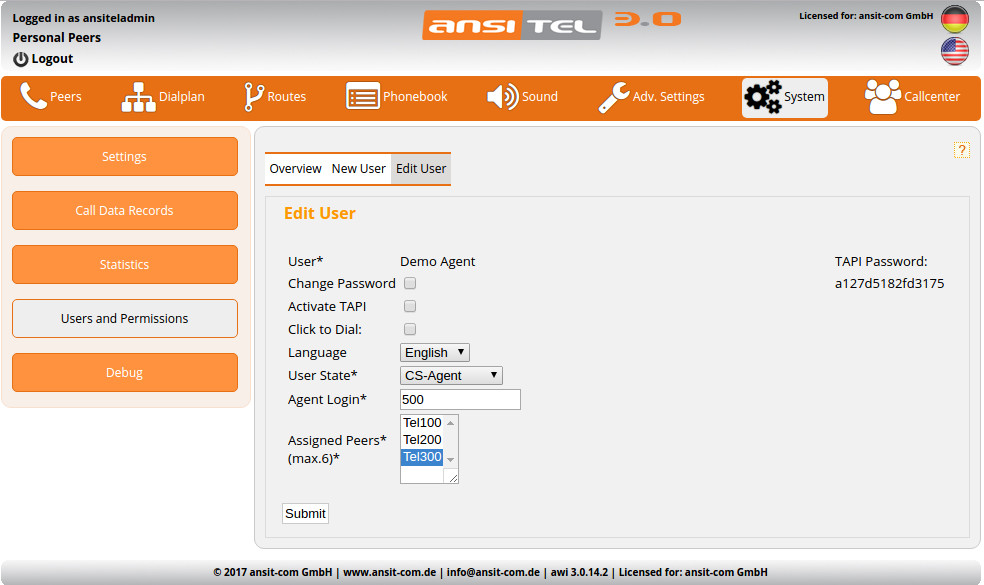
Figure: Edit awi-Agent
Set global permissions
Administrator have access to all modules. Users have restricted access for user modules.
To change the permissions for an user, click on and enable the desired module.
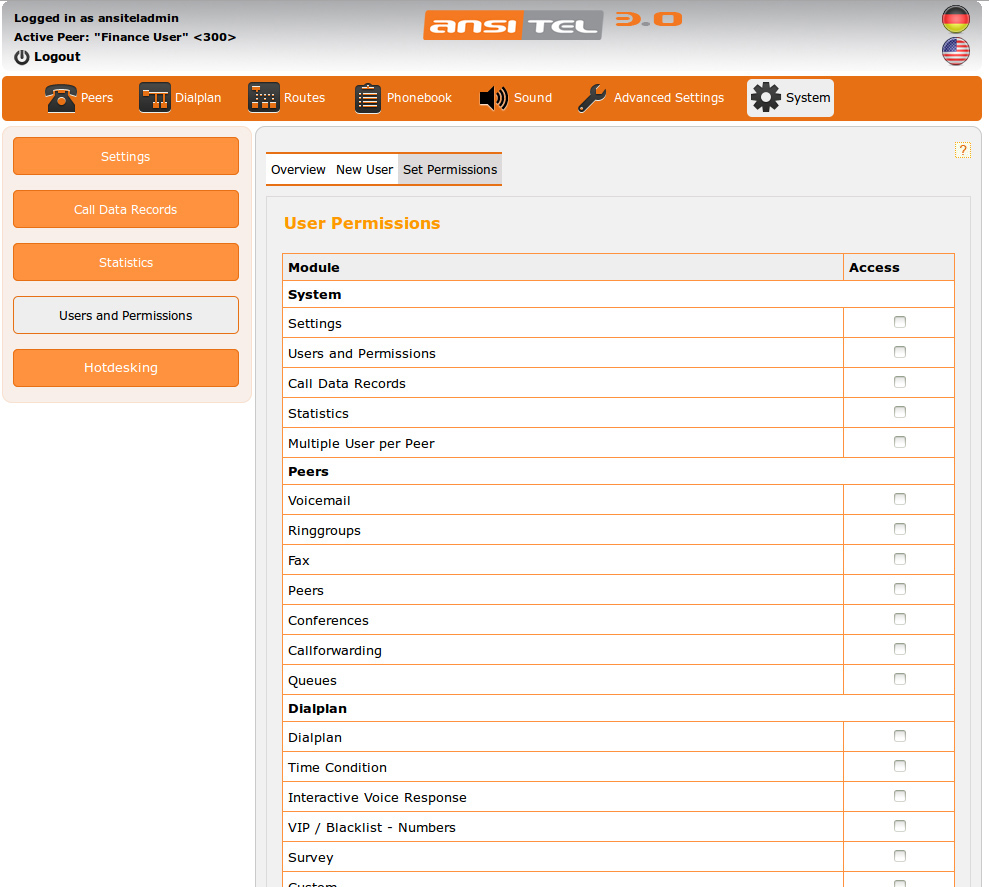
Figure: Set global permissions
Set permissions object based
Administrators can assign single objects from modules "queues", "hotdesking" and "peers" to users. Just click on the module directly. The object view shows all single objects of a module. Select the desired objects the user can access in ansitel webinterface and ansitel Callcenter Suite.
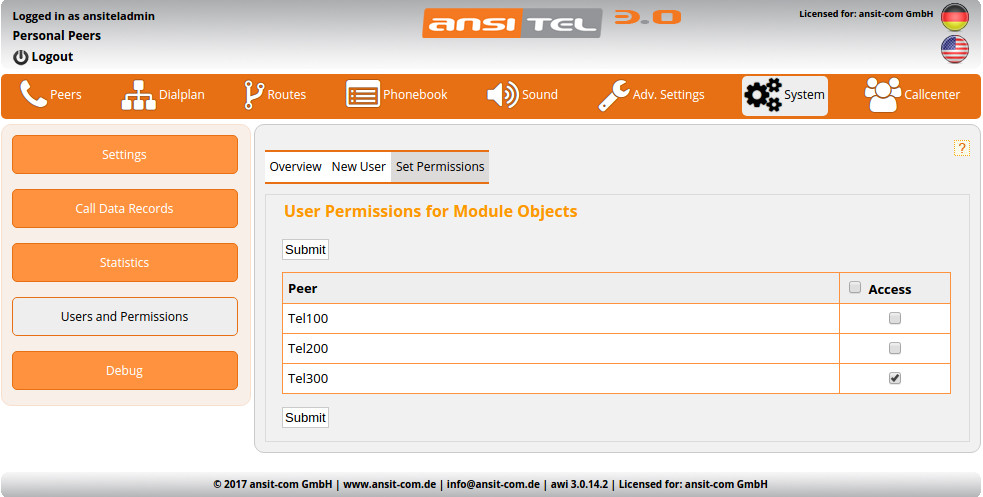
Figure: Set permissions object based
2.5.40 Queues
Queues are used in call centres. Callers land in the queue and hear a hold music and / or announcement. In the background the phone calls are distributed according to predefined ring strategy to the logged on agents. Queues offer the possibility to pass on callers or customers to certain employees.
The queue module can be configured in different parameters to the needs of the call centres. These parameters can be the Wrapup time or the respective distribution and forwarding of the phone calls to the agents.
In the ansitel web interface, queues are created and edited under the menu item "Callcenter".
Create queue
The following parameters are important for the creation of new queues:
- Queue Name Unique name for this queue.
- Queue Number: With queue number the data of outgoing calls can assign to queues and reported by ansitel Callcenter Suite. Use the following scheme to dial: ** + <queue number> + <destination number incl. prefix>
- Caller ID: Caller ID for outgoing calls assigned to this queue (e.g. call via queue number)
- Type:
- Incoming: Incoming queues are queues which threat incoming phone calls and pass them on to the logged on agents.
- Outgoing: Outgoing queues are necessary to store the conversation data of the outgoing phone calls by the logged on agents. The conversation data are assigned to the queue in which the agent is logged on. With this, tools like Queuemetrics or ansitel Callcenter Suite monitor outgoing calls.
- Send busy if no agent available: If busy is required in case of all agents are in call, enable this option. This function is used for special services (e.g. Call2pay numbers).
- Add Label to CallerID: You can label the callerid with queuename. The agent knows from which queue the call is comming.
- Pause before answering queue/announcement (in sec): If a phone call gets redirected over different networks (e.g. Mobile network to telephone system), it can cause delays in the call connection. The delay becomes noticeable by the caller, because the announcement beginning of the queue is cut off. If this is the case you can add a break before the queue (in seconds).
- Create Dialplan Entry: In this module you have the possibility to immediately set a suitable dialplan number together with the queue.
- Announcement before queue: Enable an announcement for caller before reaching the queue. Announcements can be created in module announcements.
- Music On Hold: This hold music is played to the caller in the queue. You can upload music on hold in the module music on hold.
- Ring strategy: This strategy describes how logged on agents receive phone calls from the queue. The following strategies are possible:
- Ring all agents (agent weight possible)
- Ring agent with was least recently called
- Ring agent with fewest completed calls
- Ring agents randomly (agent weight possible)
- Ring all agents one after another (agent weight possible)
- Ring agents depents on penalty (metrics)
- Announcement frequency “position / expected holdtime”: Temporary distance in seconds between the announcements “position / expected holdtime” (value over 0 activates this announcement, 0 or empty turns it off)
- Announcement of the position: Play the actual position to the caller in the queue (possible values yes, no). In connection with the announcement frequency, the announcements “position, expected holdtime or both” can be set.
- Announcement “expected holdtime”: Play the caller “expected holdtime” in the queue. (Possible values: yes, no, once). In connection to the announcement frequency, the announcements “position, expected holdtime or both” can be set.
- Periodic Announce An own announcement can be played to the caller in the queue. This must be set prior in the announcement menu (Ansagen).
- Periodic Announce Frequency: Temporal distance in seconds between the repetition of own announcement. (0 or empty for out).
- Joinempty: Callers can enter the queue even when no agents are logged on (possible values: yes, no).
- Leavewhenempty: Remove callers from queue if no more agents are available (possible values: yes, no).
- Maximum amount of caller: Maximum amount of caller in the queue. If the maximum amount in the queue is reached, the queue in dialplan will ignore all other calls and jump to next sequence entry.
- Monitor calls: Record all calls of this queue. The recording can be found in the module cdrs under the speaker symbol.
- Weight of queue: Weight of queue in comparison with other queues (possible values: 0 – 9). If an agent is logged on for multiple queues, the queue with the highest priority will be handle first.
- Language: Language of the queue announcements of this queue.
- Retry: Time (in seconds) for the agents to get called. The queue tries to call the agents several times for the duration of the dial. After every phone call a break can be set between the dials.
- Agent Dial Time: Time (in seconds) the agents are called.
- Wrapuptime: post processing time (in seconds) for agents between the calls. In this time no calls are forwarded to agent.
- Autopause for Agents: When an agent does not respond a call queue will be automatically paused the agent (Yes: only the queue whose call was not answered | All: all queues in which the agent is logged on | No).
- Announcement Before Answer: The announcement which is played to the agent before accepting a call. This may differ from which queue the call came in, if the agent is logged on to multiple queues. The annopuncement can be set in announcement module.
- Announce Holdtime for Agents: Announcement of the length of the holdtime of the caller. This is played to the agent before accepting the call.
- Call Agents in use: Agents in call will get additional call if this option is enabled.
- Max Calls to Agent: With this option you can limit the calls if "Call Agents in use" is enabled.
- Dial Free Agents First: If call to agent in use is enabled, dial free agents first and then the parallel channels of agent.

Figure: Create new queue
Overview of queues
The overview shows the queue number, queue name and the queue type (incoming or outgoing).
Additionally, static agents can be added to the queue by clicking the symbol. Static agents are permanently logged in at the queue. In the overview, all the static agents and their weight is listed.
With the  symbol, queue options can be added.
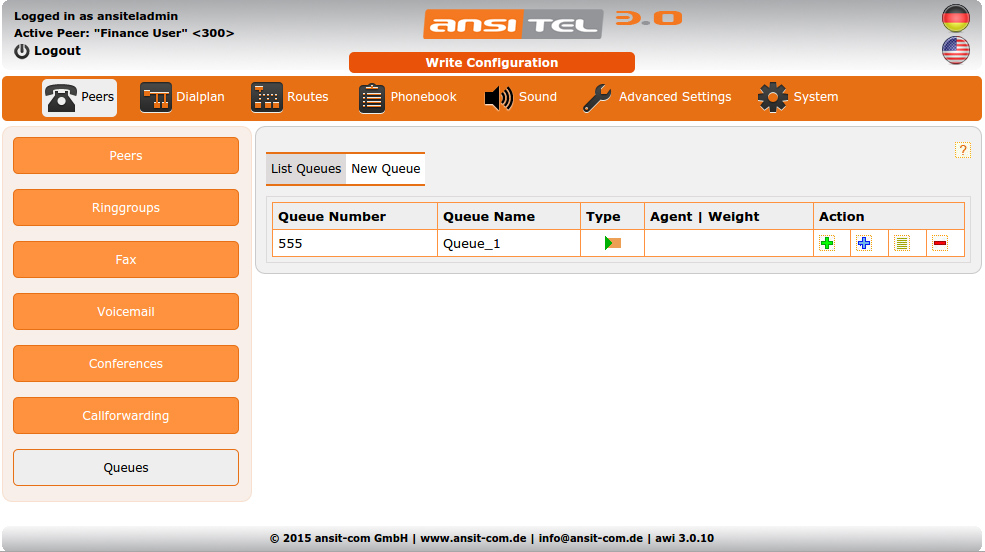
Figure: Queues
Add static agents
Static agents are permanently logged on to the queue. Choose a peer / agent and the preferred weight.
Agents with lower weight receive calls earlier than agents with higher weight.
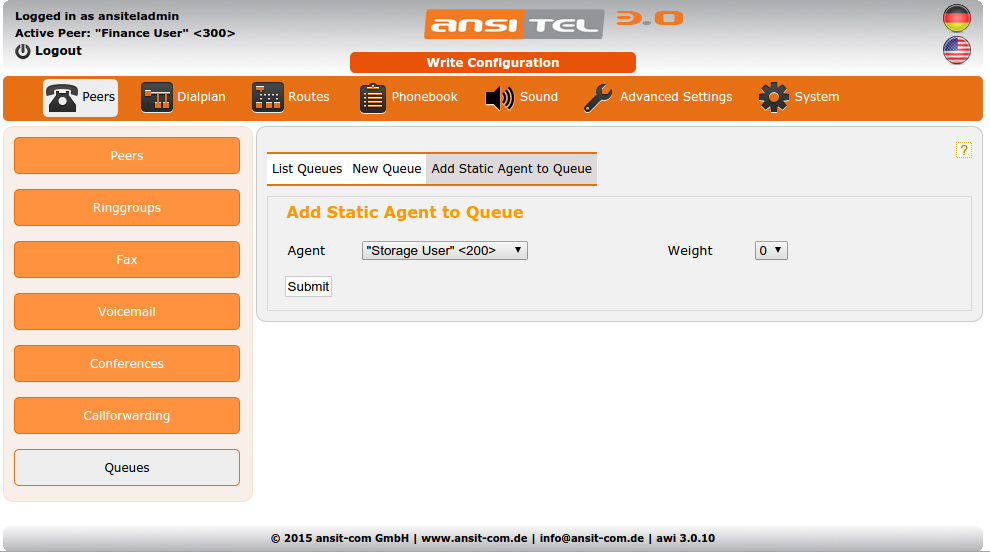
Figure: Add static agents to queue
Add queue options
Through queue options, callers can dial a number in the queue and will be forwarded to a dialplan number.
Example: The caller gets the announcement “Currently all employees are occupied. When you don’t want to wait, you can press the button 1 and leave a message”. When number 800 is assigned in dialplan to the voicemail, the above mentioned example is realized.
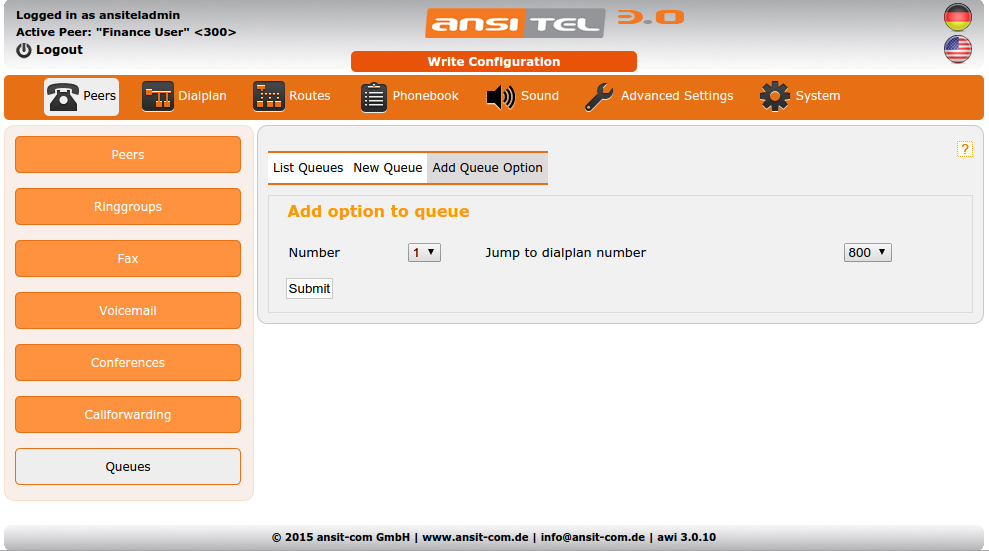
Figure: Add queue option
Edit queue
The same parameter as create queue are usable. Additionally the static agents and the queue options can be changed.
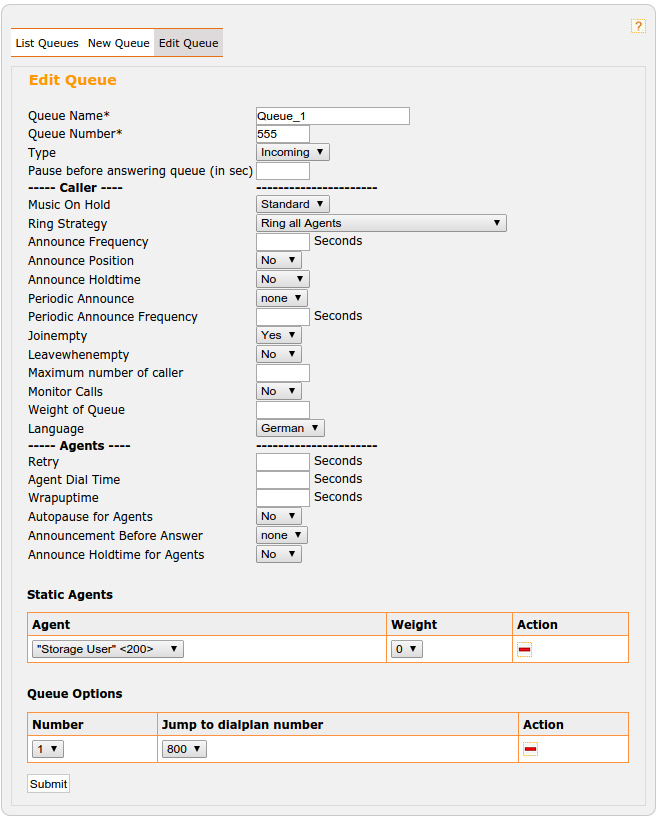
Figure: Edit queue
2.5.41 Hotdesking
With hotdesking it is possible to let a peer be used by multiple users. More information about the hotdesking module can be found in chapter Setting up the web interface ansitel 3.0 with queues and hotdesking on a phone↓.
2.5.42 Restricted users
User with state "awi-User"(Users and permissions↑) can logon ansitel webinterface with thier credentials. All user get an user view with user assigned modules.
After logon the active peers of users personal peer module can be edited under menu "User" or on top left "Personal Peers" link.
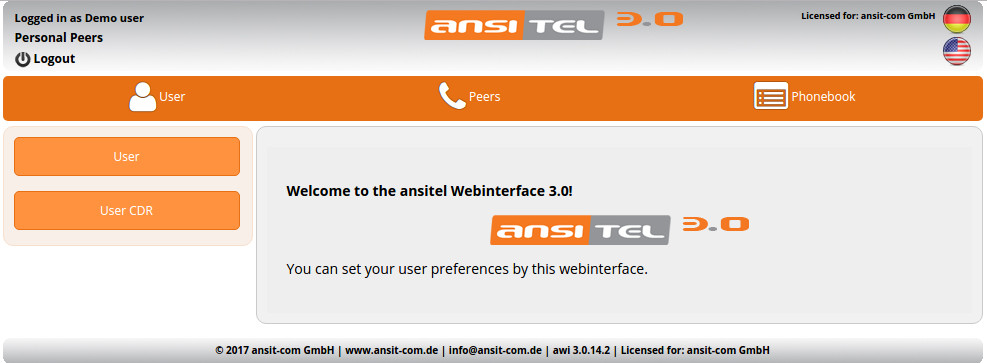
Figure: Logon restricted users
2.5.42.1 User module: User
In this module the user can change the personal peers, the forwardings, the personal voicemail, the caller Id and the logon password.
Additionally the click-to-dial function of phonebook is connected with active personal peers.

Figure: Activate peers for user
Detailed information about personal peers of users you will find in chapter Detailierte Informationen über die Persönlichen Nebenstellen von Benutzern finden Sie in Kapitel Personal Peers (One Number Concept)↓.
2.5.42.2 User module: User CDR
All cdrs can be sorted and searched by date / time, source number, caller id, destination, disposition and duration.
The basis are alle assigned peers from users personal peer module.
for additional reports all data can be exported via csv-file.
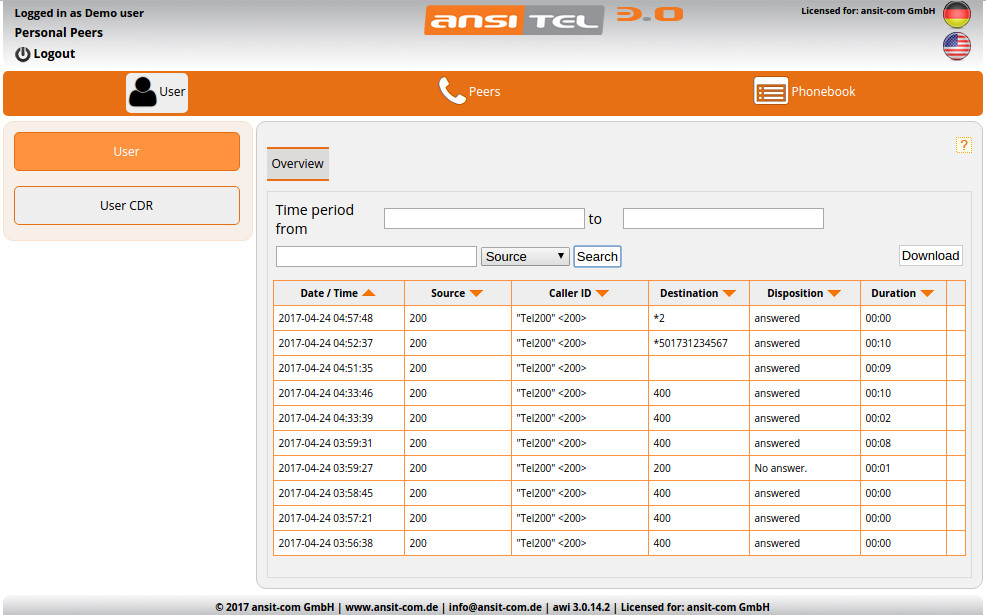
Figure: User CDR
2.5.42.3 User module: Peers
In this module the user can configure the assigned peer accounts (Peers↑) by himself.
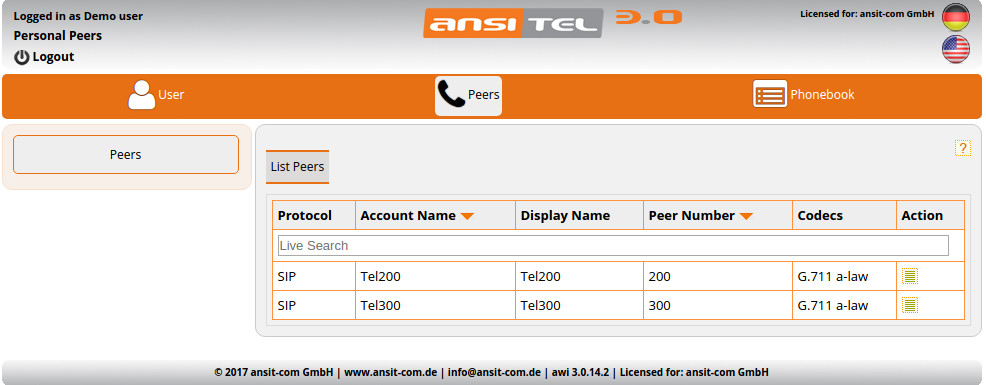
Figure: User peers
2.5.42.4 User module: Phonebook
The ansitel pbx provides each user a local and a ldap phonebook. It has the same functionality as the phonebook of administrator view (Phonebook↑)
Both phonebooks can store all company contacts. Generally the ldap phonebook is used by multiple users to handle same contacts. All contacts can be shown on devices with ldap functionality. A reverse search ist also possible.
The local phonebook will be stored directly in the user phone and will be transmitted via auto provisioning. It can be used for private conatcts.
All user kann dial contacts in phonebook directly (Click-to-dial).
Attention: The logged on uses needs minimum on active peer in the personal peer module to dial from phonebook.
The personal peers can be assigned in Users and permissions↑) menu.
Local and ldap phonebook
The overview shows the user view of local and ldap phonebook. You can add contacts to user groups.
Select date / time range, an available group and click on "Change Group" to show all contacts of this group.
The search function can be found on the right side. You can search over lastname, company, and phonenumber. Substrings are possible.
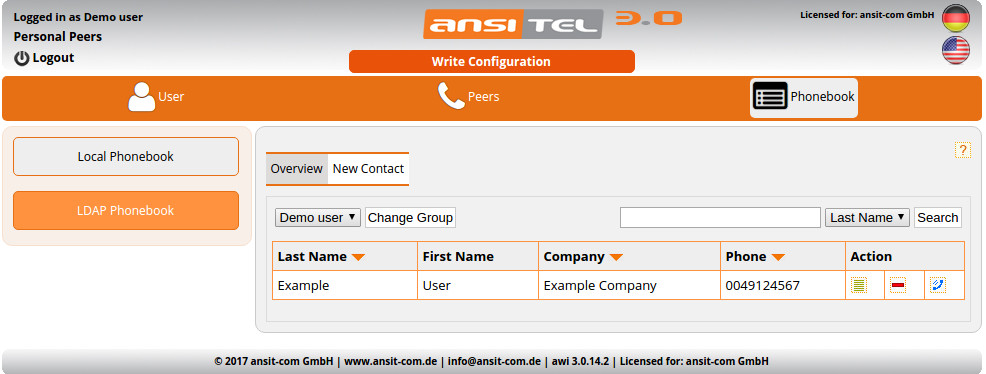
Figure: Local phonebook
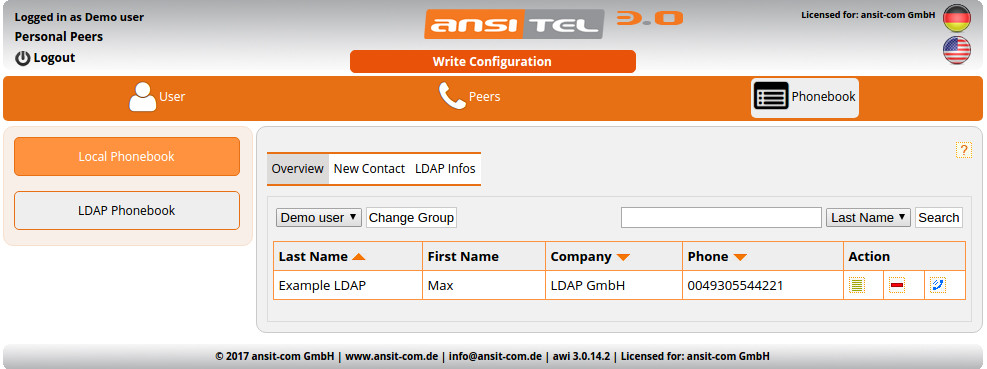
Figure: Ldap phonebook
2.6 Dial methods for outgoing routes
If several outbound routes are used with different lines, the desired outgoing route can be selected based on the method of dialing, which should be used for calling.The ansitel telephone system supports two dial methods:
- Based on the prefix (default)
- Based on the dialed telephone number
2.6.1 Prefix-based dial method
The prefix based dialing method uses a prefix (e.g. 0 or 1) in front of the dialed phone number (0 + 03069206868) to select the outbound route that is supposed to be used for calling.
2.6.1.1 Configure dial methods
The prefix based dialing method is set in the module default settings↑ and defined under main menu point “Advanced Settings”.
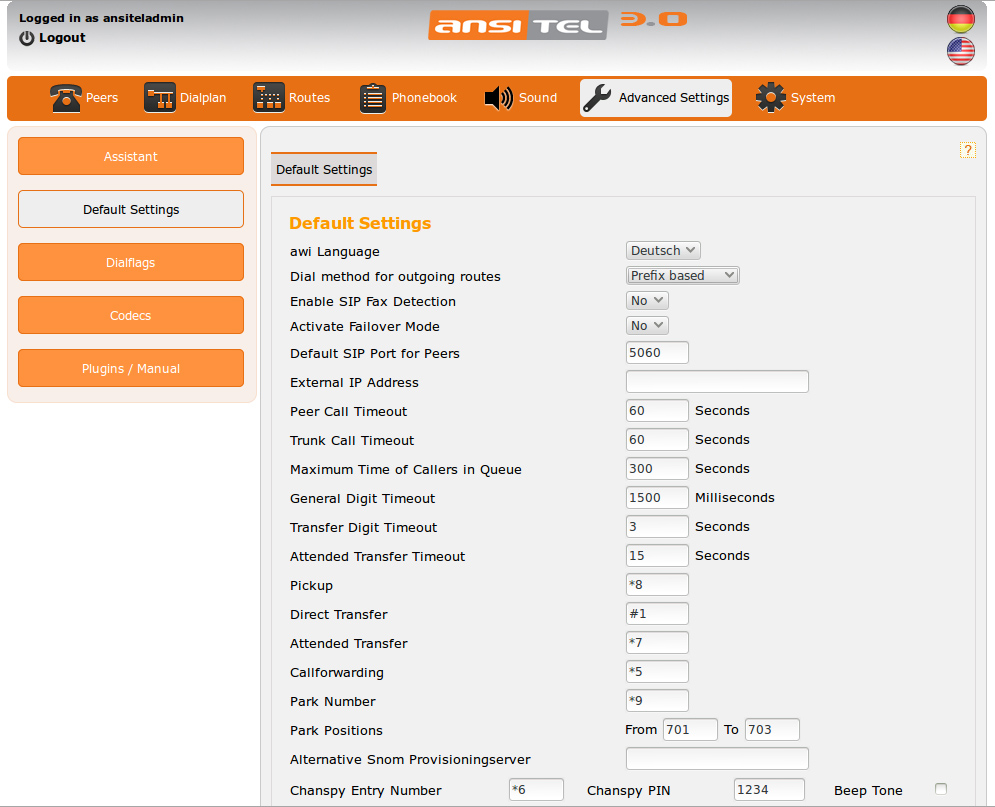
Figure: Default settings
2.6.1.2 Outgoing routes with prefix
In the module “Outgoing Routes” under the menu item “Routes”, routes can be added via “New Outgoing Route”.By selecting a prefix (e.g. 0), this route can be selected when you dial to pstn with leading prefix before the number. Add this outgoing route to one or multiple lines.
The prefix 1 can be assigned to one further outgoing route. By preselecting the respective prefix, outgoing routes are distinguished from one another.
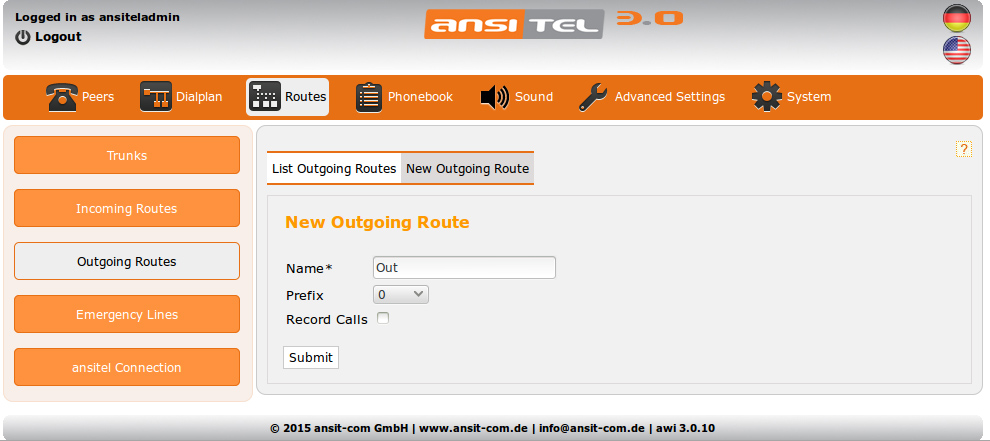
Figure: Outgoing routes with prefix
2.6.1.3 Incoming route with prefix
The prefix of each outgoing route can be associated with the incoming phone number. The ansitel telephone system puts this prefix on front of the senders number (CallerId) on incoming calls. This is the identification, through which route / line the call came in. Many devices store the phone number for missed calls. In combination with prefix and sender number it is easier to call back using the correct corresponding outbound route.
With the selection of the outgoing route, the belonging line number (CallerId) is also set as the sender number. This is especially beneficial when handling multiple companies across an ansitel PBX.
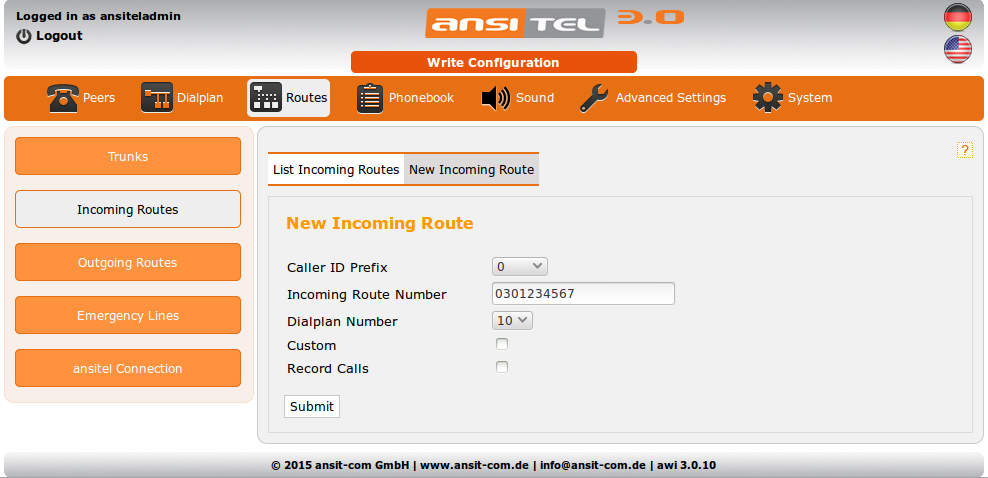
Figure: Incoming route with prefix
2.6.1.4 Forwarding with prefix
If outgoing routes with prefixes exist, it is necessary to specify the prefix of the outgoing route through which the routing is to be implemented in the forwarding module.
Note: Redirects that are configured directly on the device, the prefix number of the desired outbound route must be prefixed.
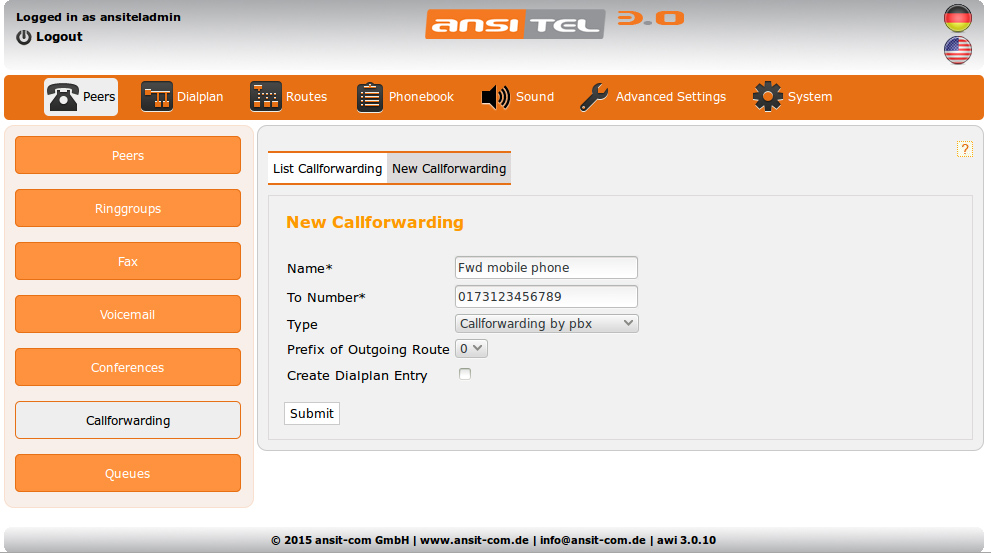
Figure: Forwarding with prefix
2.6.2 Number based dial method
The number based dial method selects the outbound route based on the first digits of the dialed number. Therefore, international format of numbers required (e.g. 0049 Germany, 0033 France, 0044 England). This system is used in combination of several VoIP providers / VoIP trunks.
2.6.2.1 Configuration of the dial method
The number based dialing method is set in the module default settings↑ and defined under main menu point “Advanced Settings”.
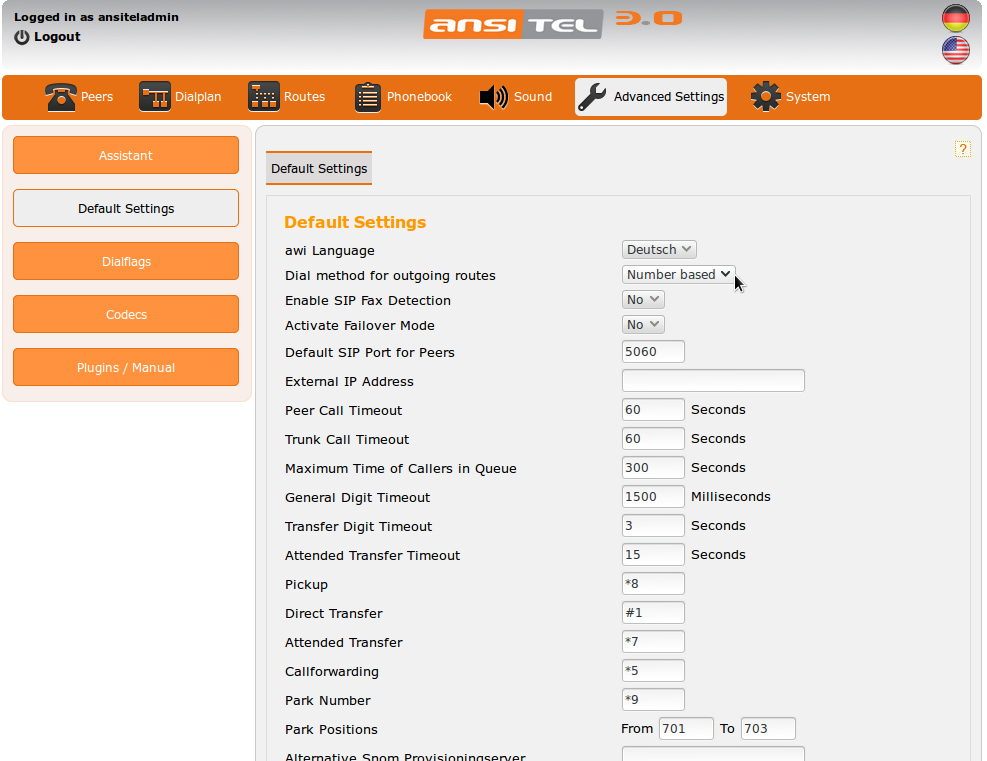
Figure: Default Settings
2.6.2.2 Outgoing route
Routes can be added in the module “Outgoing Routes” under the menu item “Routes” using “New Outgoing Route” button. Create multiple outgoing routes and add these one or more lines ().
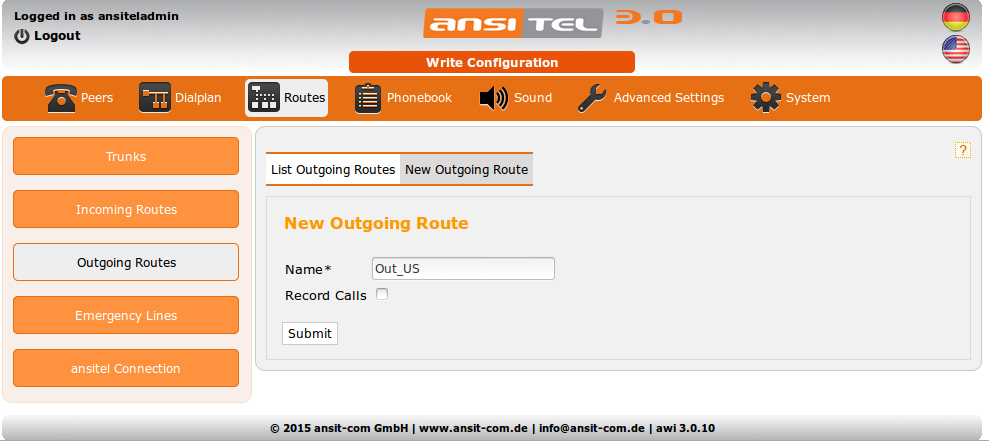
Figure: Outgoing route
The first outgoing route is set as default (Standard) after creating (in example Out_US). In order for the desired route to be selected when a number is dialed, one or more matching number must be added (blue plus icon).
If a number is dialed and the first 4 digits do not match matching numbers, the default route is selected.
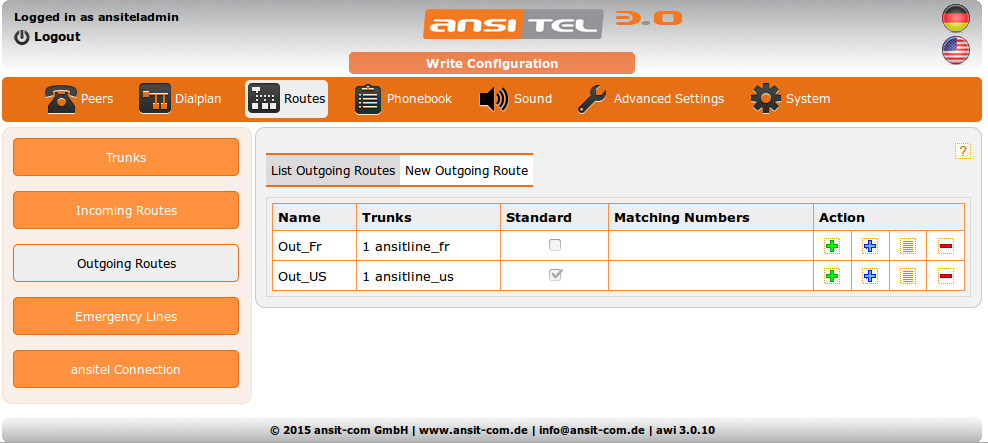
Figure: Overview of outgoing routes
Adding matching numbers
Click on the blue plus sign and add matching numbers to outgoing routes.
Possible examples are 0049 Germany, 0033 France, 0044 England etc.
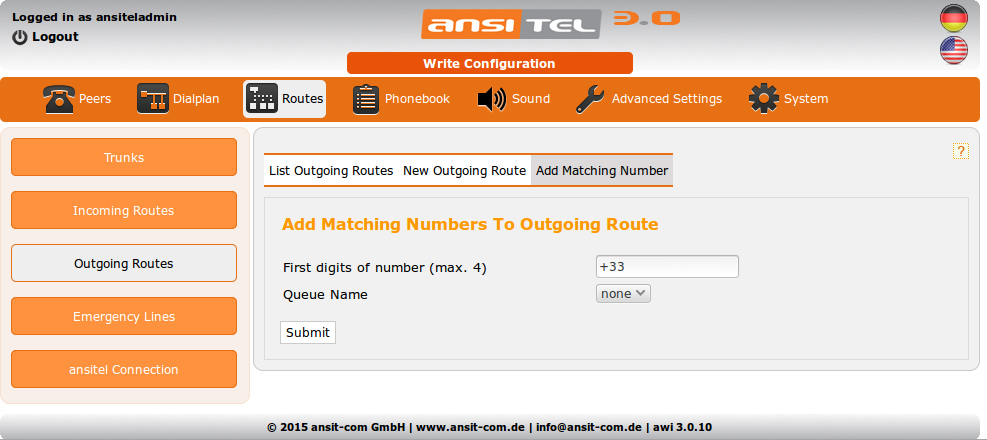
Figure: Matching numbers
In addition an outgoing queue can be selected. This is used for the collection of call data when an agent is logged on to this queue and makes phone calls using this route to pstn landlines. The call data can then be evaluated by monitoring and reporting software.
After mapping of the matching numbers to the existing outgoing routes, the dialing method is ready to use. If a peer dials a number +33XXXXXXX, the outgoing route “Out_Fr” with the trunk “ansitline_fr” will be used. If a call to Germany with the phone number 0049XXXXXXX is placed, the outgoing route “ansitline_us” with the line “ansitel_us” gets used, because it is the default route. This dial method makes it possible to use different outgoing routes/trunks for different targets.
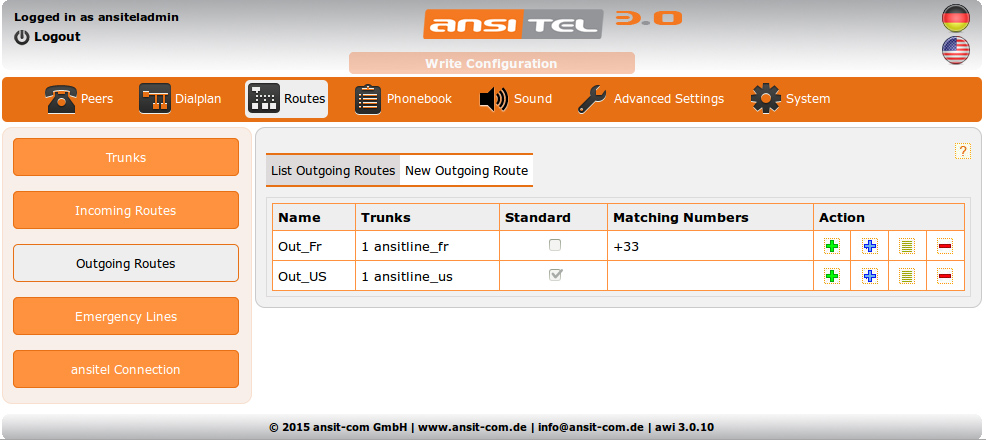
Figure: Overview outgoing route with matching numbers
You can edit the outgoing route and change the matching numbers. It is also possible to set a default route.
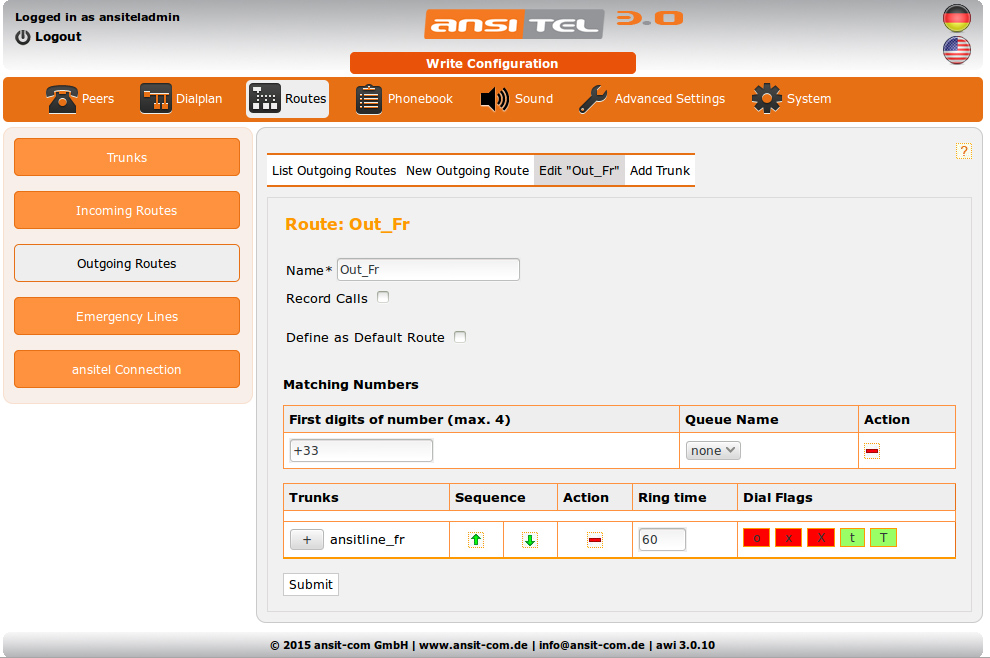
Figure: Edit outgoing route with matching numbers
2.6.2.4 Set the sender telephone number (Caller Id) based on the matching numbers
Based on matching numbers, outgoing routes and lines/trunks are selected. For dialing in the appropriate direction (e.g. US and France), a international country specific number must be set (format specified by the provider). Sender phone numbers (Caller Id) can be set in the peer module under the menu item “Peers” in case the peer is being edited. In the “External Caller ID” field, any sender number, separated by comma characters can be set.
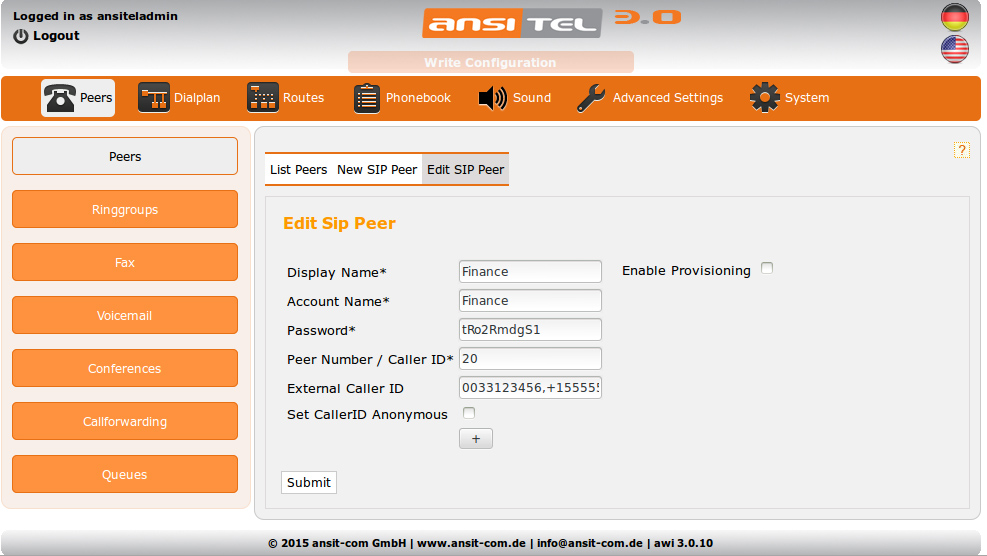
Figure: Set the sender telephone number (Caller Id) based on the matching numbers
If the peer “Finance” dials in the direction of France 0033XXXXXXX, it will recognize the ansitel telephone system and automatically set the appropriate sender number (caller id). The same scenario occurs with the US telephone number. With this system a cross-border telephony with different VoIP providers can be implemented.
2.7 Setting up the ansitel 3.0 with queues and hotdesking on a phone
This module is part of the call centre functionality of the ansitel PBX. With this multiple users can be defined for working the on one peer. For example, a call centre has 4 peers and 6 agents at different times. The agent begins his work by using a telephone, enter the agent ID and therefore logs on all assigned queues. He now gets calls from the associated queues.
Setting up hotdesking to a phone requires the basic configuration by the administrator. After setting up agents to login in and out either directly on the phone or via the ansitel web interface and set pause and unpause.
2.7.1 Setting up hotdesking
2.7.1.1 Log on as administrator
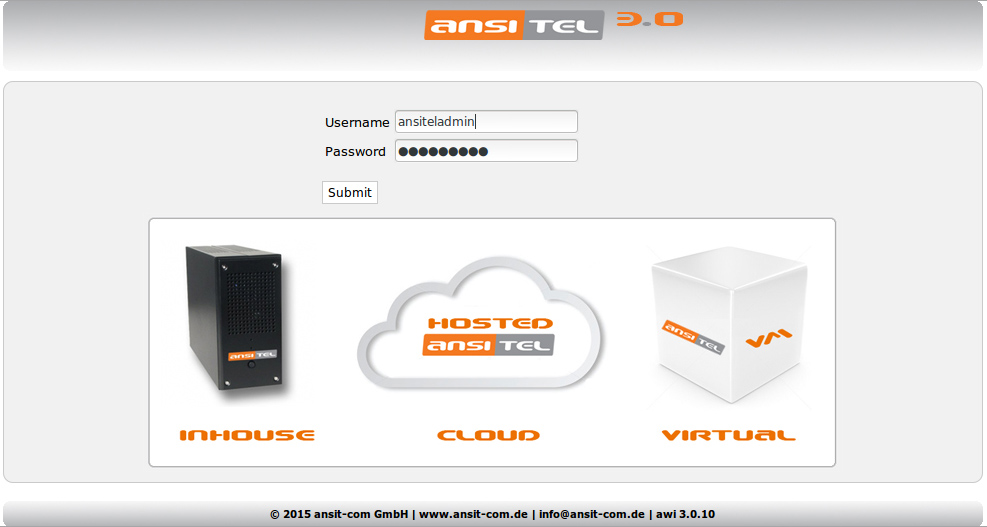
Figure: Logon
2.7.1.2 Create peer
Create a new SIP peer under main menu “Peers” > sub menu “Peers” > “New SIP Peer”. Write configuration and register in the SIP phone with this information.
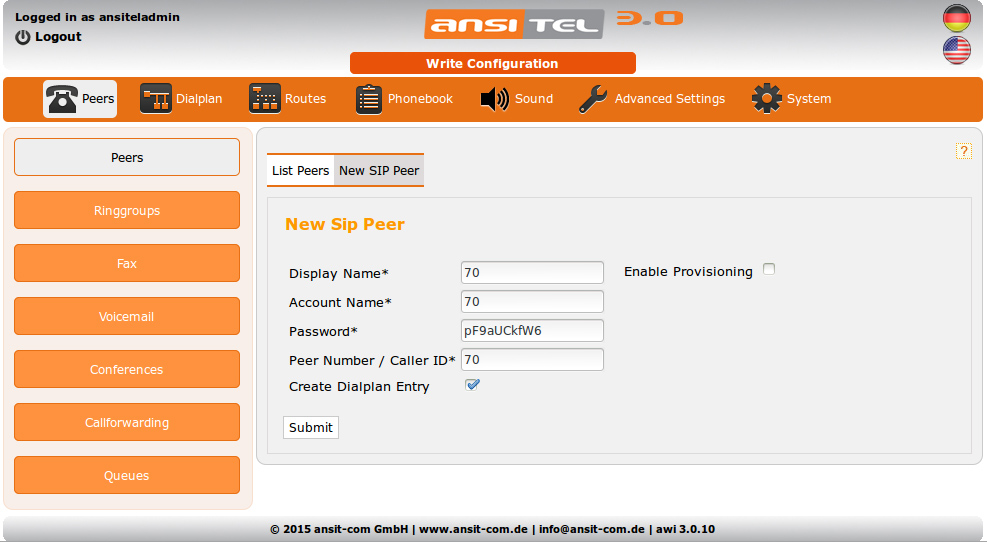
Figure: Create SIP peer
2.7.1.3 Create queue
Create queue under main menu “Callcenter” > sub menu “Queues” > “New Queue”. Depending on whether you operate an outbound or inbound call center, select Incoming or Outgoing queue.
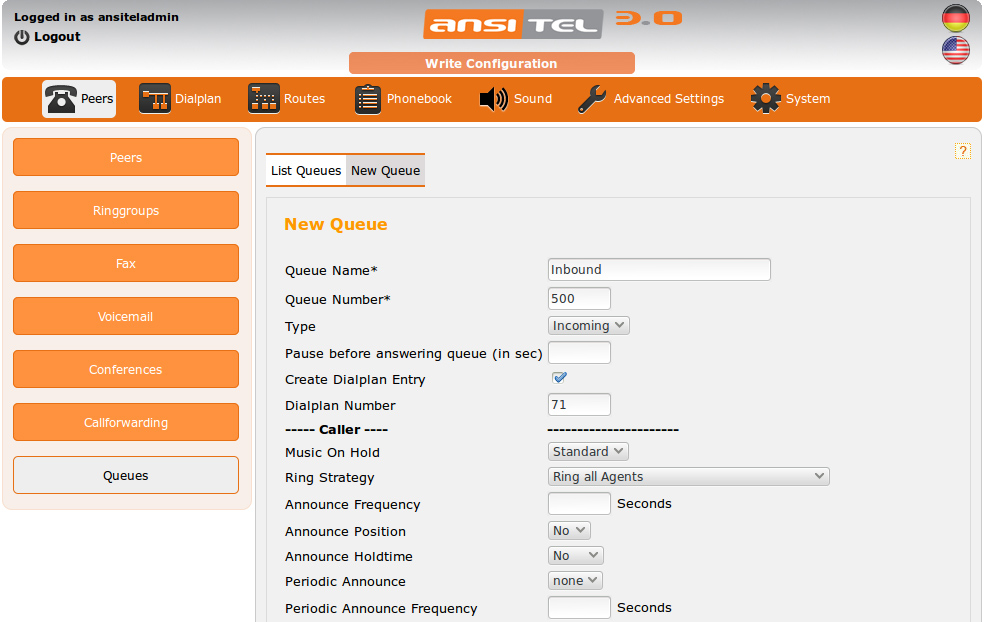
Figure: Create queue
2.7.1.4 Define codes for hotdesking on the phone.
Under menu “Callcenter” > “Hotdesking” > “Parameters”:
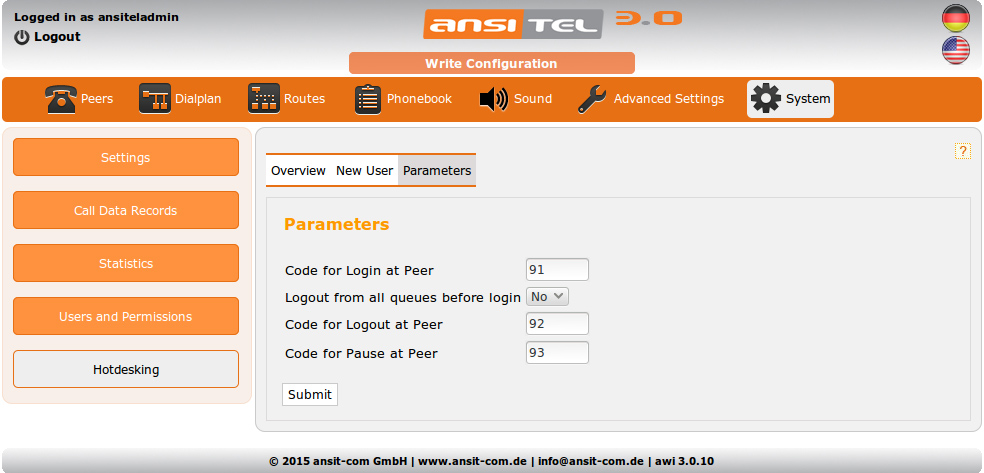
Figure: Define codes for hotdesking
With this code agents can log on directly on telephone. The Codes are dialed on the numeric keypad just like a normal dialplan number.
If agent should be logged off from all queues, enable this option.
After the code has been dialed for login and logout at the phone, the system requires an agent number (agent Id) to identify the agent.
The agent number will be set in section Create users for hotdesking↓.
When dialing the code for pause at the phone, the system requires one of the pausecodes↓ to put the user in pause.
Additionally you can define the login, logout and pause function for a key (BLD) on phone. The state will be displayed on led of the key. The keys can be defined as followed:
- Login BLF: <Code for login> * <peer number> (Example: 300*100) In this case the led lights up on phone.
- Logout BLF: <Code for logout> (Example: 301) In this case the led has state off on phone.
- Pause BLF: <Code for pause> (Example: 302) On pause the led will blink.

Figure: Enter agent number on phone
Additionally the combination with the agent number can be set on blf key too:
- Login BLF: <Code for login> * <peer number> # <agent number> (Example: 300*100#6) In this case the led lights up on phone.
- Logout BLF: <Code for logout> # <agent number> (Example: 301#6) In this case the led has state off on phone.
- Pause BLF: <Code for pause> (Example: 302) On pause the led will blink.

Figure: Sending of agent number via blf key on phone
2.7.1.5 Pausecodes
When dialing the code for pause at the phone, the system requires one of the following numbers (default) to put the user in pause:
- 10 Lunch
- 11 Hourly break
- 12 Email processing
- 13 Back office
- 20 Wrap
If the pause code is 0, the phone is returned back to status “logged in” and receives calls again from the queue.
The pausecode can be edited or more pausecodes can beadded.
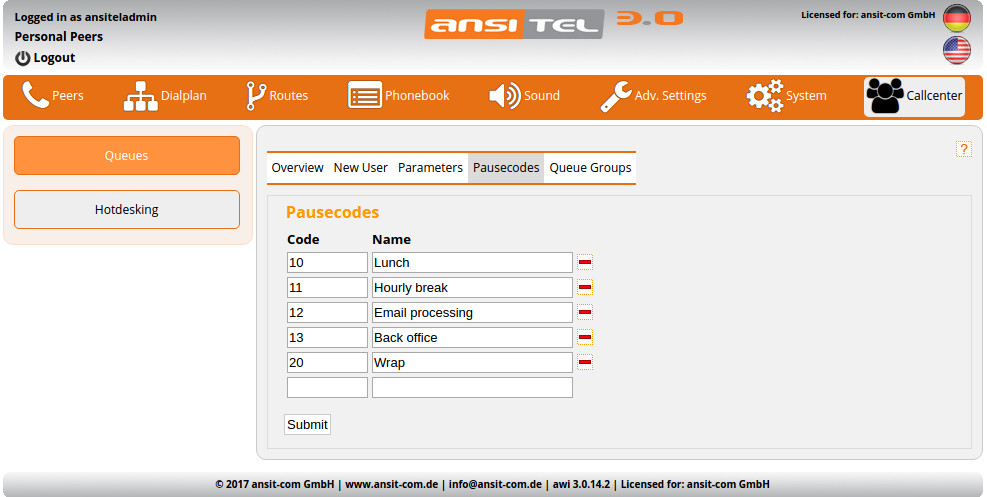
Figure: Pausecodes
2.7.1.6 Queue groups
Queue groups can summerize single queues to assign one agent to multiple queues easily.
Add new queue groups, enter a unique name and select a queue group weight if necessary.
Queue groups contain the same single queue with different weight uses the queue group with higher weight.
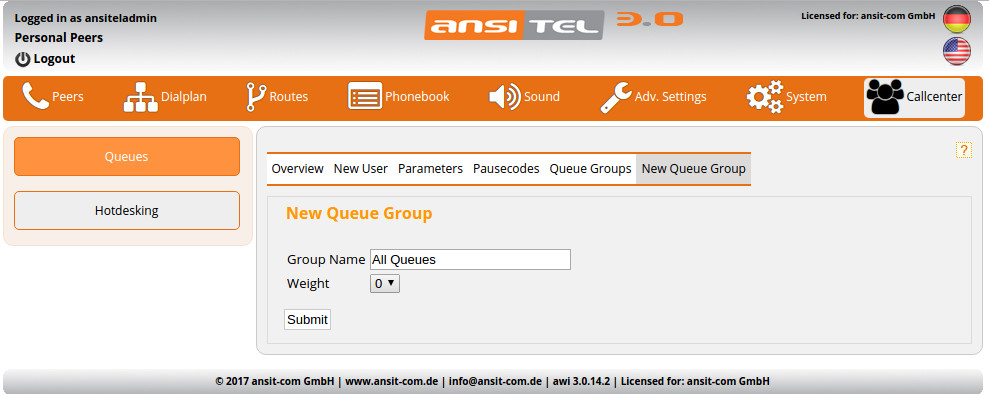
Figure: Create queue group
Assign single queues with or without weight to queue group by clicking on symbol.
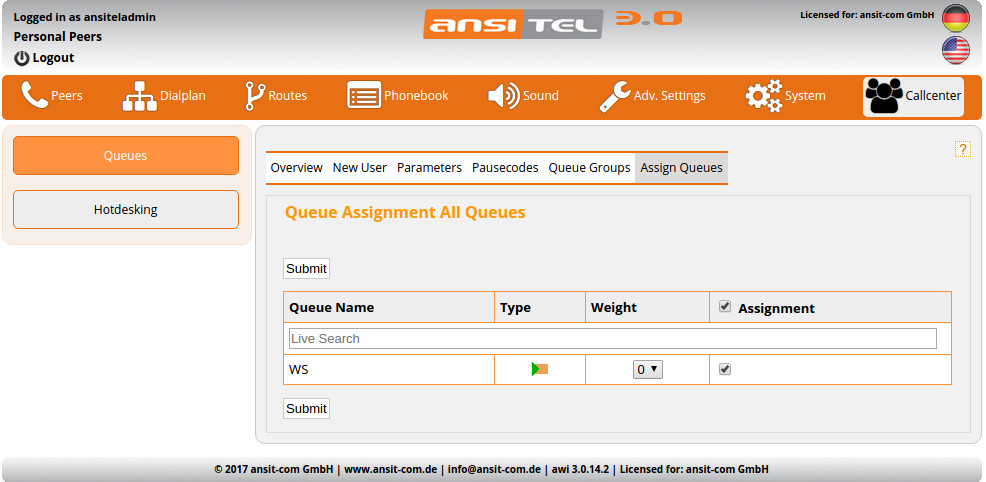
Figure: Add queues to queue group
2.7.1.7 Create users for hotdesking
Under menu "Callcenter" > “Hotdesking” > “New User”:
Enter the user name / agent name, a password, an agent number and assign possible peers. This agent number is asked by the telephone on log in.
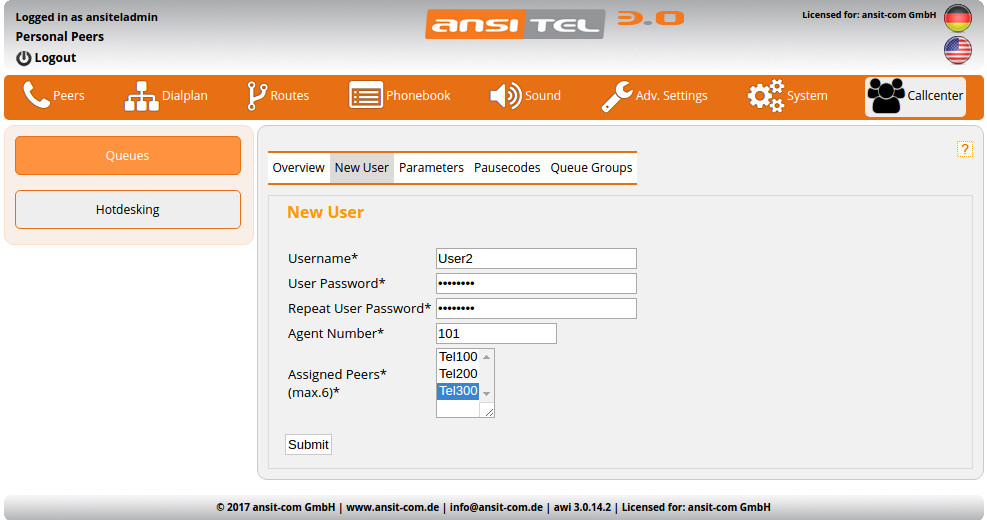
Figure: Create users for hotdesking
Next, the assignment of this agent to the desired queues / queue groups is required. By log on the phone, the agent is automatically logged into the associated queues. The weight of the agent describes whether the agent receives calls or other agents will in the queue will get preference. Agents with low weight receive calls rather than agents with high weight.
The weight of agents in single queues will be used earlier than the weight of agents in queue groups.
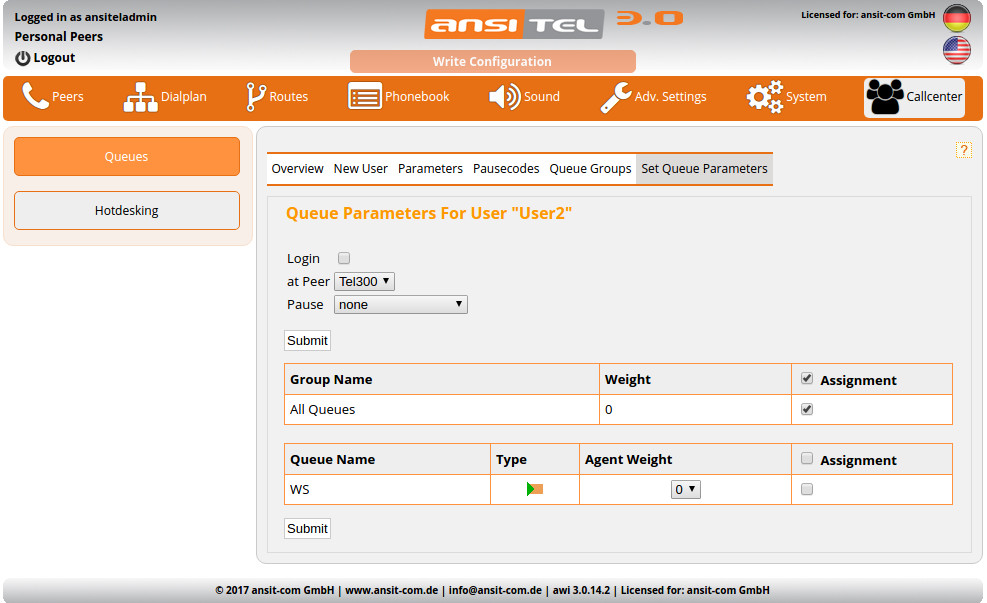
Figure: Queue assignment
On this page you can select a peer and get the agent logged on immediately with this peer.
If an agent is logged on to multiple outgoing queues and the number based dial method gets used (Default settings↑), the outgoing queue must be assigned to a matching number (Adding matching numbers↑).
In the overview, all agents/users are shown and the peers to which they are logged in. In addition, the agent number to log on / off the phone can be seen for each agent and the pause state.
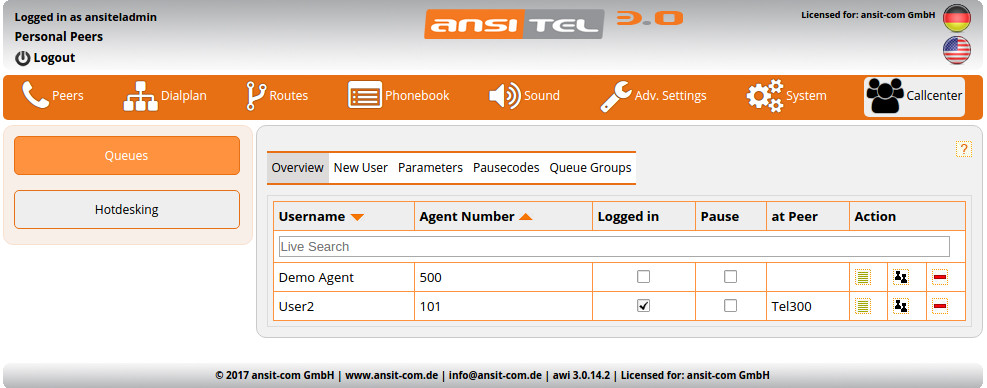
Figure: Overview user/agents